|   |
| |
Employee Identifiers
To review information on a specific field or option on any of these tabs, scroll through the information below, or press <Ctrl+F> to access your browser's search feature and enter the name of the field/option in question.
![]() IMPORTANT! Other staff information tabs may be available in your AWARDS database, including tabs for employee forms. For more information on using the FormBuilder for employee forms, please click here and refer to the information on the "Employee" locations. For more information on other tabs that can be turned on behind-the-scenes in AWARDS, please contact the Help Desk.
IMPORTANT! Other staff information tabs may be available in your AWARDS database, including tabs for employee forms. For more information on using the FormBuilder for employee forms, please click here and refer to the information on the "Employee" locations. For more information on other tabs that can be turned on behind-the-scenes in AWARDS, please contact the Help Desk.
Scroll through the alphabetical fields/options list below to learn more about the data collected on the Demographics tab.
Birthdate
In the Birthdate field, type or make changes to the employee's birthday (using mm/dd/yyyy format).
Cell Phone
In the Cell Phone field, type or make changes to the employee's cell phone number (using (nnn) nnn-nnnn format).
Emergency Contact Information
To enter or update employee emergency contact information on the staff information record, configure the following fields and options:
![]() Person/Phone - In this field, type or make changes to the name and phone number of the employee's emergency contact.
Person/Phone - In this field, type or make changes to the name and phone number of the employee's emergency contact.
![]() Relation - Click this drop-down arrow and select the nature of the relationship between the employee and his or her emergency contact. Available options are "Parent," "Spouse," "Sibling," "Friend," "Grandparent," "Child," and "Other."
Relation - Click this drop-down arrow and select the nature of the relationship between the employee and his or her emergency contact. Available options are "Parent," "Spouse," "Sibling," "Friend," "Grandparent," "Child," and "Other."
![]() Medical Info - In this field, type or make changes to any important medical information for the employee; for example, allergies or medical conditions.
Medical Info - In this field, type or make changes to any important medical information for the employee; for example, allergies or medical conditions.
Ethnicity
Click the Ethnicity drop-down arrow and select the employee's ethnicity.
First Name, Middle Name, and Last Name
In the First Name, Middle Name, and Last Name fields, type or make changes to the employee's first, middle, and last names, respectively.
Gender
Click the Gender drop-down arrow and select the employee's gender. Available options are "Male" and "Female."
Home Address
In the Street Address and City, State, Zip fields, type or make changes to the employee's home address, including street address, city, state, and zip code as specified.
Home Phone
In the Home Phone field, type or make changes to the employee's home phone number (using (nnn) nnn-nnnn format).
IRS Exemptions
Click the IRS Exemptions drop-down arrow and select the number of IRS exemptions the employee is claiming. Available options are: "0" through "12."
Marital
Click the Marital drop-down arrow and select the employee's marital status. Available selections are "Single," "Married," "Common Law," "Divorced," "Remarried," and "Widow(er)."
Personal Email
In this field, type or make changes to the employee's personal email address. The value entered here is reflected in the employee's Password & Security and under Notifications (when in use). Likewise, any changes made to the employee's personal email address information via his or her security informaiton or Notifications settings are reflected here.
SSN
In the SSN field, type or make changes to the employee's social security number (using nnn-nn-nnnn format).
U.S. Citizen / Country
Click the U.S. Citizen drop-down arrow and select "Yes" or "No" to indicate whether the employee is a citizen of the United States. If no, enter the employee's country of citizenship in the corresponding Country field.
Work Email
In this field, type or make changes to the employee's work email address. The value entered here is reflected in the employee's Password & Security and under Notifications (when in use). Likewise, any changes made to the employee's personal email address information via his or her security information or Notifications settings are reflected here.
Scroll through the alphabetical fields/options list below to learn more about the data collected on the Work Role tab.
Job Title / Job Title History
To enter or update job title information for an employee on the staff information record, configure the following fields and options:
![]() NOTE: Collection of Job Title history information is optional, and as a result not all AWARDS databases are configured to see the Job Title Start and Job Title End date fields. If you do not see them and would like to, please contact the Help Desk.
NOTE: Collection of Job Title history information is optional, and as a result not all AWARDS databases are configured to see the Job Title Start and Job Title End date fields. If you do not see them and would like to, please contact the Help Desk.
![]() Job Title - Click this drop-down arrow and select the employee's job title. If the appropriate title is not listed, select "ADD NEW JOB TITLE BELOW," and enter the job title in the For New Job Title Only field.
Job Title - Click this drop-down arrow and select the employee's job title. If the appropriate title is not listed, select "ADD NEW JOB TITLE BELOW," and enter the job title in the For New Job Title Only field.
![]() TIP: If it is necessary to add a job title, it should be generic; for example, enter "Case Manager" rather than "Program X Case Manager."
TIP: If it is necessary to add a job title, it should be generic; for example, enter "Case Manager" rather than "Program X Case Manager."
![]() Job Title Start - In this field, type or make changes to the date on which the employee started in this position (using mm/dd/yyyy format).
Job Title Start - In this field, type or make changes to the date on which the employee started in this position (using mm/dd/yyyy format).
![]() Job Title End - In this field, type or make changes to the date on which the employee left this position and/or began a new position (using mm/dd/yyyy format).
Job Title End - In this field, type or make changes to the date on which the employee left this position and/or began a new position (using mm/dd/yyyy format).
![]() TIP: When a job title has been entered and the staff information record is updated, a second set of job title fields is then included in data entry mode. Use this set of job title fields to record a switch in the employee's title. When doing so, be sure to enter the job title end date for the previous title.
TIP: When a job title has been entered and the staff information record is updated, a second set of job title fields is then included in data entry mode. Use this set of job title fields to record a switch in the employee's title. When doing so, be sure to enter the job title end date for the previous title.
Supervisor Information
To enter or update employee supervisor information on the staff information record, configure the following fields and options:
![]() Work Supervisor - Click this drop-down arrow and select the employee's work supervisor. Work supervisor information is displayed in various places throughout AWARDS (for example, on discharge forms) and it also gives the supervisor the ability to complete various report viewing and data entry tasks for their supervisees (for example, changing a supervisee's password).
Work Supervisor - Click this drop-down arrow and select the employee's work supervisor. Work supervisor information is displayed in various places throughout AWARDS (for example, on discharge forms) and it also gives the supervisor the ability to complete various report viewing and data entry tasks for their supervisees (for example, changing a supervisee's password).
![]() TIP: For a walk through of the specific privileges automatically granted to work supervisors, see Understanding Work Supervisor Privileges.
TIP: For a walk through of the specific privileges automatically granted to work supervisors, see Understanding Work Supervisor Privileges.
![]() Time Off Approval - If applicable, click this drop-down arrow and select the worker through whom the employee must have time off approved. This selection is only relevant when your AWARDS database is set up to use the Attendance module's Time Off Requests and Timesheets features, as well as when accruals balances have been entered for all users.
Time Off Approval - If applicable, click this drop-down arrow and select the worker through whom the employee must have time off approved. This selection is only relevant when your AWARDS database is set up to use the Attendance module's Time Off Requests and Timesheets features, as well as when accruals balances have been entered for all users.
![]() Time Sheet Data - If applicable, click this drop-down arrow and select the worker who will be allowed to open and make changes to the supervisee's time sheet when needed. This selection is only relevant when your AWARDS database is set up to use the Attendance module Timesheets feature.
Time Sheet Data - If applicable, click this drop-down arrow and select the worker who will be allowed to open and make changes to the supervisee's time sheet when needed. This selection is only relevant when your AWARDS database is set up to use the Attendance module Timesheets feature.
Work Schedule Information
To enter or update employee work schedule information on the staff information record, configure the following fields/options. Be sure to enter separate information for each day on which the employee is scheduled to work - beginning each work day/shift on a separate line.
![]() Weekday / Start Time - Click the first Weekday drop-down arrow and select the starting weekday of the shift being entered or updated for the selected employee. In the corresponding Start Time field, type or make changes to the time at which the employee is scheduled to begin work on the selected day (using HH:MM format followed by a space and AM or PM).
Weekday / Start Time - Click the first Weekday drop-down arrow and select the starting weekday of the shift being entered or updated for the selected employee. In the corresponding Start Time field, type or make changes to the time at which the employee is scheduled to begin work on the selected day (using HH:MM format followed by a space and AM or PM).
![]() Weekday / Finish Time - Click the second Weekday drop-down arrow and select the ending weekday of this shift. In the corresponding End Time field, type or make changes to the time at which the employee is scheduled to end work on the selected day (using HH:MM format followed by a space and AM or PM).
Weekday / Finish Time - Click the second Weekday drop-down arrow and select the ending weekday of this shift. In the corresponding End Time field, type or make changes to the time at which the employee is scheduled to end work on the selected day (using HH:MM format followed by a space and AM or PM).
![]() Worksite - Click the Worksite drop-down arrow and select the site at which the employee is to work during this shift.
Worksite - Click the Worksite drop-down arrow and select the site at which the employee is to work during this shift.
![]() TIP: Employee work schedule information can also be entered and updated using the Work Schedules module, or from within the Attendance module's Work Schedules feature (if turned on).
TIP: Employee work schedule information can also be entered and updated using the Work Schedules module, or from within the Attendance module's Work Schedules feature (if turned on).
Scroll through the alphabetical fields/options list below to learn more about the data collected on the Payroll tab.
Employee Termination Information
![]() NOTE: These fields and options are only available when the employee has been terminated and his or her record is placed in the staff archives. An employee is considered to be terminated when a group end date has been entered for the current payroll group record, and a new payroll group record has not been created.
NOTE: These fields and options are only available when the employee has been terminated and his or her record is placed in the staff archives. An employee is considered to be terminated when a group end date has been entered for the current payroll group record, and a new payroll group record has not been created.
To enter or update employee termination information on the staff information record, configure the following fields and options:
![]() Circumstances - Click this drop-down arrow and select the circumstances involved in the employee's termination; for example, "Voluntary - Other Employment," or "Involuntary - Disciplinary."
Circumstances - Click this drop-down arrow and select the circumstances involved in the employee's termination; for example, "Voluntary - Other Employment," or "Involuntary - Disciplinary."
![]() Summary of Circumstances - In this text box, type or make changes to any comments regarding the employee's termination.
Summary of Circumstances - In this text box, type or make changes to any comments regarding the employee's termination.
Payroll Compensation History Records
Each employee may have one or more payroll compensation history records. These records are created and updated using the following fields and options in the staff information record:
![]() TIP: Employee payroll compensation information can also be entered and updated using the Human Resources module Salary History feature.
TIP: Employee payroll compensation information can also be entered and updated using the Human Resources module Salary History feature.
![]() Annual Basis - In the Annual Basis field, type or make changes to the employee's annual salary. An annual basis must be entered if the employee is overtime exempt.
Annual Basis - In the Annual Basis field, type or make changes to the employee's annual salary. An annual basis must be entered if the employee is overtime exempt.
![]() NOTE: If an annual basis is not entered, it will be calculated automatically (once the record is saved) based on the hourly rate entered.
NOTE: If an annual basis is not entered, it will be calculated automatically (once the record is saved) based on the hourly rate entered.
![]() Delete - A Delete checkbox is available for selection after a salary history record has been saved at least once. It is used to delete the corresponding record.
Delete - A Delete checkbox is available for selection after a salary history record has been saved at least once. It is used to delete the corresponding record.
![]() Effective - In the Effective field, type or make changes to the date on which the salary became effective (using mm/dd/yyyy format).
Effective - In the Effective field, type or make changes to the date on which the salary became effective (using mm/dd/yyyy format).
![]() Hourly - In the Hourly field, type or make changes to the employee's hourly rate. An hourly rate must be entered if the employee is not overtime exempt.
Hourly - In the Hourly field, type or make changes to the employee's hourly rate. An hourly rate must be entered if the employee is not overtime exempt.
![]() NOTE: If an hourly rate is not entered, it will be calculated automatically (once the record is saved) based on the annual basis entered, and on the "Std Hrs/Week."
NOTE: If an hourly rate is not entered, it will be calculated automatically (once the record is saved) based on the annual basis entered, and on the "Std Hrs/Week."
![]() OTexempt - Click the OTexempt drop-down arrow and select "Yes" or "No" to indicate whether the employee is overtime exempt.
OTexempt - Click the OTexempt drop-down arrow and select "Yes" or "No" to indicate whether the employee is overtime exempt.
![]() RateSite - If the compensation rate is for a specific program/work site, click the RateSite drop-down arrow and select the appropriate site. The default value is "All."
RateSite - If the compensation rate is for a specific program/work site, click the RateSite drop-down arrow and select the appropriate site. The default value is "All."
![]() Std Hrs/Week - The Std Hrs/Week information is read-only, and indicates the standard number of hours worked by the employee each week. This information is taken from the "Hours/Week" information entered in the employee's payroll group status in the Staff Information feature.
Std Hrs/Week - The Std Hrs/Week information is read-only, and indicates the standard number of hours worked by the employee each week. This information is taken from the "Hours/Week" information entered in the employee's payroll group status in the Staff Information feature.
Payroll Group Status History Records
Each employee must have at least one payroll group status history record within his or her staff information record. More records can be added as necessary when/if the employee changes payroll groups.
Payroll records are created and updated using the following fields and options:
![]() Agency - Click this drop-down arrow and select the agency with which this employee is associated, or select "Continuum Staff" if the employee is a system administrator who should have access to all agencies.
Agency - Click this drop-down arrow and select the agency with which this employee is associated, or select "Continuum Staff" if the employee is a system administrator who should have access to all agencies.
![]() NOTE: This option is only available in HMIS, multi-agency, and single-agency divisional databases.
NOTE: This option is only available in HMIS, multi-agency, and single-agency divisional databases.
![]() Delete - A Delete checkbox is available for selection after a payroll group status record has been saved at least once. When checked, the corresponding record will be deleted when UPDATE is clicked during the data entry process.
Delete - A Delete checkbox is available for selection after a payroll group status record has been saved at least once. When checked, the corresponding record will be deleted when UPDATE is clicked during the data entry process.
![]() TIP: Each employee must have at least one payroll group record. If there is only one payroll group record, it cannot be deleted.
TIP: Each employee must have at least one payroll group record. If there is only one payroll group record, it cannot be deleted.
![]() Group End - In this field, type or make changes to the date on which the employee stopped work in the corresponding payroll group (using mm/dd/yyyy format).
Group End - In this field, type or make changes to the date on which the employee stopped work in the corresponding payroll group (using mm/dd/yyyy format).
![]() TIP: A group end date must be entered in the existing payroll status record if a new payroll status record has been entered. If a group end date is entered and a new payroll group status record is not created, the employee is considered to be terminated and his or her staff information record is placed in the staff archives. His or her AWARDS login is also de-activated as of the end date. For more information on terminating an employee, see Terminating an Employee.
TIP: A group end date must be entered in the existing payroll status record if a new payroll status record has been entered. If a group end date is entered and a new payroll group status record is not created, the employee is considered to be terminated and his or her staff information record is placed in the staff archives. His or her AWARDS login is also de-activated as of the end date. For more information on terminating an employee, see Terminating an Employee.
![]() Group Start - In this field, type or make changes to the date on which the employee began work in the corresponding payroll group (using mm/dd/yyyy format).
Group Start - In this field, type or make changes to the date on which the employee began work in the corresponding payroll group (using mm/dd/yyyy format).
![]() Hours/Week - In the Hours/Week field, type or make changes to the number of hours the employee is to work each week while in the corresponding payroll group.
Hours/Week - In the Hours/Week field, type or make changes to the number of hours the employee is to work each week while in the corresponding payroll group.
![]() NOTE: The range of hours available for entry in this field is determined by the selected payroll group:
NOTE: The range of hours available for entry in this field is determined by the selected payroll group:
- If the payroll group is "Per Diem," the Hours/Week must be 0.
- If the payroll group is "Full Time," the Hours/Week must be 35 or more.
- If the payroll group is "Part Time w/Benefits," the Hours/Week must be between 34 and 24.
- If the payroll group is "Part Time w/o Benefits," the Hours/Week must be 23 or less.
For partial hours, use a decimal value; for example for 35 and a half hours, enter 35.5.
![]() Payroll Group - Click this drop-down arrow and select the payroll group to which the employee belongs.
Payroll Group - Click this drop-down arrow and select the payroll group to which the employee belongs.
Scroll through the alphabetical fields/options list below to learn more about the data collected on the Credentialing tab.
Authorization Credentials (Credential Name / Credential ID / Credential Expiration Date / Not valid for billing)
Click the checkbox next to each credential held by the employee, enter the ID number of each in the Credential ID field, and specify an expiration date in the corresponding Credential Expiration Date field. To assign a credential to a staff member and not have it be used as a billing procedure requirement, click the corresponding Not valid for billing checkbox as well.
![]() NOTE: The list of credentials shown in the "Credential Name" column is customizable and can be used in association with billing rules for those agencies using the AWARDS BillingBuilder. For more information altering the default credentials list, please contact your Foothold Customer Success & Advocacy representative for assistance. For more information on billing rules, click here.
NOTE: The list of credentials shown in the "Credential Name" column is customizable and can be used in association with billing rules for those agencies using the AWARDS BillingBuilder. For more information altering the default credentials list, please contact your Foothold Customer Success & Advocacy representative for assistance. For more information on billing rules, click here.
The "Credential ID" is associated with the professional organization that sets the standards for the particular credential.
Degrees (Degree / Year / School)
In one or both sets of these fields, type the degree(s) held by the employee, the year the degree was received (using yyyy format), and the school from which it was received.
Highest Grade Level Completed
In this field, type the highest grade level completed by the employee (in number format).
![]() TIP: This field is required. If any credentials information is entered, this field must be filled in.
TIP: This field is required. If any credentials information is entered, this field must be filled in.
Languages
Click the checkbox next to each language spoken by the employee. If a needed language is not listed, check "Other" and type the name of the language in the corresponding field.
License Type Code
In this field, type or make changes to the code for the type of license number entered in the Professional License Number field.
![]() TIP: Code: 42 = Nurse, 45 = Certified Social Worker, 77 = Clinical Psychologist
TIP: Code: 42 = Nurse, 45 = Certified Social Worker, 77 = Clinical Psychologist
Medicaid Provider ID
In this field, type or make changes to the employee's Medicaid Provider ID, if applicable.
Medicare Provider ID
In this field, type or make changes to the employee's Medicare Provider ID, if applicable.
In this field, type or make changes to the employee's national provider identifier, if applicable.
Professional License Number
In this field, type or make changes to the employee's professional license number, if applicable.
Rendering/Attending Provider Secondary ID
Only available after a value has been entered for National Provider Identifier. In this field, type or make changes to the employee's rendering provider secondary ID, if applicable.
![]() NOTE: This information is used in billing the HCFA-1500 form if the employee's associated National Provider Identifier is used as the rendering NPI on the invoice line when an invoice batch is generated. Additionally, the rendering Provider Secondary ID is only reported in the HCFA-1500 claim form (box 24J - shaded area) if the Configure Payers option Send Rendering Provider Secondary ID in HCFA-1500 is checked off.
NOTE: This information is used in billing the HCFA-1500 form if the employee's associated National Provider Identifier is used as the rendering NPI on the invoice line when an invoice batch is generated. Additionally, the rendering Provider Secondary ID is only reported in the HCFA-1500 claim form (box 24J - shaded area) if the Configure Payers option Send Rendering Provider Secondary ID in HCFA-1500 is checked off.
This information is also used in billing both the 837P and 837I claim files if the employee's associated National Provider Identifier is used as the rendering NPI on the invoice line when an invoice batch is generated. Additionally, the Rendering/Attending Provider Secondary ID and ID Qualifier are only reported in the 837 claim file's "REF" segment within the 2310B loop (837P) and the 2310A loop (837I), if the Configure Payers option Send Rendering/Attending Provider Secondary ID in 837 is checked off.
Taxonomy Code
In this field, type or make changes to the employee's taxonomy code information, if applicable.
![]() NOTE: This information is used in billing claim files if the employee's associated National Provider Identifier is used as the rendering/attending NPI on the invoice line when an invoice batch is generated. Additionally, the taxonomy code is only reported in the 837 claim file if the Configure Payers Send Rendering/Attending Provider Taxonomy Code in 837 option is checked off.
NOTE: This information is used in billing claim files if the employee's associated National Provider Identifier is used as the rendering/attending NPI on the invoice line when an invoice batch is generated. Additionally, the taxonomy code is only reported in the 837 claim file if the Configure Payers Send Rendering/Attending Provider Taxonomy Code in 837 option is checked off.
The File Cabinet tab of staff information records allows for the uploading of employee-specific attachments. Uploaded files are viewable and editable by all users with permission to access and edit the staff information record to which they have been attached.
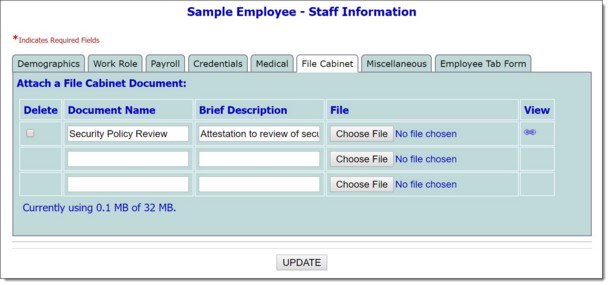
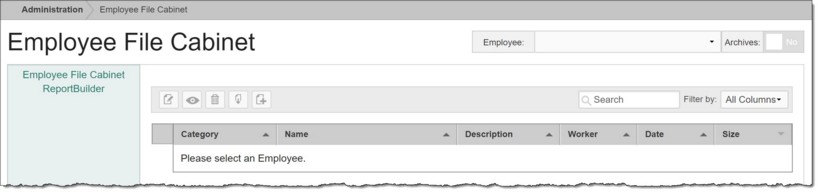
When the tab is accessed, any previously attached documents are displayed at the top of the documents table. Click the link for any file to download it to your machine. To otherwise work with the file cabinet, including uploading or deleting a document click Update Employee File Cabinet to open the Employee File Cabinet index page.
![]() TIP: When working on the index page, files are easily accessible using the following tools and navigation features:
TIP: When working on the index page, files are easily accessible using the following tools and navigation features:
![]() Sorting options - Records in the index are sorted alphabetically by "Category" (if applicable), and then by "Name." Click a column header in the data table to sort the index by a different type of data. Click the heading again to reverse the sort order.
Sorting options - Records in the index are sorted alphabetically by "Category" (if applicable), and then by "Name." Click a column header in the data table to sort the index by a different type of data. Click the heading again to reverse the sort order.
![]() Navigation options - 10 files are displayed on the page by default. To access files on subsequent pages of the index (when applicable), click the arrows in the bottom-right corner of the table. To display 25 or 50 files at a time, click the Show drop-down to the left of the file count, also in the bottom-right corner, and make a selection.
Navigation options - 10 files are displayed on the page by default. To access files on subsequent pages of the index (when applicable), click the arrows in the bottom-right corner of the table. To display 25 or 50 files at a time, click the Show drop-down to the left of the file count, also in the bottom-right corner, and make a selection.
Once you select files on the index, a count of how many total files are selected is displayed in the action bar. Selections are maintained while moving from one page of the index to the next; meaning, you can select files on the first page (showing files 1-10 by default) and move to the next page (displaying files 11-20) without losing the selections made on the first page. Links for Show all selected records and Uncheck All are available beneath the index table for easy navigation.
![]() Search and filtering options - A Search field is available on the action bar along with a corresponding Filter by drop-down list. To search the contents of the index (including those files not currently displayed on the page), enter a value in the Search field. The index is automatically updated as you type. To further narrow your search, use the Filter by selection to indicate whether the search should look at data in "All Columns" (the default) or a specific column. (Keep in mind that this search looks only at the index values, NOT the files themselves.)
Search and filtering options - A Search field is available on the action bar along with a corresponding Filter by drop-down list. To search the contents of the index (including those files not currently displayed on the page), enter a value in the Search field. The index is automatically updated as you type. To further narrow your search, use the Filter by selection to indicate whether the search should look at data in "All Columns" (the default) or a specific column. (Keep in mind that this search looks only at the index values, NOT the files themselves.)
![]() ReportBuilder access - The Employee File Cabinet ReportBuilder link on the left-hand menu bar provides a shortcut to access the ReportBuilder for this feature. For instructions on using that ReportBuilder, click here.
ReportBuilder access - The Employee File Cabinet ReportBuilder link on the left-hand menu bar provides a shortcut to access the ReportBuilder for this feature. For instructions on using that ReportBuilder, click here.
At this time, complete one or more of the following tasks as needed:
![]()
![]() Add a new file - Click the add new icon from the action bar above the files table. A new data entry page is displayed. Configure the fields and options on this page as follows, and then click Save. The file is uploaded, and a confirmation page is displayed.
Add a new file - Click the add new icon from the action bar above the files table. A new data entry page is displayed. Configure the fields and options on this page as follows, and then click Save. The file is uploaded, and a confirmation page is displayed.
![]() TIP: Before beginning the add process, confirm whether or not the file to be attached is already in the employee's file cabinet by using the Search field above the files table. The index is automatically updated as you type, and looks for matches in all of the file table's columns.
TIP: Before beginning the add process, confirm whether or not the file to be attached is already in the employee's file cabinet by using the Search field above the files table. The index is automatically updated as you type, and looks for matches in all of the file table's columns.
![]() Category - Click this drop-down arrow and select the category in which this file should be placed. This option is only available if your agency has configured a customized categories list. Leave this selection blank if the file should not be categorized.
Category - Click this drop-down arrow and select the category in which this file should be placed. This option is only available if your agency has configured a customized categories list. Leave this selection blank if the file should not be categorized.
![]() Name - In this field, type the name of the file using 40 characters or less. (The name entered here will be used to identify and access the file in the future, and should therefore be brief and descriptive.)
Name - In this field, type the name of the file using 40 characters or less. (The name entered here will be used to identify and access the file in the future, and should therefore be brief and descriptive.)
![]() Description - In this field, type a brief description of what the file contains using 100 characters or less.
Description - In this field, type a brief description of what the file contains using 100 characters or less.
![]() Choose File - Click this button to open a File Upload window. Select the file to be uploaded, and then click Open.
Choose File - Click this button to open a File Upload window. Select the file to be uploaded, and then click Open.
![]() TIP: Keep the Employee File Cabinet's available space in mind when selecting which file to use, as each client is limited to a total of 10MB by default, or to the maximum displayed on this page if it has been increased for your agency. Additionally, note that the maximum individual file size is 8 MB. Accepted file types are DOC, XLS, PDF, JPG, BMP, TIFF, MP4, and ZIP.
TIP: Keep the Employee File Cabinet's available space in mind when selecting which file to use, as each client is limited to a total of 10MB by default, or to the maximum displayed on this page if it has been increased for your agency. Additionally, note that the maximum individual file size is 8 MB. Accepted file types are DOC, XLS, PDF, JPG, BMP, TIFF, MP4, and ZIP.
![]()
![]() Update the information for an existing file - Click the file for which the details are to be updated, or click the checkbox to the left of that file, and then click the edit icon from the action bar above the files table. A data entry page is displayed. Make changes to the information on this page as needed (field/option descriptions are detailed above), and then click Save. The changes are saved, and a confirmation page is displayed.
Update the information for an existing file - Click the file for which the details are to be updated, or click the checkbox to the left of that file, and then click the edit icon from the action bar above the files table. A data entry page is displayed. Make changes to the information on this page as needed (field/option descriptions are detailed above), and then click Save. The changes are saved, and a confirmation page is displayed.
![]() TIP: Documents cannot be re-uploaded during the update/editing process. If you'd like to replace the current file with a new version, delete that file entirely and then re-add it as new.
TIP: Documents cannot be re-uploaded during the update/editing process. If you'd like to replace the current file with a new version, delete that file entirely and then re-add it as new.
![]()
![]() Download an existing file - Click the checkbox to the left of the file to be downloaded, and then click the download icon from the action bar above the files table. A PHI Download Alert is displayed, reminding you of your obligation to properly handle any confidential data and/or protected health information (PHI) within the download in accordance with related government regulations and agency policies. After reading the alert, click OK to acknowledge it and proceed with the download, or Cancel to return to the previous page. Once downloaded the file is accessible on your machine and can be opened and displayed in the appropriate software application (for example, Adobe Acrobat or Microsoft Word). AWARDS remains open and available in the web browser window behind the file.
Download an existing file - Click the checkbox to the left of the file to be downloaded, and then click the download icon from the action bar above the files table. A PHI Download Alert is displayed, reminding you of your obligation to properly handle any confidential data and/or protected health information (PHI) within the download in accordance with related government regulations and agency policies. After reading the alert, click OK to acknowledge it and proceed with the download, or Cancel to return to the previous page. Once downloaded the file is accessible on your machine and can be opened and displayed in the appropriate software application (for example, Adobe Acrobat or Microsoft Word). AWARDS remains open and available in the web browser window behind the file.
![]() TIP: If changes are made to a file once it has been opened and the updated file is saved on your computer, the updates made will not be reflected in AWARDS. Rather, the existing file must be deleted and the new version uploaded in its place.
TIP: If changes are made to a file once it has been opened and the updated file is saved on your computer, the updates made will not be reflected in AWARDS. Rather, the existing file must be deleted and the new version uploaded in its place.
![]()
![]() View or print an existing file's details - Click the checkbox to the left of the file whose details are to be viewed or printed, and then click the view icon from the action bar above the files table. A read-only version of the file information (name, description, category, etc.) is displayed and can be printed as needed using your browser's print option. This option does NOT display the file itself; for file viewing use the download option.
View or print an existing file's details - Click the checkbox to the left of the file whose details are to be viewed or printed, and then click the view icon from the action bar above the files table. A read-only version of the file information (name, description, category, etc.) is displayed and can be printed as needed using your browser's print option. This option does NOT display the file itself; for file viewing use the download option.
![]()
![]() Delete an existing file - Click the checkbox(es) to the left of the file(s) to be deleted, and then click the delete icon from the action bar above the files table. A confirmation message is displayed. Click OK to proceed with the deletion. The selected files(s) are deleted and the updated index is displayed.
Delete an existing file - Click the checkbox(es) to the left of the file(s) to be deleted, and then click the delete icon from the action bar above the files table. A confirmation message is displayed. Click OK to proceed with the deletion. The selected files(s) are deleted and the updated index is displayed.
![]() NOTE: Deletions of Employee File Cabinet files are tracked and can be viewed using the Audit Trail ReportBuilder.
NOTE: Deletions of Employee File Cabinet files are tracked and can be viewed using the Audit Trail ReportBuilder.
![]() WARNING! When a File Cabinet File is deleted, it is removed from AWARDS entirely and cannot be retrieved from any of the file cabinet access points.
WARNING! When a File Cabinet File is deleted, it is removed from AWARDS entirely and cannot be retrieved from any of the file cabinet access points.
![]()
![]() Return to the Employee File Cabinet index - To do so, click the To Index icon from the action bar while working with a file's details to return to the index page. You can also return to the index page at any time by clicking Employee File Cabinet from the breadcrumbs trail below the AWARDS navigation bar.
Return to the Employee File Cabinet index - To do so, click the To Index icon from the action bar while working with a file's details to return to the index page. You can also return to the index page at any time by clicking Employee File Cabinet from the breadcrumbs trail below the AWARDS navigation bar.
Tips for Optimizing File Cabinet Documents
The File Cabinet in AWARDS staff information records allows agencies to store documents, pictures, sound clips, and other media directly on the staff information record for each employee. By default there is a 10 MB per employee cap on the aggregate files stored in the file cabinet. While 10 MB might seem paltry in a world with 16 GB iPhones and 1 TB hard drives, it's more than enough to store about 500 pages of text-only files, 60 pages of mixed image-text files, 100 images, or 25 minutes of spoken word audio. In order to maximize your usage of the File Cabinet, here are some tips and tricks for optimizing your files to get the most out of the allotted space.
Working with Word Documents
The best place to start with optimizing a file for the Employee File Cabinet in AWARDS is the source. Most documents will typically originate as ".docx" files in Microsoft Word. So long as a ".docx" file in Microsoft Word is not image heavy, Word does a good job of keeping file sizes as small as possible. In the event you need to upload a Word document that is image heavy, you can compress the images in the file prior to saving it. To do so, complete the following steps (in Microsoft Word 2007/2010):
Scanning Documents
The other common way of creating a file for the Employee File Cabinet is to use a scanner to digitalize a paper document. When scanning a document it's important to optimize the settings on the scanner for a text document so you don't unnecessarily inflate the file size. When scanning a document, we recommend using the following settings to keep the size of the file small, while maintaining the readability of the document:
![]() DPI/Resolution: 200x200
DPI/Resolution: 200x200
![]() Quality: Normal
Quality: Normal
![]() File Type: PDF
File Type: PDF
![]() Document Type: Text (or Mixed if necessary)
Document Type: Text (or Mixed if necessary)
Working with PDF Files
If you already have a file that isn't optimized for the Employee File Cabinet, there are several utilities available for Windows to manipulate PDF files, both paid and free. (Please be cautious when downloading files from the internet.) On Macs with OS X, the "Preview" application displays a "Reduce File Size" option in the Quartz Filter menu of the Save As dialog to decrease the size of an existing PDF.
Using Optical Character Recognition (OCR)
Since Word documents have the inherent advantage of storing the contents as text and not as an image (which takes up much more space), you may want to utilize technology called OCR or Optical Character Recognition. Much like dictation software can decipher your voice and turn it into text, OCR software will decipher text and images on a piece of paper and turn them into editable characters and images in a Word document. If you have the option to use OCR on your scanner, we strongly recommend taking advantage of it - and if you don't, there's software available for the desktop that will let you take advantage of this powerful feature. Please note that your experience may vary based on the application you use and the content of the PDF you're working with.
A secondary point of access to the Human Resources module's Employee Identifiers feature. Used to maintain records of additional employee identification details, based on an identifiers list configured using the ListBuilder.
https://demodb.footholdtechnology.com/help/?10927
