|   |
| |
![]() TIP: For frequently asked questions about this report, skip down to the bottom of the page.
TIP: For frequently asked questions about this report, skip down to the bottom of the page.
The Employees ReportBuilder, located in the AWARDS Reports module, is used to generate customized reports of employee records, including credentialing, payroll status, and work schedule. To generate and save an Employees ReportBuilder report that can be re-run in the future, to generate a single-use report, or to use and/or update an existing report format to generate a report, complete the following steps:

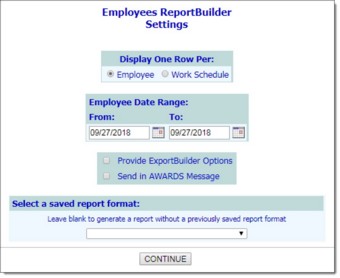
![]() Employee - When this option is selected each employee is listed only once in the report, regardless of how many work schedule records he/she has.
Employee - When this option is selected each employee is listed only once in the report, regardless of how many work schedule records he/she has.
![]() Work Schedule - When this option is selected each employee is listed once for each work schedule record existing for the employee.
Work Schedule - When this option is selected each employee is listed once for each work schedule record existing for the employee.
"Employee" is selected by default.
![]() NOTE: In the event that you are creating a new report that will be saved, or if you will be using an existing report format that was saved previously, please be aware that the date range set here is not saved with reports. You must specify one each time the report is run.
NOTE: In the event that you are creating a new report that will be saved, or if you will be using an existing report format that was saved previously, please be aware that the date range set here is not saved with reports. You must specify one each time the report is run.
![]() NOTE: This option is used to provide access to an ExportBuilder corresponding to the ReportBuilder with which you are working. AWARDS ExportBuilders - which are designed for use by individuals who are familiar with export files and formats, their design, and setup - harness the power of ReportBuilder functionality and take it a step further to meet a variety of outside reporting needs. With ExportBuilders users can create customized data reports as they would with the ReportBuilder itself, and from those reports generate export files of a number of different types - CSV, TXT, XLS, or XML. Exported files can be saved to your computer, then uploaded into other data collection systems and/or worked with in other applications as needed. Additionally, as can be done with ReportBuilders, ExportBuilder formats can be saved and shared for future use.
NOTE: This option is used to provide access to an ExportBuilder corresponding to the ReportBuilder with which you are working. AWARDS ExportBuilders - which are designed for use by individuals who are familiar with export files and formats, their design, and setup - harness the power of ReportBuilder functionality and take it a step further to meet a variety of outside reporting needs. With ExportBuilders users can create customized data reports as they would with the ReportBuilder itself, and from those reports generate export files of a number of different types - CSV, TXT, XLS, or XML. Exported files can be saved to your computer, then uploaded into other data collection systems and/or worked with in other applications as needed. Additionally, as can be done with ReportBuilders, ExportBuilder formats can be saved and shared for future use.
The instructions provided in this portion of Online Help detail use of the Employees ReportBuilder only, not the corresponding ExportBuilder. For more information on using ExportBuilders, please refer to the corresponding portion of Online Help.
![]() NOTE: When using this option the report will remain in your messages for one month, after which time it will be deleted. (The exact date of deletion will be displayed in red at the top of the report message for your reference.) If you know you will need the report content after that time, be sure to download the Excel file (Excel File.zip) or HTML content (Report Content.html) attached to the report message. If you don't download one of these attachments before the message is deleted, you will need to manually re-generate the report if you need access to it in the future.
NOTE: When using this option the report will remain in your messages for one month, after which time it will be deleted. (The exact date of deletion will be displayed in red at the top of the report message for your reference.) If you know you will need the report content after that time, be sure to download the Excel file (Excel File.zip) or HTML content (Report Content.html) attached to the report message. If you don't download one of these attachments before the message is deleted, you will need to manually re-generate the report if you need access to it in the future.
![]() Use a previously saved report format - To generate the report using a previously created and saved format, select that format from this drop-down. When using this method, you can immediately generate the report without changing any settings. Alternately, you can first review and modify the settings of the format by checking off the available "Provide option to modify settings of saved report format" checkbox.
Use a previously saved report format - To generate the report using a previously created and saved format, select that format from this drop-down. When using this method, you can immediately generate the report without changing any settings. Alternately, you can first review and modify the settings of the format by checking off the available "Provide option to modify settings of saved report format" checkbox.
![]() TIP: Saved report formats are associated with a specific "Row Per" selection. As a result, you will only be able to choose from those that have the same option chosen in step 6.
TIP: Saved report formats are associated with a specific "Row Per" selection. As a result, you will only be able to choose from those that have the same option chosen in step 6.
![]() Start from scratch, without using a previously saved report format - To create your own report format for single-time use or for saving and later re-use, leave the saved report format drop-down blank.
Start from scratch, without using a previously saved report format - To create your own report format for single-time use or for saving and later re-use, leave the saved report format drop-down blank.
![]() NOTE: If you (or another user) have previously saved a default report format for this ReportBuilder and program, that format is pre-selected here. Make changes to the selection as needed, or leave it at its default value.
NOTE: If you (or another user) have previously saved a default report format for this ReportBuilder and program, that format is pre-selected here. Make changes to the selection as needed, or leave it at its default value.
If you are using an existing report format and have NOT chosen to view/modify the settings of that format, you are now taken directly to the report page. Continue with step 20.
![]() NOTE: If you chose to send the report to yourself via the Messages module (in step 9), a notice is first displayed on the page to let you know that report generation is in process and that the report will be sent to your Messages module upon completion. You can then navigate away from the page, or wait for the report to complete and then proceed with step 20. If you did NOT set that option, you can do so now by clicking Send to AWARDS Messages.
NOTE: If you chose to send the report to yourself via the Messages module (in step 9), a notice is first displayed on the page to let you know that report generation is in process and that the report will be sent to your Messages module upon completion. You can then navigate away from the page, or wait for the report to complete and then proceed with step 20. If you did NOT set that option, you can do so now by clicking Send to AWARDS Messages.
In all other instances, the Options page is displayed.
Continue with step 12.
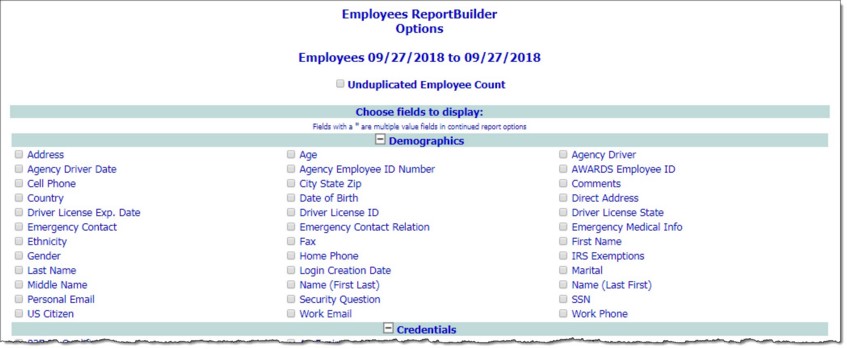
![]() NOTE: When this option is selected, only the information for the employee's most recent employment history is included in the report contents.
NOTE: When this option is selected, only the information for the employee's most recent employment history is included in the report contents.
![]() NOTE: A section for "Date Parts" - common to all ReportBuilders that have date variables available for selection - is also included on this page. It is intended to allow for greater flexibility of reporting around dates; for example, giving you the option to report out on a month as either a number (1) or a written month (January).
NOTE: A section for "Date Parts" - common to all ReportBuilders that have date variables available for selection - is also included on this page. It is intended to allow for greater flexibility of reporting around dates; for example, giving you the option to report out on a month as either a number (1) or a written month (January).
Click the checkbox next to each variable to be included in the report, and/or use the available Check All options as needed.
![]() TIP: Individual detail report options and/or summary table selections must be set before the report can be generated. For more information on using the various report options, please click here.
TIP: Individual detail report options and/or summary table selections must be set before the report can be generated. For more information on using the various report options, please click here.
![]() TIP: If it is not necessary to save the report format and you only want to generate the report itself, skip to step 19.
TIP: If it is not necessary to save the report format and you only want to generate the report itself, skip to step 19.
![]() TIP: For more information on using the save report format options, please click here.
TIP: For more information on using the save report format options, please click here.
![]() NOTE: If you chose to send the report to yourself via the Messages module (in step 9), a notice is first displayed on the page to let you know that report generation is in process and that the report will be sent to your Messages module upon completion. You can then navigate away from the page, or wait for the report to complete and then proceed with step 19. If you did NOT set that option, you can do so now by clicking Send to AWARDS Messages.
NOTE: If you chose to send the report to yourself via the Messages module (in step 9), a notice is first displayed on the page to let you know that report generation is in process and that the report will be sent to your Messages module upon completion. You can then navigate away from the page, or wait for the report to complete and then proceed with step 19. If you did NOT set that option, you can do so now by clicking Send to AWARDS Messages.
![]() NOTE: When working with report data, please keep in mind that:
NOTE: When working with report data, please keep in mind that:
![]() When a report is long enough to require you to scroll down the page to view all of its content, the header row of the data table (individual detail and/or summary) "freezes" at the top of the page. Similarly, when printing a report that covers more than one page, the header row of any tables split between pages is shown at the top of each page.
When a report is long enough to require you to scroll down the page to view all of its content, the header row of the data table (individual detail and/or summary) "freezes" at the top of the page. Similarly, when printing a report that covers more than one page, the header row of any tables split between pages is shown at the top of each page.
![]() The report shows the values for each characteristic as of the date on which the report is generated. For example, if an employee's marital status on his or her date of hire was "Married," but it has since changed to "Divorced," the report shows him or her as divorced, even when the report is run with the date range set to include the employee's hire date.
The report shows the values for each characteristic as of the date on which the report is generated. For example, if an employee's marital status on his or her date of hire was "Married," but it has since changed to "Divorced," the report shows him or her as divorced, even when the report is run with the date range set to include the employee's hire date.
![]() When the report includes multiple value characteristics (those with an asterisk next to them on the initial Report Options page), the individual detail for each employee includes a list of the characteristic values separated by commas. Additionally, because each employee may have more than one value, the summary table totals information for any multiple value characteristic may not add up to the total number of employees.
When the report includes multiple value characteristics (those with an asterisk next to them on the initial Report Options page), the individual detail for each employee includes a list of the characteristic values separated by commas. Additionally, because each employee may have more than one value, the summary table totals information for any multiple value characteristic may not add up to the total number of employees.
The process of generating an Employee ReportBuilder report is now complete.
Employees ReportBuilder Frequently Asked Questions
The following frequently asked questions provide details on the most commonly asked about pieces of the Employee ReportBuilder feature. Click a question from the list here to navigate directly to the corresponding answer, or scroll through the full list of questions and answers below.
Are the Employee ReportBuilder report contents limited to information for active employees?
How are "Job Title Start Date" and "Job Title End Date" determined?
How are "Seniority" and "Seniority Start Date" calculated?
How is an employee's "Salary - Annual" or "Salary - Hourly" determined?
How is an employee's "Termination Date" determined?
Where does the "Current Weekly Hours" data come from?
Are the Employee ReportBuilder report contents limited to information for active employees?
No, inactive employees may also be included in the report based on the report date range and payroll record start and end dates. Specifically, the report looks at any employees with payroll records where the start or end date of the employee's payroll group status history overlaps with the report period at some point. As a result, the employee could have been active for only part of the report period but still be included in the report contents.
Click here to return to the top of the FAQs list.
How are "Job Title Start Date" and "Job Title End Date" determined?
Job title start and end dates are determined using the following rules:
![]() Job Title Start Date - This is the start date the corresponds to the job title being displayed for an employee, as entered in the "Job Title Start" field on the staff information record.
Job Title Start Date - This is the start date the corresponds to the job title being displayed for an employee, as entered in the "Job Title Start" field on the staff information record.
![]() Job Title End Date - This is the end date the corresponds to the job title being displayed for an employee, as entered in the "Job Title End" field on the staff information record.
Job Title End Date - This is the end date the corresponds to the job title being displayed for an employee, as entered in the "Job Title End" field on the staff information record.
Please keep in mind that these report variables are only available for agencies that have opted to display the "Job Title History" portion of staff information records, as opposed to just one current Job Title. Please contact the Help Desk if you are interested in turning on the history aspect of this functionality at your agency.
Click here to return to the top of the FAQs list.
How are "Seniority" and "Seniority Start Date" calculated?
Seniority and seniority start date are calculated using the following rules:
![]() Seniority Start Date - This is the payroll group start date on the first of a group of previous consecutive and continuous payroll records for which the payroll type is "Full Time," "Part Time," or "On Leave."
Seniority Start Date - This is the payroll group start date on the first of a group of previous consecutive and continuous payroll records for which the payroll type is "Full Time," "Part Time," or "On Leave."
![]() Seniority - This is the number of years between the seniority start date and the end date of the report being run, or between the seniority start date and termination date if applicable. Seniority is only accrued by staff who have been specified as "Full Time," "Part Time," or "On Leave."
Seniority - This is the number of years between the seniority start date and the end date of the report being run, or between the seniority start date and termination date if applicable. Seniority is only accrued by staff who have been specified as "Full Time," "Part Time," or "On Leave."
Click here to return to the top of the FAQs list.
How is an employee's "Salary - Annual" or "Salary - Hourly" determined?
Salary amounts are determined using the following rules:
![]() Salary - Annual - This is the annual salary of an employee as entered in his or her staff information record in the "Annual Basis" field; otherwise, the annual salary is determined using the "Hourly" rate entered under staff information.
Salary - Annual - This is the annual salary of an employee as entered in his or her staff information record in the "Annual Basis" field; otherwise, the annual salary is determined using the "Hourly" rate entered under staff information.
![]() Salary - Hourly - This is the hourly salary of an employee as entered in his or her staff information record in the "Hourly" field; otherwise, the hourly salary is determined using the "Annual Basis" amount entered under staff information.
Salary - Hourly - This is the hourly salary of an employee as entered in his or her staff information record in the "Hourly" field; otherwise, the hourly salary is determined using the "Annual Basis" amount entered under staff information.
Keep in mind that if an employee has multiple payroll group records during the report's data range, the report displays information for each of the payroll group records in a separate row of the report. Each row reports on the most recent salary on record that corresponds to the dates of the payroll group.
![]() NOTE: The hours/week displayed on a salary record is the number of hours/week entered in the payroll group record that applies to the salary effective date. Salary records can span payroll group records. If the annual salary is calculated off the hourly salary for non-OTexempt employees, it is calculated using that number of hours/week. In the Employees ReportBuilder, hours/week are taken from the payroll group record in the report so the calculation will be correctly done with the more up to date information. If the payroll group is set with a type of "On Leave," the salary shown will be that of the previous payroll group. (The annual salary will not be calculated using zero hours/week.)
NOTE: The hours/week displayed on a salary record is the number of hours/week entered in the payroll group record that applies to the salary effective date. Salary records can span payroll group records. If the annual salary is calculated off the hourly salary for non-OTexempt employees, it is calculated using that number of hours/week. In the Employees ReportBuilder, hours/week are taken from the payroll group record in the report so the calculation will be correctly done with the more up to date information. If the payroll group is set with a type of "On Leave," the salary shown will be that of the previous payroll group. (The annual salary will not be calculated using zero hours/week.)
Also note that only users with the "Human Resources Data Full Access" permission or the "Human Resources Data Read Only" permission will have these report variables available to them. Users with the "Human Resources Data Work Supervisees" permission do not have access to salary information.
Click here to return to the top of the FAQs list.
How is an employee's "Termination Date" determined?
If the employee is not active, his or her termination date is the payroll group end date entered for him/her on the most recent payroll record. Payroll records are updated using the Staff Information or Payroll Status features in the Human Resources module.
![]() NOTE: In order to be included in the report contents, a termination date need not be within the report date range. Terminated employees will be included even if their termination dates are past the report end date as long as they had an active payroll record at some point during the report date range.
NOTE: In order to be included in the report contents, a termination date need not be within the report date range. Terminated employees will be included even if their termination dates are past the report end date as long as they had an active payroll record at some point during the report date range.
Click here to return to the top of the FAQs list.
Where does the "Current Weekly Hours" data come from?
Current weekly hours are calculated using any work schedule data entered for the employees in the Human Resources or Attendance/Work Schedule modules. In addition to being available as a variable in the ReportBuilder, they also display at the top of individual employee work schedules.
Click here to return to the top of the FAQs list.
https://demodb.footholdtechnology.com/help/?11756
