|   |
| |
Optional categorization functionality enables an AWARDS administrator to set up a shared categories list for the Client File Cabinet in all programs in their AWARDS database. Once that list is configured, a corresponding Category column is added to all client file indexes, and a Category option is automatically made available to all users during file data entry - both when uploading new files, as well as when editing existing files. Making a category selection using that option allows for the assignment of individual files into the appropriate categories.
![]() TIP: When file categorization is in use, the Client File Cabinet index is sorted alphabetically - first by category, and then by file name.
TIP: When file categorization is in use, the Client File Cabinet index is sorted alphabetically - first by category, and then by file name.
![]() NOTE: Please be aware that at the current time it is not possible to select multiple files for placement into a category; each file must be categorized separately. We understand that this may make categorization of existing files tedious for agencies that have large file cabinets. As we work on additional phases of the file cabinet enhancements project in coming months we will be looking into the feasibility of building in multi-select categorization to improve usability. In the meantime, we encourage you to begin taking advantage of categorization for new files uploaded into AWARDS, and gradually categorizing existing files as they are updated or otherwise worked with. This categorization, particularly when used in combination with the Client File Cabinet ReportBuilder, will provide additional flexibility in not only navigation, but also in administrative oversight.
NOTE: Please be aware that at the current time it is not possible to select multiple files for placement into a category; each file must be categorized separately. We understand that this may make categorization of existing files tedious for agencies that have large file cabinets. As we work on additional phases of the file cabinet enhancements project in coming months we will be looking into the feasibility of building in multi-select categorization to improve usability. In the meantime, we encourage you to begin taking advantage of categorization for new files uploaded into AWARDS, and gradually categorizing existing files as they are updated or otherwise worked with. This categorization, particularly when used in combination with the Client File Cabinet ReportBuilder, will provide additional flexibility in not only navigation, but also in administrative oversight.
If you are an AWARDS administrator and would like to set up the Client File Cabinet categories list for the first time, or to make changes to the existing categories list, complete the following steps from the AWARDS Home screen:
![]() NOTE: In order to complete the steps outlined here you must have the ListBuilder permission assigned to you within the Permissions Maintenance feature.
NOTE: In order to complete the steps outlined here you must have the ListBuilder permission assigned to you within the Permissions Maintenance feature.
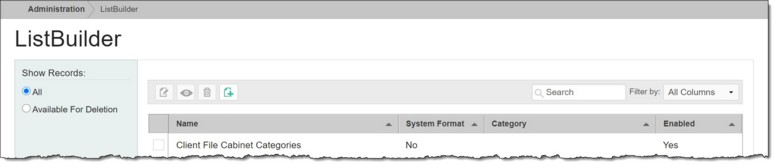
![]() TIP: If the number of available lists is extensive, first enter "client" into the Search field to narrow selections.
TIP: If the number of available lists is extensive, first enter "client" into the Search field to narrow selections.
The ListBuilder data entry page is displayed.
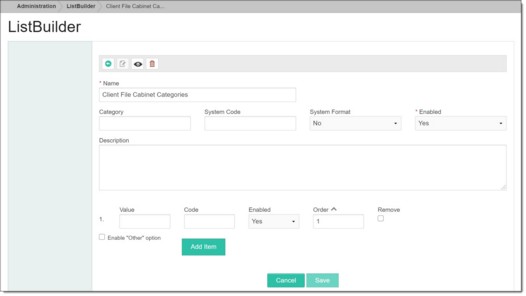
![]() NOTE: The majority of the fields and options on this page do NOT apply to the Client File Cabinet categories list. Only those specifically referenced below need to be filled in.
NOTE: The majority of the fields and options on this page do NOT apply to the Client File Cabinet categories list. Only those specifically referenced below need to be filled in.
![]() Add a category - To do so, type the category name in the Value field, enter a unique numeric value in the Code field, and confirm that the corresponding Enabled option is set to "Yes." To add additional categories, click Add Item and then continue until all new categories have been entered. Click Save to apply your changes.
Add a category - To do so, type the category name in the Value field, enter a unique numeric value in the Code field, and confirm that the corresponding Enabled option is set to "Yes." To add additional categories, click Add Item and then continue until all new categories have been entered. Click Save to apply your changes.
![]() TIP: "Enable 'Other' option" is not applicable to this categories list and will not be a selection regardless of whether or not this option is checked.
TIP: "Enable 'Other' option" is not applicable to this categories list and will not be a selection regardless of whether or not this option is checked.
![]() TIP: Categories are always displayed alphabetically in the File Cabinet's selection list, regardless of the order specified here.
TIP: Categories are always displayed alphabetically in the File Cabinet's selection list, regardless of the order specified here.
![]() Disable a category - To turn off a category so that it is no longer available for selection in the Client File Cabinet, click the corresponding Enabled drop-down arrow and select "No." Click Save to apply your changes. The disabled category is no longer available for data entry, but will continue to display for files previously assigned to it (for example, within the Client File Cabinet ReportBuilder) unless/until the category assignment for those files is manually changed.
Disable a category - To turn off a category so that it is no longer available for selection in the Client File Cabinet, click the corresponding Enabled drop-down arrow and select "No." Click Save to apply your changes. The disabled category is no longer available for data entry, but will continue to display for files previously assigned to it (for example, within the Client File Cabinet ReportBuilder) unless/until the category assignment for those files is manually changed.
![]() Delete a category - To delete a category so that it is as if that category never existed, click the Remove check box next to the category and then click Save to apply your changes. The category of any existing Client File Cabinet files previously assigned to the deleted category is now set to blank.
Delete a category - To delete a category so that it is as if that category never existed, click the Remove check box next to the category and then click Save to apply your changes. The category of any existing Client File Cabinet files previously assigned to the deleted category is now set to blank.
The process of configuring the Client File Cabinet Categories list is now complete.
![]() TIP: If this is the first time the list has been set up for your agency, we recommend that you now share guidelines to all staff for which types of documents should be placed into which category. This will allow for consistent use moving forward and therefore for more accurate reporting when necessary.
TIP: If this is the first time the list has been set up for your agency, we recommend that you now share guidelines to all staff for which types of documents should be placed into which category. This will allow for consistent use moving forward and therefore for more accurate reporting when necessary.
https://demodb.footholdtechnology.com/help/?12366
