|   |
| |
New forms are built using the FormBuilder Configuration tool.
![]() IMPORTANT! When preparing to use this tool, please keep in mind that the FormBuilder was not intended to be used to create forms for functions that already exist as AWARDS features. For example service plans, because of their complexity and regulations regarding the timing of their execution, are not good candidates to be built from scratch using the FormBuilder. If you have questions or concerns about any existing AWARDS functionality, please reach out to your Foothold Customer Success & Advocacy team representative for guidance before using the FormBuilder in relation to that functionality.
IMPORTANT! When preparing to use this tool, please keep in mind that the FormBuilder was not intended to be used to create forms for functions that already exist as AWARDS features. For example service plans, because of their complexity and regulations regarding the timing of their execution, are not good candidates to be built from scratch using the FormBuilder. If you have questions or concerns about any existing AWARDS functionality, please reach out to your Foothold Customer Success & Advocacy team representative for guidance before using the FormBuilder in relation to that functionality.
For other helpful FormBuilder design and creation tips, please click here.
To build a new form, complete the following steps from the AWARDS Home screen:
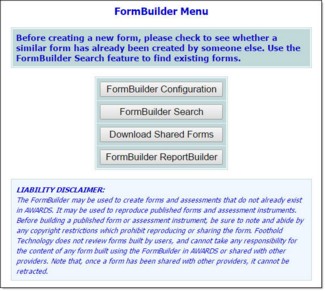

This page contains an index of all existing forms associated with programs to which you have chart access permission, as well as an option to add a new form.
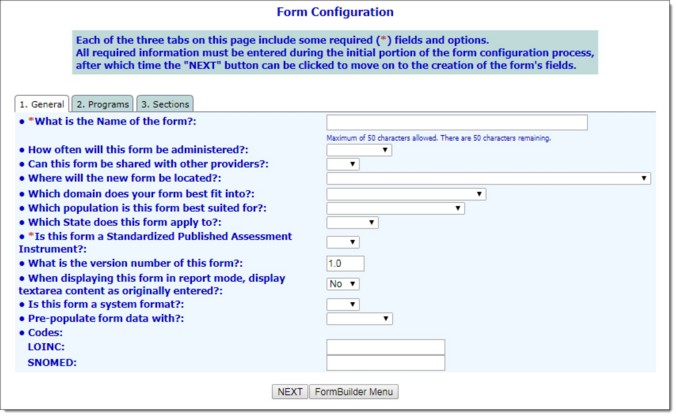
![]() TIP: When entering a form name, please keep in mind that:
TIP: When entering a form name, please keep in mind that:
![]() Form names are limited to 50 characters. (As you type the name of the form the number of characters remaining is displayed beneath the form name field.)
Form names are limited to 50 characters. (As you type the name of the form the number of characters remaining is displayed beneath the form name field.)
![]() Special characters - single quotation marks ('), double quotation marks ("), and plus signs (+) - should never be used in the form name, as it will cause the form to save incorrectly; however, apostrophes (') when used alone and not as quotation marks are allowed. For example, Client's Form is an acceptable form name, but 'Client's Form' is not.
Special characters - single quotation marks ('), double quotation marks ("), and plus signs (+) - should never be used in the form name, as it will cause the form to save incorrectly; however, apostrophes (') when used alone and not as quotation marks are allowed. For example, Client's Form is an acceptable form name, but 'Client's Form' is not.
![]() The form name must be unique from all other forms.
The form name must be unique from all other forms.
|
Daily |
Weekly |
Bi-Weekly |
Monthly |
Quarterly |
|
Annually |
Bi-Annually |
Ongoing |
|
|
![]() TIP: The majority of form locations are used to collect client-specific data and are associated with individual client records. If you are creating a form to be used for the collection of employee-specific data instead, be sure to select one of the locations that specifically references "Employee."
TIP: The majority of form locations are used to collect client-specific data and are associated with individual client records. If you are creating a form to be used for the collection of employee-specific data instead, be sure to select one of the locations that specifically references "Employee."
![]() Admission - as an embedded form in the single-step admission form - When this location is selected, the form automatically displays on the single step admission form in data entry mode. Specifically, the form is fully embedded into the admission form and is accessible at the bottom of the page under a header labeled with the form's name.
Admission - as an embedded form in the single-step admission form - When this location is selected, the form automatically displays on the single step admission form in data entry mode. Specifically, the form is fully embedded into the admission form and is accessible at the bottom of the page under a header labeled with the form's name.
![]() IMPORTANT! There can only be one FormBuilder form with this location in a given program.
IMPORTANT! There can only be one FormBuilder form with this location in a given program.
![]() TIP: This form location is distinguishable from the other admission-based location on the FormBuilder index by the label "Single-Step Admission Form" as opposed to "Intake/Admisison."
TIP: This form location is distinguishable from the other admission-based location on the FormBuilder index by the label "Single-Step Admission Form" as opposed to "Intake/Admisison."
![]() Discharge - as a link on the Process Discharge Menu - When this location is selected a "Client Name - Forms/Assessments" link is displayed on the Discharge module Process Discharge feature's Consumer Selection page. Clicking the link expands/hides an alphabetical list of forms for the program, from which any form can be opened in data entry mode by clicking its name.
Discharge - as a link on the Process Discharge Menu - When this location is selected a "Client Name - Forms/Assessments" link is displayed on the Discharge module Process Discharge feature's Consumer Selection page. Clicking the link expands/hides an alphabetical list of forms for the program, from which any form can be opened in data entry mode by clicking its name.
![]() IMPORTANT! When this location is selected, a Required prior to Processing Discharge checkbox is displayed directly below the form location drop-down. When checked, the form will be made required and will be designated as such with a red asterisk. The form must then be completed before the user can process the discharge. If you change the form location after selecting Required prior to Processing Discharge the checkbox will be cleared and hidden.
IMPORTANT! When this location is selected, a Required prior to Processing Discharge checkbox is displayed directly below the form location drop-down. When checked, the form will be made required and will be designated as such with a red asterisk. The form must then be completed before the user can process the discharge. If you change the form location after selecting Required prior to Processing Discharge the checkbox will be cleared and hidden.
![]() Discharge - to be included on the process discharge form - When this location is selected, an "Include" option is available on the client selection page when processing discharge in data entry mode. When a form is selected there and the user continues the data entry process, the selected form drops into the discharge form at the bottom of the page. Upon entering data into the form, that data appears in report mode, and the "Include" selection becomes read-only for the client's discharge record, preventing the inclusion of additional forms.
Discharge - to be included on the process discharge form - When this location is selected, an "Include" option is available on the client selection page when processing discharge in data entry mode. When a form is selected there and the user continues the data entry process, the selected form drops into the discharge form at the bottom of the page. Upon entering data into the form, that data appears in report mode, and the "Include" selection becomes read-only for the client's discharge record, preventing the inclusion of additional forms.
![]() IMPORTANT! For best results when using this form location, it is strongly recommended that the form be designed simply. Although it's not necessary to limit the form to a single section without buttons to other areas of the application it is recommended. Doing so keeps the form and overall data entry process more manageable.
IMPORTANT! For best results when using this form location, it is strongly recommended that the form be designed simply. Although it's not necessary to limit the form to a single section without buttons to other areas of the application it is recommended. Doing so keeps the form and overall data entry process more manageable.
![]() Employee - as a button on the Human Resources Menu - When this location is selected, a link for the form is displayed under "Forms" on the Human Resources fly-out menu. When the form link is clicked, a menu page is displayed on which an employee and date range are specified. The user is then presented with a form index for the selected employee and given the opportunity to complete a new form, or to choose an existing form that was administered with the specified date range.
Employee - as a button on the Human Resources Menu - When this location is selected, a link for the form is displayed under "Forms" on the Human Resources fly-out menu. When the form link is clicked, a menu page is displayed on which an employee and date range are specified. The user is then presented with a form index for the selected employee and given the opportunity to complete a new form, or to choose an existing form that was administered with the specified date range.
![]() NOTE: When an employee has existing forms displayed on the form index, each is listed with the date and time at which the form was administered. The index also includes a column for each of the first three non-formatting fields from the form and their values for the corresponding date and time.
NOTE: When an employee has existing forms displayed on the form index, each is listed with the date and time at which the form was administered. The index also includes a column for each of the first three non-formatting fields from the form and their values for the corresponding date and time.
![]() Employee - as a tab on the staff information form - When this location is selected, the form is located as an additional tab within each employee's Staff Information record in the Human Resources module, and can be found there in both data entry and report modes.
Employee - as a tab on the staff information form - When this location is selected, the form is located as an additional tab within each employee's Staff Information record in the Human Resources module, and can be found there in both data entry and report modes.
![]() IMPORTANT! There can only be one FormBuilder form with this location at a given time.
IMPORTANT! There can only be one FormBuilder form with this location at a given time.
![]() Employment - as a link on the Jobs fly-out
Employment - as a link on the Jobs fly-out
Services - as a link on the Services - Individual fly-out
Discharge - as a link on the Discharge fly-out
Medical - as a link on the Medical fly-out - When any of these four locations is selected a Forms option is listed within each module's respective fly-out. Clicking that fly-out item displays a list from which this form can then be accessed. When the form's link is clicked from the selected location, a form menu page is displayed on which a client and date range are specified. The user is then presented with a form index for the selected client and given the opportunity to complete a new form, or to choose an existing form that was administered within the specified date range.
![]() NOTE: When a client has existing forms displayed on the form index, each is listed with the date and time at which the form was entered into AWARDS, listed chronologically with the most recent form first. The index also includes a column for the first three fields located on the form, excluding dynamic sections and computed fields. (In other words, if a dynamic section or computed field is listed among the first three fields on the form, those fields are "skipped over" when it is determined what displays on the form index.)
NOTE: When a client has existing forms displayed on the form index, each is listed with the date and time at which the form was entered into AWARDS, listed chronologically with the most recent form first. The index also includes a column for the first three fields located on the form, excluding dynamic sections and computed fields. (In other words, if a dynamic section or computed field is listed among the first three fields on the form, those fields are "skipped over" when it is determined what displays on the form index.)
Forms located in the Employment, Services, Discharge, and Medical modules are not linked to a chart event, but a history is kept of completed forms so that you have the flexibility to administer them at whatever frequency you see fit. An exception to this is found with forms composed totally of dynamic sections and/or dynamic text fields. A history of such forms is not automatically kept because they act as an entry point into different portions of a client's record rather than a place to enter data for a specific point in time; however, if a form with dynamic sections is electronically signed, the dynamic sections will display the history of what was in those fields at the time the form was signed.
![]() Group Notes - as an option to be included on a group note - When this location is selected an "Include" drop-down option is added to the group notes index for that program in data entry mode. Included in that drop-down are all forms for the program for which group notes is the specified location. When a form is selected there and the user continues the data entry process, the selected form drops into the group note entry page and is available for data entry itself. Any information entered on the included form is also displayed with the group note in report mode.
Group Notes - as an option to be included on a group note - When this location is selected an "Include" drop-down option is added to the group notes index for that program in data entry mode. Included in that drop-down are all forms for the program for which group notes is the specified location. When a form is selected there and the user continues the data entry process, the selected form drops into the group note entry page and is available for data entry itself. Any information entered on the included form is also displayed with the group note in report mode.
![]() IMPORTANT! For best results when using this form location, it is strongly recommended that the form be designed simply. Although it's not necessary to limit the form to a single section without buttons to other areas of the application it is recommended. Doing so keeps the form and overall data entry process more manageable.
IMPORTANT! For best results when using this form location, it is strongly recommended that the form be designed simply. Although it's not necessary to limit the form to a single section without buttons to other areas of the application it is recommended. Doing so keeps the form and overall data entry process more manageable.
![]() Incidents - to be included in Incident Reports - When this location is selected an "Include" drop -down option is added to the incidents index for that program in data entry mode. Included in that drop-down are all forms for the program for which incidents is the specified location. When a form is selected there and the user continues the data entry process, the selected form drops into the initial incident report data entry page and is available for data entry. Any information entered on the included form is also displayed with the incident in report mode.
Incidents - to be included in Incident Reports - When this location is selected an "Include" drop -down option is added to the incidents index for that program in data entry mode. Included in that drop-down are all forms for the program for which incidents is the specified location. When a form is selected there and the user continues the data entry process, the selected form drops into the initial incident report data entry page and is available for data entry. Any information entered on the included form is also displayed with the incident in report mode.
![]() Intake/Admission - as a linked form on Intake/Admission Form - When this location is selected a "Client Name - Forms/Assessments" link is displayed on client intake forms after intake or admission is processed. Clicking the link expands/hides an alphabetical list of intake-located forms for the program, from which any form can be opened in data entry mode by clicking its name.
Intake/Admission - as a linked form on Intake/Admission Form - When this location is selected a "Client Name - Forms/Assessments" link is displayed on client intake forms after intake or admission is processed. Clicking the link expands/hides an alphabetical list of intake-located forms for the program, from which any form can be opened in data entry mode by clicking its name.
![]() NOTE: When designing a form in this location, keep in mind that any dynamic section fields it contains should only be updated AFTER processing either an intake or admission. If data is entered in the dynamic section before that happens, it will not be saved.
NOTE: When designing a form in this location, keep in mind that any dynamic section fields it contains should only be updated AFTER processing either an intake or admission. If data is entered in the dynamic section before that happens, it will not be saved.
![]() IMPORTANT! When this location is selected, a Required prior to Process Admission on multi-step intake forms checkbox is displayed directly below the form location drop-down. When checked, the form will be made required and will be designated as such with a red asterisk. The form must then be completed before the user can process the admission (not the intake). This option works only for programs configured to use the multi-step intake process. If you change the form location after selecting Required prior to Process Admission on multi-step intake forms the checkbox will be cleared and hidden.
IMPORTANT! When this location is selected, a Required prior to Process Admission on multi-step intake forms checkbox is displayed directly below the form location drop-down. When checked, the form will be made required and will be designated as such with a red asterisk. The form must then be completed before the user can process the admission (not the intake). This option works only for programs configured to use the multi-step intake process. If you change the form location after selecting Required prior to Process Admission on multi-step intake forms the checkbox will be cleared and hidden.
![]() TIP: This form location is distinguishable from the other admission-based location on the FormBuilder index by the label "Intake/Admission" as opposed to "Single-Step Admission Form."
TIP: This form location is distinguishable from the other admission-based location on the FormBuilder index by the label "Intake/Admission" as opposed to "Single-Step Admission Form."
![]() Listed as a Charting Event, available under Services - Individual - When this location is selected an event representing the form is scheduled for a client using the Services - Individual module's Charting Timetable feature. The form itself is then accessed for data entry using the Assessment Data feature in the Outcomes module. (The Services - Individual module is an optional secondary point of access for the Assessment Data feature. Please contact the Help Desk to have it be made available there.)
Listed as a Charting Event, available under Services - Individual - When this location is selected an event representing the form is scheduled for a client using the Services - Individual module's Charting Timetable feature. The form itself is then accessed for data entry using the Assessment Data feature in the Outcomes module. (The Services - Individual module is an optional secondary point of access for the Assessment Data feature. Please contact the Help Desk to have it be made available there.)
![]() TIP: When using this location, please keep in mind the following:
TIP: When using this location, please keep in mind the following:
![]() You must contact the Foothold Help Desk to have the form added to the list of events available in the charting timetable. When submitting your request, be sure to indicate which program type(s) the event should be available for.
You must contact the Foothold Help Desk to have the form added to the list of events available in the charting timetable. When submitting your request, be sure to indicate which program type(s) the event should be available for.
![]() Forms placed in this location must be named uniquely from any forms already listed as chart events
Forms placed in this location must be named uniquely from any forms already listed as chart events
![]() Forms placed in this location are available for auto-scheduling. For instructions on setting up form schedules, click here.
Forms placed in this location are available for auto-scheduling. For instructions on setting up form schedules, click here.
![]() Forms included in the list of chart events will generate chart review reminder messages. These messages are sent 3 weeks/21 days, 2 weeks/14 days, and 1 week/7 days prior to the form's due date. Once the due date has passed, a reminder is sent every third day until the form's done date is entered in the charting timetable.
Forms included in the list of chart events will generate chart review reminder messages. These messages are sent 3 weeks/21 days, 2 weeks/14 days, and 1 week/7 days prior to the form's due date. Once the due date has passed, a reminder is sent every third day until the form's done date is entered in the charting timetable.
![]() Medical - as an option to be included on the Provider Appointment Form - When this location is selected an "Include" drop-down option is added to the appointment forms index for that program in data entry mode. Included in that drop-down are all forms for the program for which Provider Appointment Form is the specified location. When a form is selected there and the user continues the data entry process, the selected form drops into the appointment form entry page and is available for data entry. Any information entered on the included form is also displayed with the appointment form in report mode and when using SHOW FORM to access a printable version.
Medical - as an option to be included on the Provider Appointment Form - When this location is selected an "Include" drop-down option is added to the appointment forms index for that program in data entry mode. Included in that drop-down are all forms for the program for which Provider Appointment Form is the specified location. When a form is selected there and the user continues the data entry process, the selected form drops into the appointment form entry page and is available for data entry. Any information entered on the included form is also displayed with the appointment form in report mode and when using SHOW FORM to access a printable version.
![]() IMPORTANT! For best results when using this form location, it is strongly recommended that the form be designed simply. Although it's not necessary to limit the form to a single section without buttons to other areas of the application it is recommended. Doing so keeps the form and overall data entry process more manageable.
IMPORTANT! For best results when using this form location, it is strongly recommended that the form be designed simply. Although it's not necessary to limit the form to a single section without buttons to other areas of the application it is recommended. Doing so keeps the form and overall data entry process more manageable.
![]() Profile - as a link at the top of client face sheets - When this location is selected a "Client Name - Forms/Assessments" link is displayed on the top of client face sheets. Clicking the link expands/hides an alphabetical list of face sheet-located forms for the program, from which any form can be opened in data entry mode by clicking its name.
Profile - as a link at the top of client face sheets - When this location is selected a "Client Name - Forms/Assessments" link is displayed on the top of client face sheets. Clicking the link expands/hides an alphabetical list of face sheet-located forms for the program, from which any form can be opened in data entry mode by clicking its name.
![]() TIP: When using this location, the form does not save a history of its content if responses are edited. As a result this form location should not be used for forms that may need to be filled out more than once when access to previous responses will be necessary, and it is only available if the question "How often will this form be administered?" is set to "Ongoing."
TIP: When using this location, the form does not save a history of its content if responses are edited. As a result this form location should not be used for forms that may need to be filled out more than once when access to previous responses will be necessary, and it is only available if the question "How often will this form be administered?" is set to "Ongoing."
![]() Program Status - as an option to be included on the Program Status form - When this location is selected, an "Include" drop-down option is added to the Program Status - Data Entry page. Included in that drop-down are all forms for the selected program for which program status is the specified location. (If there are no such forms, the drop-down is not displayed.) When a form is selected from this list the data entry page automatically refreshes to make the form available for immediate data entry. Any information entered on the included form is saved with the program status record, is displayed with that record in report mode, and is available for reporting purposes within the Program Status ReportBuilder. The name of the included form will also be shown on the program status record index.
Program Status - as an option to be included on the Program Status form - When this location is selected, an "Include" drop-down option is added to the Program Status - Data Entry page. Included in that drop-down are all forms for the selected program for which program status is the specified location. (If there are no such forms, the drop-down is not displayed.) When a form is selected from this list the data entry page automatically refreshes to make the form available for immediate data entry. Any information entered on the included form is saved with the program status record, is displayed with that record in report mode, and is available for reporting purposes within the Program Status ReportBuilder. The name of the included form will also be shown on the program status record index.
![]() IMPORTANT! For best results when using this form location, it is strongly recommended that the form be designed simply. Although it's not necessary to limit the form to a single section without buttons to other areas of the application it is recommended. Doing so keeps the form and overall data entry process more manageable.
IMPORTANT! For best results when using this form location, it is strongly recommended that the form be designed simply. Although it's not necessary to limit the form to a single section without buttons to other areas of the application it is recommended. Doing so keeps the form and overall data entry process more manageable.
![]() Progress Notes - as an option to be included in a progress note - When this location is selected an "Include" drop-down option is added to the progress notes data entry settings page. Included in that drop-down are all forms for the program for which progress notes is the specified location. When a form is selected there and the user continues the data entry process, the selected form drops into the note entry page above the note text box and is available for data entry. Any information entered on the included form is also displayed with the progress note in report mode.
Progress Notes - as an option to be included in a progress note - When this location is selected an "Include" drop-down option is added to the progress notes data entry settings page. Included in that drop-down are all forms for the program for which progress notes is the specified location. When a form is selected there and the user continues the data entry process, the selected form drops into the note entry page above the note text box and is available for data entry. Any information entered on the included form is also displayed with the progress note in report mode.
![]() NOTE: Any FormBuilder forms for which progress notes is the specified location will be available for data entry multiple times per day per client, as long as the notes the form is attached to are distinct. For example, if a single staff person writes two notes for a given client on a single day, those notes would need to have different clock times in order to be distinct and allow for the form to be completed more than once.
NOTE: Any FormBuilder forms for which progress notes is the specified location will be available for data entry multiple times per day per client, as long as the notes the form is attached to are distinct. For example, if a single staff person writes two notes for a given client on a single day, those notes would need to have different clock times in order to be distinct and allow for the form to be completed more than once.
![]() IMPORTANT! For best results when using this form location, it is strongly recommended that the form be designed simply. Although it's not necessary to limit the form to a single section without buttons to other areas of the application it is recommended. Doing so keeps the form and overall data entry process more manageable.
IMPORTANT! For best results when using this form location, it is strongly recommended that the form be designed simply. Although it's not necessary to limit the form to a single section without buttons to other areas of the application it is recommended. Doing so keeps the form and overall data entry process more manageable.
![]() Services - to be included on the Service Plan Coversheet - When this location is selected, an "Include" column is available on the service plan index for that program in data entry mode. When a form is selected there for a plan and the user continues the data entry process, the selected form drops into the top of the coversheet page. Upon entering data into the form, that data appears in report mode, and the "Include" selection becomes read-only for that plan, preventing the inclusion of additional forms. Additionally, once data is entered into the included form, if the same form is selected for the next plan, that form's data may be pre-populated with what was entered on the previous plan, depending on how the Pre-populate form data with? option is configured in step 18. (When in effect, pre-population only applies when data was entered in the form in the previous plan, not any plans prior to that.)
Services - to be included on the Service Plan Coversheet - When this location is selected, an "Include" column is available on the service plan index for that program in data entry mode. When a form is selected there for a plan and the user continues the data entry process, the selected form drops into the top of the coversheet page. Upon entering data into the form, that data appears in report mode, and the "Include" selection becomes read-only for that plan, preventing the inclusion of additional forms. Additionally, once data is entered into the included form, if the same form is selected for the next plan, that form's data may be pre-populated with what was entered on the previous plan, depending on how the Pre-populate form data with? option is configured in step 18. (When in effect, pre-population only applies when data was entered in the form in the previous plan, not any plans prior to that.)
![]() IMPORTANT! For best results when using this form location, it is strongly recommended that the form be designed simply. Although it's not necessary to limit the form to a single section without buttons to other areas of the application it is recommended. Doing so keeps the form and overall data entry process more manageable.
IMPORTANT! For best results when using this form location, it is strongly recommended that the form be designed simply. Although it's not necessary to limit the form to a single section without buttons to other areas of the application it is recommended. Doing so keeps the form and overall data entry process more manageable.
If the location you've selected is one of the following, continue with step 9; otherwise, skip ahead to step 10:
- Discharge - to be included on the process discharge form
- Group Notes - as an option to be included on a group note
- Incidents - to be included in Incident Reports
- Medical - as an option to be included on the Medical Appointment Form
- Program Status - as an option to be included on the Program Status form
- Progress Notes - as an option to be included in a progress note
- Services - to be included on the Service Plan Coversheet
If "No" is selected, continue with step 10. If "Yes" is selected a For which programs? multi-selection list is automatically added to the page. Select the program(s) in which the form should be pre-selected for users in the specified location. Press <Ctrl> while making your selections to assign this form as the default for multiple programs.
![]() NOTE: This option is only available when the form's location has been set to "Listed as a Charting Event."
NOTE: This option is only available when the form's location has been set to "Listed as a Charting Event."
![]() IMPORTANT! In order for the "Yes" selection to work, this form must have electronic signatures configured for it. For information on configuring electronic signatures on FormBuilder forms, click here.
IMPORTANT! In order for the "Yes" selection to work, this form must have electronic signatures configured for it. For information on configuring electronic signatures on FormBuilder forms, click here.
|
Education/Employment |
Housing Retention |
Living Skills/Functioning |
|
Medical/Physical Health |
Mental Health Status |
Misc. Client Information |
|
Quality of Life |
Satisfaction/Assessment of Care |
Substance Use |
|
NYSCRI |
OASAS |
MSDP |
|
Aging |
Children/Youth |
Families |
|
HIV/AIDS |
Homeless |
Mental Health |
|
Developmentally Disabled |
Physically Disabled |
Substance Abuse |
|
Violence/Trauma Victims |
Other/Multiple Service Areas |
|
![]() NOTE: This option is available when the form's location has been set to Intake, Face Sheet, the Services fly-out, Charting Timetable, the Medical fly-out, or the Employment Jobs fly-out.
NOTE: This option is available when the form's location has been set to Intake, Face Sheet, the Services fly-out, Charting Timetable, the Medical fly-out, or the Employment Jobs fly-out.
![]() TIP: In a divisional database if this option is set to "Yes" an additional Copy Across Divisions? option is displayed. The default value is "No." Change that selection to "Yes" if copying form data from programs located in two different divisions in multi-agency databases should be allowed if the user doing the copying has chart access to both programs.
TIP: In a divisional database if this option is set to "Yes" an additional Copy Across Divisions? option is displayed. The default value is "No." Change that selection to "Yes" if copying form data from programs located in two different divisions in multi-agency databases should be allowed if the user doing the copying has chart access to both programs.
To use this option, click the Pre-populate drop-down arrow and make one of the following selections to specify which data should pre-populate the form (choices are based on the location selected in step 8):
![]() Latest Data - This option is available when the form is located on a module menu page (Discharge, Employee, Employment, Medical, or Services). When selected, data from the immediately preceding instance of the form (if available) will be dropped into the new instance of the form when it is opened.
Latest Data - This option is available when the form is located on a module menu page (Discharge, Employee, Employment, Medical, or Services). When selected, data from the immediately preceding instance of the form (if available) will be dropped into the new instance of the form when it is opened.
![]() Latest Scheduled Assessment - This option is available when the form is located under Services - Individual, listed as a Chart Event. When selected, data from the immediately preceding scheduled assessment (if available) will be dropped into the new assessment when it is opened.
Latest Scheduled Assessment - This option is available when the form is located under Services - Individual, listed as a Chart Event. When selected, data from the immediately preceding scheduled assessment (if available) will be dropped into the new assessment when it is opened.
![]() Latest Completed Assessment (Marked as Done) - This option is available when the form is located under Services - Individual, listed as a Chart Event. When selected, data present in the last completed (marked as done) assessment (if available) will be dropped into the new assessment when it is opened.
Latest Completed Assessment (Marked as Done) - This option is available when the form is located under Services - Individual, listed as a Chart Event. When selected, data present in the last completed (marked as done) assessment (if available) will be dropped into the new assessment when it is opened.
![]() Latest Scheduled Review - This is the default when the form is located on Service Plan Coversheets. It indicates that such forms are automatically pre-populated with data from the latest scheduled review, if present. If you would instead like to have the form start with no data when it is added to a service plan, regardless of whether it was used on the previous plan, leave the Pre-populate option blank instead.
Latest Scheduled Review - This is the default when the form is located on Service Plan Coversheets. It indicates that such forms are automatically pre-populated with data from the latest scheduled review, if present. If you would instead like to have the form start with no data when it is added to a service plan, regardless of whether it was used on the previous plan, leave the Pre-populate option blank instead.
This option is set to N/A for all form locations other than those specifically listed here.
![]() IMPORTANT! In all cases when a pre-populate option is specified, a client's program history will impact which specific data pre-populates the form:
IMPORTANT! In all cases when a pre-populate option is specified, a client's program history will impact which specific data pre-populates the form:
- When a client has multiple consecutive stays in the same program, the form will pre-populate from a previous program stay if there is no data found in the form during the current stay.
- When a client has multiple program stays in various programs (regardless of whether they are concurrent), form data will NOT pre-populate across program stays.
When you have chosen a pre-populate option, you may wish to include on the form an instructional field that makes users aware that existing data has been dropped into the form. Further, you may choose to recommend in those instructions that they should review all form content and make changes as needed. When a new form is viewed containing pre-populated data, AWARDS will also display a message at the top of the new form listing where the information is being pulled from. This message will not display once the form is completed and saved.
If you are creating an employee form, the Programs tab is not relevant and is therefore inaccessible. Skip ahead to step 22.
![]() TIP: If the form has been set as the default for any programs in step 9, click Check Defaults to automatically select those programs. Additional programs can then be selected manually if needed; doing so will make the form available to those additional programs but will not affect the default selection options in step 9.
TIP: If the form has been set as the default for any programs in step 9, click Check Defaults to automatically select those programs. Additional programs can then be selected manually if needed; doing so will make the form available to those additional programs but will not affect the default selection options in step 9.
![]() TIP: By default the program selection list is sorted alphabetically by program name. To instead sort the list by program type (for instance, in the event that you would like to make the form available to all programs of a specific type), click the Program Type column heading. Clicking the column heading a second time reverses the sort order.
TIP: By default the program selection list is sorted alphabetically by program name. To instead sort the list by program type (for instance, in the event that you would like to make the form available to all programs of a specific type), click the Program Type column heading. Clicking the column heading a second time reverses the sort order.
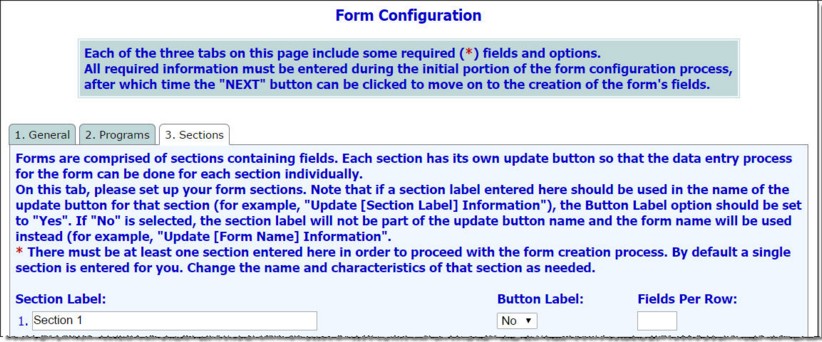
![]() TIP: At least one section is needed in order to proceed with the form creation process. By default a single section is entered for you. Change the label and characteristics of that section as needed.
TIP: At least one section is needed in order to proceed with the form creation process. By default a single section is entered for you. Change the label and characteristics of that section as needed.
![]() Section Label - In this field enter the form section's name.
Section Label - In this field enter the form section's name.
![]() Button Label - To use the section label name in the update button for this section (for example "Update [Section Label] Information"), click this drop-down arrow and select "Yes." If "No" is selected, the section name will not be shown on the update button, which will instead have the form name (for example "Update [Form Name] Information").
Button Label - To use the section label name in the update button for this section (for example "Update [Section Label] Information"), click this drop-down arrow and select "Yes." If "No" is selected, the section name will not be shown on the update button, which will instead have the form name (for example "Update [Form Name] Information").
![]() Fields Per Row - In this field, type the number of fields to be available per row in this section. For example, if "4" is entered here there can be no more than four fields in any row of the section.
Fields Per Row - In this field, type the number of fields to be available per row in this section. For example, if "4" is entered here there can be no more than four fields in any row of the section.
Repeat this step until up to eight form sections have been added. If all sections have been added as needed, continue with step 24. If additional sections are needed, instead click NEXT to save your work, and then circle back around to the Sections data entry tab (FormBuilder Menu > FormBuilder Configuration > click the form name > Sections). There you will be provided with space to enter up to seven additional sections for a total of 15.
![]() IMPORTANT! The form will not be broken into distinct sections with separate update buttons, regardless of what is specified here, when it is configured to use one of the following locations; instead, the complete form is automatically displayed when entering the record.
IMPORTANT! The form will not be broken into distinct sections with separate update buttons, regardless of what is specified here, when it is configured to use one of the following locations; instead, the complete form is automatically displayed when entering the record.
- Discharge - to be included on the Process Discharge form
- Group Notes - as an option to be included on a group note
- Incidents - to be included in Incident Reports
- Medical - as an option to be included on the Medical Appointment form
- Program Status - as an option to be included on the Program status form
- Progress Notes - as an option to be included in a progress note
- Services - to be included on the Service Plan Coversheet
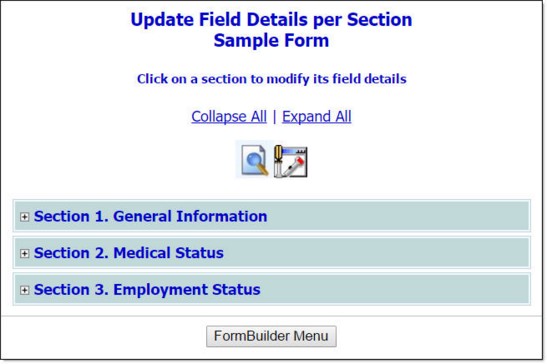
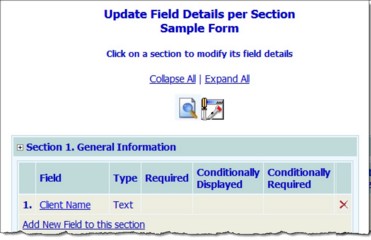
This page contains a list of all form sections, each of which can be expanded or collapsed to view or hide the fields it contains.
![]() TIP: For a brief description of each formatting option, hover your mouse pointer over the individual icons in AWARDS.
TIP: For a brief description of each formatting option, hover your mouse pointer over the individual icons in AWARDS.
![]() TIP: Note when using the spell check option that the icon must be clicked once to show any misspelled words in the text box in red. In order to see the spell check suggestions, you must then click directly on the misspelled word.
TIP: Note when using the spell check option that the icon must be clicked once to show any misspelled words in the text box in red. In order to see the spell check suggestions, you must then click directly on the misspelled word.
![]() TIP: When a field type is chosen the page may refresh to show additional field configuration options related to that selection. For detailed information on each of the available field types, including instructions on use of any type-specific options see FormBuilder Field Types. Basic field type definitions can also be accessed in AWARDS by clicking the magnifying glass icon.
TIP: When a field type is chosen the page may refresh to show additional field configuration options related to that selection. For detailed information on each of the available field types, including instructions on use of any type-specific options see FormBuilder Field Types. Basic field type definitions can also be accessed in AWARDS by clicking the magnifying glass icon.
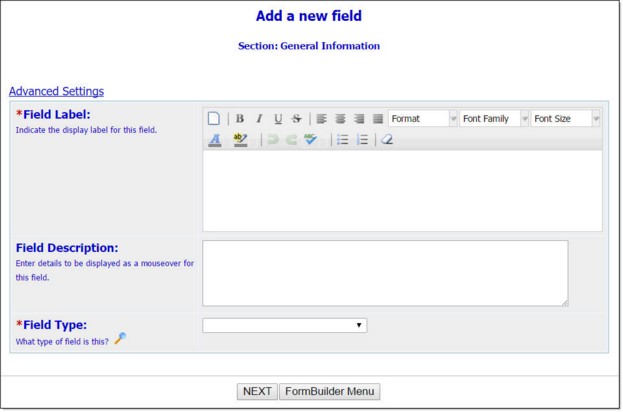
![]()
![]() TIP: Only the number of columns available on the row where the field sits show up in the "Field Width Per Row" selection list. For example, if the section has 4 fields per row and the current row already has two fields in it, the third field being added may be 1 or 2 columns wide. If it needs to occupy more columns than are available for selection on the current row, one of the fields on that row must be expanded to occupy enough columns to fill the row, allowing the new field to begin on a new row.
TIP: Only the number of columns available on the row where the field sits show up in the "Field Width Per Row" selection list. For example, if the section has 4 fields per row and the current row already has two fields in it, the third field being added may be 1 or 2 columns wide. If it needs to occupy more columns than are available for selection on the current row, one of the fields on that row must be expanded to occupy enough columns to fill the row, allowing the new field to begin on a new row.
![]() TIP: For detailed information about using Fields Per Row, see our Fields Per Row training film!
TIP: For detailed information about using Fields Per Row, see our Fields Per Row training film!
![]() TIP: If the Field Type was set to "Dynamic Text Field" in the previous step, the requirement selection specified here is disregarded in favor of the settings for the field in its original location. For example, if the dynamic field is required in its actual location, it will also be required on the form even if the Required option is set to "No" during this step of building the form.
TIP: If the Field Type was set to "Dynamic Text Field" in the previous step, the requirement selection specified here is disregarded in favor of the settings for the field in its original location. For example, if the dynamic field is required in its actual location, it will also be required on the form even if the Required option is set to "No" during this step of building the form.
![]() TIP: This option is not applicable when the form location is "Admission - as an embedded form in the single-step admission form." Default values do not work in that form location.
TIP: This option is not applicable when the form location is "Admission - as an embedded form in the single-step admission form." Default values do not work in that form location.
![]() Conditionally Displayed - Click this drop-down arrow and select the name of the existing field on which the display for this new field will be based.
Conditionally Displayed - Click this drop-down arrow and select the name of the existing field on which the display for this new field will be based.
![]() TIP: This option can only be selected if there is at least one other field in the form section. In such cases, the Conditionally Displayed selection list includes those fields previously added to that form section.
TIP: This option can only be selected if there is at least one other field in the form section. In such cases, the Conditionally Displayed selection list includes those fields previously added to that form section.
![]() Response to the above listed field - In these fields, specify one or more responses that, if entered in the conditionally displayed selection, will cause the new field to be displayed.
Response to the above listed field - In these fields, specify one or more responses that, if entered in the conditionally displayed selection, will cause the new field to be displayed.
![]() TIP: Initially a maximum of five responses can be entered. Upon saving the field and re-opening it, you have the option to add five more. If no responses are entered, the absence of any data in the conditionally displayed field causes the field to always be displayed.
TIP: Initially a maximum of five responses can be entered. Upon saving the field and re-opening it, you have the option to add five more. If no responses are entered, the absence of any data in the conditionally displayed field causes the field to always be displayed.
For example, if field 1 is "Hospitalized this year?" and field 2 is "If so, which hospital?" these options can be used to set up field 2 so that it only displays if the answer to field 1 is "yes." To do so you'd make "Hospitalized this year?" the conditionally displayed selection, and enter "yes" in the response field when creating field 2.
![]() Require if displayed based on the conditions above - If the field being added should be conditionally required based on the same settings entered in the Conditionally Displayed options, click this checkbox.
Require if displayed based on the conditions above - If the field being added should be conditionally required based on the same settings entered in the Conditionally Displayed options, click this checkbox.
![]() Conditionally Required - If the field being added should be conditionally required based on unique settings, click this drop-down arrow and select the name of the existing field on which the requirement for this new field will be based.
Conditionally Required - If the field being added should be conditionally required based on unique settings, click this drop-down arrow and select the name of the existing field on which the requirement for this new field will be based.
![]() TIP: This option can only be selected if there is at least one other field in the form section. In such cases, the Conditionally Required selection list includes those fields previously added to that form section.
TIP: This option can only be selected if there is at least one other field in the form section. In such cases, the Conditionally Required selection list includes those fields previously added to that form section.
![]() Response to the above listed field - In these fields, specify one or more responses that, if entered in the conditionally required selection, will cause the new field to be required.
Response to the above listed field - In these fields, specify one or more responses that, if entered in the conditionally required selection, will cause the new field to be required.
![]() TIP: Initially a maximum of five responses can be entered. Upon saving the field and re-opening it, you have the option to add five more. If no responses are entered, the absence of any data in the conditionally required field triggers the requirement of this new field.
TIP: Initially a maximum of five responses can be entered. Upon saving the field and re-opening it, you have the option to add five more. If no responses are entered, the absence of any data in the conditionally required field triggers the requirement of this new field.
For example, if field 1 is "Hospitalized this year?" and field 2 is "If so, which hospital?" these options can be used to set up field 2 so that it is required if the answer to field 1 is "yes." To do so you'd make "Hospitalized this year?" the conditionally required selection, and enter "yes" in the response field when creating field 2.
![]() TIP: This option is not available until a field type is chosen in step 29. At that time it is displayed as long as the field type selection is not "dynamic section," "dynamic text field (read-only)," or "dynamic text field."
TIP: This option is not available until a field type is chosen in step 29. At that time it is displayed as long as the field type selection is not "dynamic section," "dynamic text field (read-only)," or "dynamic text field."
![]() TIP: When determining whether a field should be included as a ReportBuilder variable, please keep in mind that if more than one value exists for that field during the date range used when running the report, only the latest value is included in the report contents.
TIP: When determining whether a field should be included as a ReportBuilder variable, please keep in mind that if more than one value exists for that field during the date range used when running the report, only the latest value is included in the report contents.
![]() TIP: For more information on which ReportBuilders form fields are available on when using this option click here.
TIP: For more information on which ReportBuilders form fields are available on when using this option click here.
![]() TIP: Whenever possible, label the field uniquely so that it can be differentiated from other ReportBuilder variables that may have the same or a similar name as that of your form field.
TIP: Whenever possible, label the field uniquely so that it can be differentiated from other ReportBuilder variables that may have the same or a similar name as that of your form field.
![]() NOTE: This option is only available for a handful of relevant field types, and is distinct from the Default Value if one was set for the form.
NOTE: This option is only available for a handful of relevant field types, and is distinct from the Default Value if one was set for the form.
![]() NOTE: Fields for which both codes and values have been specified during FormBuilder configuration will be listed twice on the settings page for the Assessments Report and related ReportBuilders - once as "[fieldname] - Value" and once as "[fieldname] - Code." Using one or both of these selections will enable users to view reports with the preferred data type(s).
NOTE: Fields for which both codes and values have been specified during FormBuilder configuration will be listed twice on the settings page for the Assessments Report and related ReportBuilders - once as "[fieldname] - Value" and once as "[fieldname] - Code." Using one or both of these selections will enable users to view reports with the preferred data type(s).
![]() TIP: To see a preview of the form now or at any time after at least one field has been added, click the preview icon on this page.
TIP: To see a preview of the form now or at any time after at least one field has been added, click the preview icon on this page.
![]()
![]() TIP: After the form's first field has been entered, subsequent Add a Field pages for that form may have two links near the top of the page: Default to Last Saved and Set as Default Setting. Click the Default to link if the new field should "inherit" all of the settings of the most recently saved field. Click the Set as link if subsequent Add a Field pages should have the option to "inherit" all of the settings with a Use Default Field Settings link.
TIP: After the form's first field has been entered, subsequent Add a Field pages for that form may have two links near the top of the page: Default to Last Saved and Set as Default Setting. Click the Default to link if the new field should "inherit" all of the settings of the most recently saved field. Click the Set as link if subsequent Add a Field pages should have the option to "inherit" all of the settings with a Use Default Field Settings link.
![]() TIP: If one of the other locations was chosen for the form, this step is not necessary. In all other cases the form will automatically be available from within the specified module/feature.
TIP: If one of the other locations was chosen for the form, this step is not necessary. In all other cases the form will automatically be available from within the specified module/feature.
The process of building a form is now complete.
https://demodb.footholdtechnology.com/help/?10190
