|   |
| |
To schedule an appointment/event using the Calendar, complete the following steps:
![]() TIP: For more information on the Calendar viewing options, click here.
TIP: For more information on the Calendar viewing options, click here.
![]() TIP: If, once the Calendar is displayed, you change the settings used, click REFRESH CALENDAR to apply those changes. (Note that if the View or Scope settings are changed the Calendar display is temporarily removed from the page, at which point you must click DISPLAY CALENDAR to apply your settings and view appointment and event information again.)
TIP: If, once the Calendar is displayed, you change the settings used, click REFRESH CALENDAR to apply those changes. (Note that if the View or Scope settings are changed the Calendar display is temporarily removed from the page, at which point you must click DISPLAY CALENDAR to apply your settings and view appointment and event information again.)
![]() TIP: Depending on the view you have chosen, either the Scope or Selection option must be set to a single program in order to schedule the full complement of appointment/event types. If you click on a Calendar date while a group of programs is selected, you will receive an error instructing you that you must go back and select a single program in order to proceed with the scheduling process. Similarly, if you click on a Calendar date while "All Staff" is selected, you will be allowed to proceed but will be limited to scheduling staff events only.
TIP: Depending on the view you have chosen, either the Scope or Selection option must be set to a single program in order to schedule the full complement of appointment/event types. If you click on a Calendar date while a group of programs is selected, you will receive an error instructing you that you must go back and select a single program in order to proceed with the scheduling process. Similarly, if you click on a Calendar date while "All Staff" is selected, you will be allowed to proceed but will be limited to scheduling staff events only.
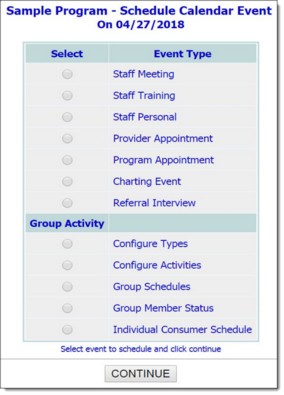
When viewing the Calendar with the hourly schedule option, double-click the timeslot in which the appointment/event is to be scheduled. (If the appropriate timeslot is not displayed, double-click in any slot and adjust the time later in the scheduling process.) The Schedule Calendar Event page is displayed.
![]() NOTE: The appointments/events available for selection vary based on your permissions and on the View, Scope, and Selection you have chosen for the Calendar. As a result, the appointments/events list you see may be different from that shown here.
NOTE: The appointments/events available for selection vary based on your permissions and on the View, Scope, and Selection you have chosen for the Calendar. As a result, the appointments/events list you see may be different from that shown here.
|
Staff Meeting |
Staff Training |
Staff Personal |
|
Provider Appointment |
Program Appointment |
Charting Event |
|
Referral Interview |
Job Interview |
Group Activity |
![]() NOTE: During the scheduling process you may receive up to two notification messages designed to alert you to potential issues with the new appointment/event:
NOTE: During the scheduling process you may receive up to two notification messages designed to alert you to potential issues with the new appointment/event:
![]() Off Hours Meeting Time - If you are scheduling a staff meeting or staff training and the meeting/training time is not between 6am and 11pm you will receive an off hours notification. To proceed with scheduling the meeting/training as is, click CONFIRM. To return to the meeting/training details to make changes, click your browser's Back button.
Off Hours Meeting Time - If you are scheduling a staff meeting or staff training and the meeting/training time is not between 6am and 11pm you will receive an off hours notification. To proceed with scheduling the meeting/training as is, click CONFIRM. To return to the meeting/training details to make changes, click your browser's Back button.
![]() Scheduling Conflict - Depending on the type of appointment/event being scheduled, AWARDS will check the schedule for the appointment / event's location, client(s), and/or staff and flag any potential conflicts with already scheduled appointments / events. If a possible conflict is identified, you will receive a scheduling conflict notification. To proceed with scheduling the appointment/event as is, click SCHEDULE ANYWAY. To return to the appointment/event details to make changes, click your browser's Back button.
Scheduling Conflict - Depending on the type of appointment/event being scheduled, AWARDS will check the schedule for the appointment / event's location, client(s), and/or staff and flag any potential conflicts with already scheduled appointments / events. If a possible conflict is identified, you will receive a scheduling conflict notification. To proceed with scheduling the appointment/event as is, click SCHEDULE ANYWAY. To return to the appointment/event details to make changes, click your browser's Back button.
When you have finished scheduling your appointment/event, one of the following will happen based on the type of appointment/event you are working with:
![]() You will automatically be returned to the Calendar where the newly scheduled appointment/event is now displayed. (In some cases you may need to adjust your current Calendar settings before your new appointment/event will be included in the Calendar display.)
You will automatically be returned to the Calendar where the newly scheduled appointment/event is now displayed. (In some cases you may need to adjust your current Calendar settings before your new appointment/event will be included in the Calendar display.)
![]() You will be shown a confirmation page from which you can click Calendar to return to the updated Calendar page.
You will be shown a confirmation page from which you can click Calendar to return to the updated Calendar page.
The scheduling process is now complete. For detailed information on completing step 6 for a specific appointment/event type, please refer to the information for that type, accessed from the table of contents or the related topics list below.
Click-by-Click Instructions ![]()
Click-by-click instructions for scheduling each of the available appointment/event types.
Scheduling a Staff Personal Appointment/Event
Scheduling a Provider Appointment
Scheduling a Program Appointment
Scheduling a Referral Interview
https://demodb.footholdtechnology.com/help/?10142
