|   |
| |
To schedule a program appointment for a client, complete the following steps from the Schedule Calendar Event page displayed after clicking a date on the Calendar:
![]() TIP: In order to schedule program appointments, you must have the following permissions:
TIP: In order to schedule program appointments, you must have the following permissions:
Display Any Chart Records Buttons
Display Chart Records Services - Individual Button
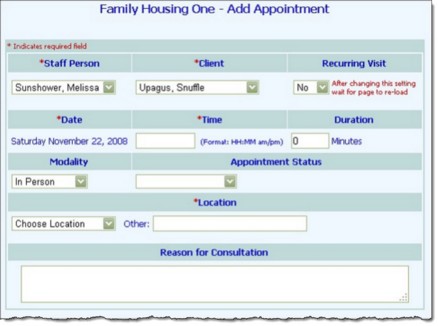
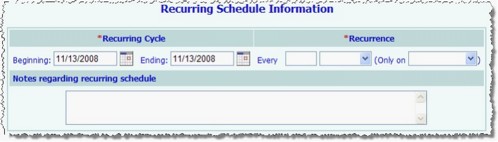
![]() TIP: If this is not a recurring appointment, leave the default "No" selection in place and skip ahead to step 9.
TIP: If this is not a recurring appointment, leave the default "No" selection in place and skip ahead to step 9.
The Add Appointment page is refreshed to include "Recurring Schedule Information."
|
Kept |
Canceled by Staff |
Canceled by Client |
No Show |
![]() NOTE: The "Kept" and "No Show" selections are only available when the appointment date is on or before today's date.
NOTE: The "Kept" and "No Show" selections are only available when the appointment date is on or before today's date.
![]() TIP: The locations available for selection here are those that have been configured using the System Setup module, Agency Program Information, Configure Locations feature. For more information on configuring locations, click here.
TIP: The locations available for selection here are those that have been configured using the System Setup module, Agency Program Information, Configure Locations feature. For more information on configuring locations, click here.
![]() TIP: A printable form button is available on this page. Clicking this button opens a printable version of the program appointment information, excluding navigation buttons and any staff information or progress notes detail (if applicable). Also, the appointment status appears as "Scheduled" on the printable version if no status was selected.
TIP: A printable form button is available on this page. Clicking this button opens a printable version of the program appointment information, excluding navigation buttons and any staff information or progress notes detail (if applicable). Also, the appointment status appears as "Scheduled" on the printable version if no status was selected.
![]() TIP: In some cases you may need to adjust your current Calendar settings before your new appointment/event will be included in the Calendar display.
TIP: In some cases you may need to adjust your current Calendar settings before your new appointment/event will be included in the Calendar display.
The process of scheduling a program appointment is now complete.
https://demodb.footholdtechnology.com/help/?10159
