To schedule a staff meeting, complete the following steps from the Schedule Calendar Event page displayed after clicking a date on the Calendar:
- Click the Select radio button next to "Staff Meeting" in the Event Type table.
- Click CONTINUE. The Staff Meeting Event Data Entry page is displayed.
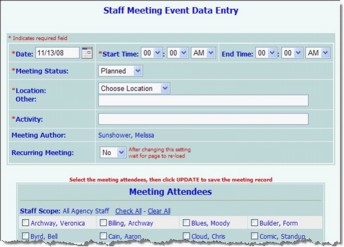
- By default the meeting date is set to the day you clicked on in the Calendar. If necessary, type a different date in the Date field (using mm/dd/yyyy format), or select a date using the available date picker to the right of the field.
- Use the Time drop-down selections to the right of the meeting date to indicate when the meeting is to begin and end.
- By default a meeting's status is set to "Planned." If you are entering a meeting on the Calendar that already took place or was canceled, click the Meeting Status drop-down arrow and choose "Held" or "Canceled," respectively.
- Click the Location drop-down arrow and choose the location at which the meeting is to take place. To select a location not included on the list, select "Other Place," and type the location name in the Other field.
 TIP: The locations available for selection here are those that have been configured using the System Setup module, Agency Program Information, Configure Locations feature. For more information on configuring locations, please click here.
- In the Activity field, type a brief meeting description. Note that whatever you enter here will be used to identify the meeting on the Calendar.
- If this meeting is recurring, click the Recurring Visit drop-down arrow and select "Yes."
TIP: If this is not a recurring appointment, leave the default "No" selection in place and skip ahead to step 12.
The Staff Meeting Event Data Entry page is refreshed to include "Recurring Schedule Information."
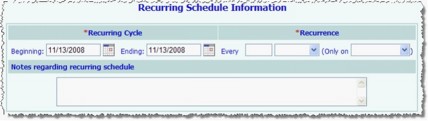
- By default the appointment is scheduled to recur beginning on the date you clicked on the Calendar, as reflected in the "Recurring Cycle" portion of the page. If necessary, make changes to that date and/or enter an ending date for the recurrences in the Beginning and/or Ending fields, respectively.
- In the "Recurrence" portion of the page, indicate how frequently the appointment is to recur. For example, if the appointment is scheduled for every Friday, you would enter "7" in the Every field, select "Days" from the corresponding drop-down, and "Fridays" from the Only on drop-down.
- In the Notes regarding recurring schedule text box, type any information applicable to the nature of the appointment's schedule.
- Click the Meeting Attendees checkbox next to each staff person who is to attend the meeting being scheduled.
TIP: If a specific program was selected using the Calendar's Scope or Selection options, the meeting attendee checkboxes are limited to staff with chart access to that program. If it is necessary to expand the selection list, click the Staff Scope drop-down arrow and select "All Agency Staff." If a specific program was not selected as part of the viewing options, all agency staff are available for selection by default.
- Click UPDATE. The meeting is scheduled, a confirmation page of meeting details is displayed, and a "MEETING SCHEDULED" internal notification message is automatically sent to the meeting's attendees.
 NOTE: If the meeting's start and/or end time is "off hours," meaning that it is outside of the hours of 6:00 am to 11:00pm, you will be asked to confirm that the time is correct before the meeting is scheduled. If so, click CONFIRM. If not, click your browser's Back button to correct the time(s).
TIP: In some AWARDS databases an optional Duplicate button is available on the confirmation page for the purposes of easily cloning and scheduling another staff training based on the one you have just entered. To do so, click Duplicate now. If you do not see this option and are interested in having it turned on, please contact the Help Desk for assistance.
- Click Calendar to return to the Calendar where your newly scheduled meeting is now displayed.
TIP: In some cases you may need to adjust your current Calendar settings before your new appointment/event will be included in the Calendar display.
The process of scheduling a staff meeting is now complete.
https://demodb.footholdtechnology.com/help/?10155


