|   |
| |
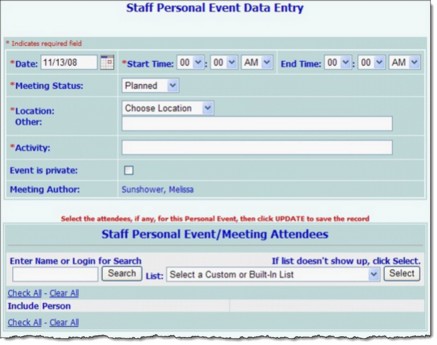
To schedule a personal appointment/event, complete the following steps from the Schedule Calendar Event page displayed after clicking a date on the Calendar:
![]() TIP: The locations available for selection here are those that have been configured using the System Setup module, Agency Program Information, Configure Locations feature. For more information on configuring locations, click here.
TIP: The locations available for selection here are those that have been configured using the System Setup module, Agency Program Information, Configure Locations feature. For more information on configuring locations, click here.
![]() TIP: If the appointment/event's start and/or end time is "off hours," meaning that it is outside of the hours of 6:00 am to 11:00pm, you will be asked to confirm that the time is correct before the appointment/event is scheduled. If so, click CONFIRM. If not, click your browser's Back button to correct the time(s).
TIP: If the appointment/event's start and/or end time is "off hours," meaning that it is outside of the hours of 6:00 am to 11:00pm, you will be asked to confirm that the time is correct before the appointment/event is scheduled. If so, click CONFIRM. If not, click your browser's Back button to correct the time(s).
![]() TIP: In some AWARDS databases an optional Duplicate button is available on the confirmation page for the purposes of easily cloning and scheduling another staff training based on the one you have just entered. To do so, click Duplicate now. If you do not see this option and are interested in having it turned on, please contact the Help Desk for assistance.
TIP: In some AWARDS databases an optional Duplicate button is available on the confirmation page for the purposes of easily cloning and scheduling another staff training based on the one you have just entered. To do so, click Duplicate now. If you do not see this option and are interested in having it turned on, please contact the Help Desk for assistance.
![]() TIP: In some cases you may need to adjust your current Calendar settings before your new appointment/event will be included in the Calendar display.
TIP: In some cases you may need to adjust your current Calendar settings before your new appointment/event will be included in the Calendar display.
The process of scheduling a personal appointment/event is now complete.
![]() TIP: Please keep in mind that once scheduled, personal appointments/events can be updated by anyone unless they have been designed as "private." Updates to private appointments/events are limited to the scheduler and attendees only.
TIP: Please keep in mind that once scheduled, personal appointments/events can be updated by anyone unless they have been designed as "private." Updates to private appointments/events are limited to the scheduler and attendees only.
https://demodb.footholdtechnology.com/help/?10157
