|   |
| |
To enter, update, or delete a chart event using the charting timetable, complete the following steps from the AWARDS Home screen:
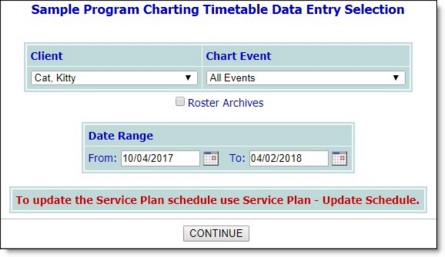
![]() TIP: If the event to be entered or worked with is for a former (discharged) client, first click the Roster Archives checkbox beneath the client selection option.
TIP: If the event to be entered or worked with is for a former (discharged) client, first click the Roster Archives checkbox beneath the client selection option.
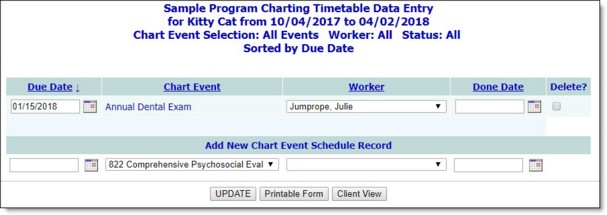
Any existing charting timetable records for the selected client, event, and date range are displayed at the top of the page.
![]() Add a new chart event - Configure the blank Add New Chart Event Schedule Record fields and options as necessary.
Add a new chart event - Configure the blank Add New Chart Event Schedule Record fields and options as necessary.
![]() TIP: For more information on the chart event record fields/options available when adding , see Chart Event Record Fields / Options.
TIP: For more information on the chart event record fields/options available when adding , see Chart Event Record Fields / Options.
![]() Update an existing chart event - Make changes to the information for any existing chart events as necessary.
Update an existing chart event - Make changes to the information for any existing chart events as necessary.
![]() NOTE: Users with the Restrict Charting Event Due Date Data Entry permission cannot edit existing charting event due dates.
NOTE: Users with the Restrict Charting Event Due Date Data Entry permission cannot edit existing charting event due dates.
![]() TIP: For more information on the chart event record fields/options available when updating events , see Chart Event Record Fields / Options.
TIP: For more information on the chart event record fields/options available when updating events , see Chart Event Record Fields / Options.
![]() Delete an existing chart event - Click the Delete? checkbox next to each record to be deleted.
Delete an existing chart event - Click the Delete? checkbox next to each record to be deleted.
![]() NOTE: The Delete? checkbox is only displayed for records without done dates (if a done date is in place it must first be removed), and those for which no assessment data entry has been done. (Keep in mind that if your agency has the optional "Chart Events Done Dates Data Entry" permission feature turned on, you must have that permission in order to add or remove chart event done dates.)
NOTE: The Delete? checkbox is only displayed for records without done dates (if a done date is in place it must first be removed), and those for which no assessment data entry has been done. (Keep in mind that if your agency has the optional "Chart Events Done Dates Data Entry" permission feature turned on, you must have that permission in order to add or remove chart event done dates.)
![]() NOTE: Users with the Restrict Charting Event Deletion data entry/access permission do not see the Delete? checkbox and cannot delete existing charting events regardless of whether a done date has been entered.
NOTE: Users with the Restrict Charting Event Deletion data entry/access permission do not see the Delete? checkbox and cannot delete existing charting events regardless of whether a done date has been entered.
The process of working with charting timetable records is now complete.
![]() TIP: If you scheduled a chart event that has an associated FormBuilder form, it is accessible under Services - Individual > Assessment Data. For more information on entering/updating assessment data, click here.
TIP: If you scheduled a chart event that has an associated FormBuilder form, it is accessible under Services - Individual > Assessment Data. For more information on entering/updating assessment data, click here.
https://demodb.footholdtechnology.com/help/?10409
