|   |
| |
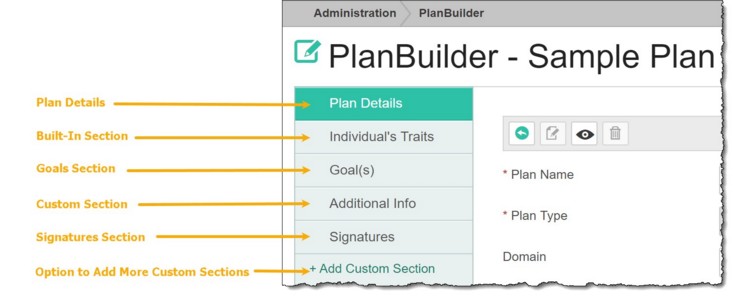
Common to all plans. Collects basic information on the plan including its type, whether or not it's currently enabled, what schedule should be used when completing the plan, which program types it has been applied to, and more.
Plan Sections (Goals / Custom / Built-In)
Each plan will inherit a goal section as well as a specific number of built-in sections from the template used to create it, with the option of also adding as many unique custom sections as needed. Specifics of each of these sections will vary from plan to plan; however, all custom and built-in plan sections are used to set the fields and options that will be available in data entry mode when completing plans and reviews. While the labels and content will vary, the building blocks for each section is the same, enabling you to add/remove fields and options, label each as you need, and re-order various pieces to meet your workflow needs. Only the Goal section is unique, in that it is tiered and it can be configured but not fully customized.
An optional plan section available for all plans for the purposes of designating who should electronically sign each plan/review and what options they will have in the signing interface when doing so. The name of this section is consistent across all plans for which it has been added, as are the tools used to set it up, though the signature requirements within each may vary.
For example, in the following sample plan custom and signature sections have been added to the standard plan details, goals section, and default built-in sections from the template:
Below is an alphabetical list of the fields and options located on each of these section types, along with tips on how to configure each section. To jump directly to the information for a specific field or option in one of the plan sections, press <Ctrl+F> to access your browser's search field and enter the name of the field/option in question.
Domain
Click this drop-down arrow and select one of the available options to indicate the basic assessment area ("domain") to which the plan applies:
![]() Case Management
Case Management
![]() Developmental Disability
Developmental Disability
![]() Educational
Educational
![]() Housing
Housing
![]() Independent Living
Independent Living
![]() Mental Health
Mental Health
![]() Medical/Physical Health
Medical/Physical Health
![]() Service Coordination
Service Coordination
![]() Substance Abuse
Substance Abuse
![]() Vocational
Vocational
Click this drop-down arrow and select "Yes" or "No" to indicate whether this plan should be available for data entry in programs of the specified Program Type(s). Disabled plans are not available for data entry; however, if a disabled plan was previously enabled and completed, that plan will still be available for reporting purposes.
![]() TIP: If this option is set to "Yes," the plan can also be enabled/disabled on the program type level; however, if it is set to "No" the selection made here is global and will override any program type assignments for the plan.
TIP: If this option is set to "Yes," the plan can also be enabled/disabled on the program type level; however, if it is set to "No" the selection made here is global and will override any program type assignments for the plan.
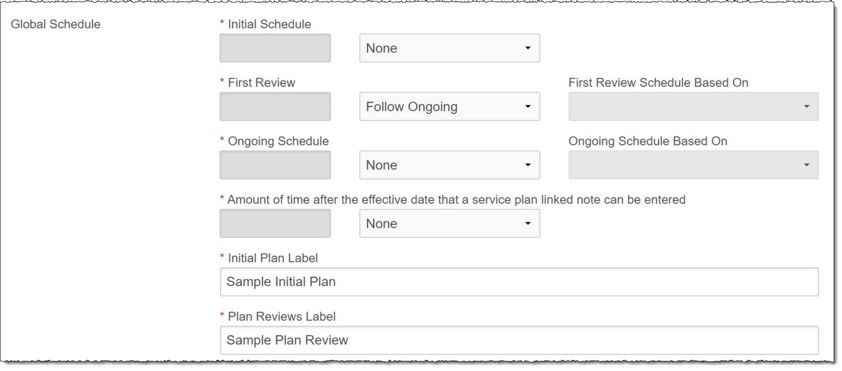
The global schedule determines the default scheduling for all plans of this type, and will be used for all program types for which a custom schedule has not been specified.
![]() TIP: When a field or option is grayed out (as shown above) it is an indication that you must first make a selection from the available drop-down list, at which point the other fields/options will be opened for data entry.
TIP: When a field or option is grayed out (as shown above) it is an indication that you must first make a selection from the available drop-down list, at which point the other fields/options will be opened for data entry.
![]() Initial Schedule - Using this field and the corresponding drop-down option, type or make changes to the number of "Day(s)," "Month(s)," "Year(s)," or "None" after the individual's admission date on which the first plan of this type should automatically be scheduled.
Initial Schedule - Using this field and the corresponding drop-down option, type or make changes to the number of "Day(s)," "Month(s)," "Year(s)," or "None" after the individual's admission date on which the first plan of this type should automatically be scheduled.
![]() NOTE: Changes made here are not retroactive; if plans of this type have already been scheduled, their original dates are retained and must be changed manually from within the Plans and Reviews feature if no longer correct.
NOTE: Changes made here are not retroactive; if plans of this type have already been scheduled, their original dates are retained and must be changed manually from within the Plans and Reviews feature if no longer correct.
![]() First Review - Available only when the Plan Type has been set to "Service Plan" or "Care Plan." Using this field and the corresponding drop-down option, type or make changes to the number of "Day(s)," "Month(s)," or "Year(s)" after the individual's initial plan of this type on which the first plan review should automatically be scheduled. Also click the First Review Schedule Based On drop-down arrow and make a selection to specify whether this scheduling should be based on a given plan's "Due Date," "Done Date," or "Effective Date." Alternately, if the first review should not be scheduled differently than other reviews, leave this setting at it's default value - "Follow Ongoing." When "Follow Ongoing" is used all reviews will use the ongoing schedule established in the next row of the settings page.
First Review - Available only when the Plan Type has been set to "Service Plan" or "Care Plan." Using this field and the corresponding drop-down option, type or make changes to the number of "Day(s)," "Month(s)," or "Year(s)" after the individual's initial plan of this type on which the first plan review should automatically be scheduled. Also click the First Review Schedule Based On drop-down arrow and make a selection to specify whether this scheduling should be based on a given plan's "Due Date," "Done Date," or "Effective Date." Alternately, if the first review should not be scheduled differently than other reviews, leave this setting at it's default value - "Follow Ongoing." When "Follow Ongoing" is used all reviews will use the ongoing schedule established in the next row of the settings page.
![]() TIP: First reviews cannot be scheduled based on the admission date.
TIP: First reviews cannot be scheduled based on the admission date.
![]() NOTE: Changes made here are not retroactive; if plans of this type have already been scheduled, their original dates are retained and must be changed manually from within the Plans and Reviews feature if no longer correct.
NOTE: Changes made here are not retroactive; if plans of this type have already been scheduled, their original dates are retained and must be changed manually from within the Plans and Reviews feature if no longer correct.
![]() Ongoing Schedule - Available only when the Plan Type has been set to "Service Plan" or "Care Plan." Using this field and the corresponding drop-down option, type or make changes to the number of "Day(s)," "Month(s)," "Year(s)," or "None" after the individual's first plan of this type on which subsequent plans should automatically be scheduled. Also click the Ongoing Schedule Based On drop-down arrow and make a selection to specify whether this scheduling should be based on a given plan's "Due Date," "Done Date," or "Effective Date."
Ongoing Schedule - Available only when the Plan Type has been set to "Service Plan" or "Care Plan." Using this field and the corresponding drop-down option, type or make changes to the number of "Day(s)," "Month(s)," "Year(s)," or "None" after the individual's first plan of this type on which subsequent plans should automatically be scheduled. Also click the Ongoing Schedule Based On drop-down arrow and make a selection to specify whether this scheduling should be based on a given plan's "Due Date," "Done Date," or "Effective Date."
![]() NOTE: Changes made here are not retroactive; if plans of this type have already been scheduled, their original dates are retained and must be changed manually from within the Plans and Reviews feature if no longer correct.
NOTE: Changes made here are not retroactive; if plans of this type have already been scheduled, their original dates are retained and must be changed manually from within the Plans and Reviews feature if no longer correct.
![]() Amount of time after the effective date that a service plan linked note can be entered - Available only when the Plan Type has been set to "Service Plan" or "Care Plan." Using this field and the corresponding drop-down option, type or make changes to the number of "Day(s)," "Month(s)," "Year(s)," or "None" after a plan's effective date during which service plan linked notes can be entered for that plan. Once the specified amount of time has passed, users will be prevented from linking notes to the plan.
Amount of time after the effective date that a service plan linked note can be entered - Available only when the Plan Type has been set to "Service Plan" or "Care Plan." Using this field and the corresponding drop-down option, type or make changes to the number of "Day(s)," "Month(s)," "Year(s)," or "None" after a plan's effective date during which service plan linked notes can be entered for that plan. Once the specified amount of time has passed, users will be prevented from linking notes to the plan.
![]() Immediate Needs Plan Label - Available only when the Plan Type has been set to "Immediate Needs Plan." Make changes to the label as needed, keeping in mind that in the Plans and Reviews index, plans of this type will be displayed as "Immediate Needs Plan - " followed by the label specified here. The default value is "Initial Plan."
Immediate Needs Plan Label - Available only when the Plan Type has been set to "Immediate Needs Plan." Make changes to the label as needed, keeping in mind that in the Plans and Reviews index, plans of this type will be displayed as "Immediate Needs Plan - " followed by the label specified here. The default value is "Initial Plan."
![]() Initial Plan Label - Available only when the Plan Type has been set to "Service Plan" or "Care Plan." Make changes to the label as needed, keeping in mind that in the Plans and Reviews index, plans of this type will be displayed as "Service Plan - " or "Care Plan - " (based on the plan type) followed by the label specified here. The default value is "Initial Plan."
Initial Plan Label - Available only when the Plan Type has been set to "Service Plan" or "Care Plan." Make changes to the label as needed, keeping in mind that in the Plans and Reviews index, plans of this type will be displayed as "Service Plan - " or "Care Plan - " (based on the plan type) followed by the label specified here. The default value is "Initial Plan."
![]() Plan Reviews Label - Available only when the Plan Type has been set to "Service Plan" or "Care Plan." Make changes to the label as needed, keeping in mind that in the Plans and Reviews index, plans of this type will be displayed as "Service Plan - " or "Care Plan - " (based on the plan type) followed by the label specified here. The default value is "Plan Review."
Plan Reviews Label - Available only when the Plan Type has been set to "Service Plan" or "Care Plan." Make changes to the label as needed, keeping in mind that in the Plans and Reviews index, plans of this type will be displayed as "Service Plan - " or "Care Plan - " (based on the plan type) followed by the label specified here. The default value is "Plan Review."
Plan Name
In this field, type or make changes to the name of the plan being worked with. Please name the plan carefully, as this name will be used to identify the plan throughout AWARDS.
Click this drop-down arrow and select or make changes to the type of plan being worked with. Available options are: "Immediate Needs Plan," "Service Plan," and "Care Plan."
![]() IMPORTANT! When using Immediate Needs Plans, please keep in mind that data entered in the plan does not carry over to/display in subsequent Initial Plans.
IMPORTANT! When using Immediate Needs Plans, please keep in mind that data entered in the plan does not carry over to/display in subsequent Initial Plans.
Pre-Populate Reviews
Click this drop-down arrow and select "Yes" or "No" to indicate whether data in any custom and built-in sections of this plan should be pre-populated with data from the initial plan (in the instance of the first review) or preceding review (in the case of subsequent reviews). Setting this option to "No" will prevent those sections from pre-populating with data from the previous plan or review.
Click this drop-down arrow and select the type of program to which this plan applies. The page is refreshed to list your selection, along with the date added, as shown in the following example:

Additional configuration options are also available for each associated program type:
![]() Disable - By default each program type selected automatically has the plan enabled for it. To disable the plan for the program type at any time, click the corresponding Disable link. A confirmation message is displayed. Click OK to proceed. The page is updated and the program type is removed from the plan on the next calendar day.
Disable - By default each program type selected automatically has the plan enabled for it. To disable the plan for the program type at any time, click the corresponding Disable link. A confirmation message is displayed. Click OK to proceed. The page is updated and the program type is removed from the plan on the next calendar day.
![]() TIP: If it were ever necessary to enable the plan for a program type again in the future, you would do so by re-selecting it from the Program Type list.
TIP: If it were ever necessary to enable the plan for a program type again in the future, you would do so by re-selecting it from the Program Type list.
![]() TIP: Each program type can only have one active (enabled) plan of each type assigned to it at a time. Program types already assigned to a plan will not display in the Program Type drop-down list for other plans.
TIP: Each program type can only have one active (enabled) plan of each type assigned to it at a time. Program types already assigned to a plan will not display in the Program Type drop-down list for other plans.
![]() IMPORTANT! Please keep in mind that this option is only relevant if the plan's overall Enabled? option is set to "Yes." If that is set to "No," the selection made there is global and will override any program type assignments for the plan, automatically disabling it for all.
IMPORTANT! Please keep in mind that this option is only relevant if the plan's overall Enabled? option is set to "Yes." If that is set to "No," the selection made there is global and will override any program type assignments for the plan, automatically disabling it for all.
![]() Delete - If no plan data has been entered for a plan in a program type, that program type can be removed from the plan. To do so, click Delete.
Delete - If no plan data has been entered for a plan in a program type, that program type can be removed from the plan. To do so, click Delete.
![]() Add Custom Schedule - By default each program type will use the Global Schedule for this plan unless a custom schedule has been specified. To create a custom schedule, click the corresponding Add Custom Schedule link. The page is refreshed to display schedule options for the program type.
Add Custom Schedule - By default each program type will use the Global Schedule for this plan unless a custom schedule has been specified. To create a custom schedule, click the corresponding Add Custom Schedule link. The page is refreshed to display schedule options for the program type.
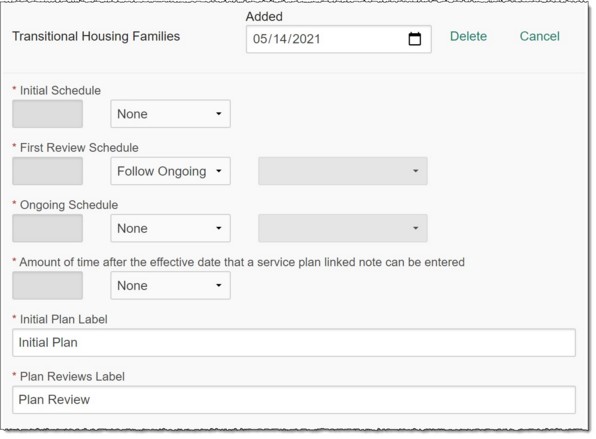
Configure these options as needed, or click Cancel to re-apply the global schedule for this program type.
![]() TIP: For information on each of the available schedule fields/options, refer to Global Schedule above. Each field/option works the same way, with the only difference being whether it applies to all program types (global) or the specific program type you are working with.
TIP: For information on each of the available schedule fields/options, refer to Global Schedule above. Each field/option works the same way, with the only difference being whether it applies to all program types (global) or the specific program type you are working with.
Repeat as needed until all of the appropriate program types have been associated with the plan and configured as necessary.
Show Discontinued Items in View Mode
Defaults to "Yes" so that discontinued plan items are displayed when users access the plan in view mode. If discontinued plan items should be hidden instead, click this drop-down arrow and select "No.".
State
Click this drop-down arrow and select the abbreviation for the state the plan applies to. If the plan is applicable to more than a single state, this option can be left blank.
System Format
A read-only "Yes" or "No" value. Plans/templates with a "yes" value here have been created by Foothold Technology for your use and cannot be edited.
Return to the top of the page.
Plan Sections (Goals / Custom / Built-In)
![]() NOTE: Specifics of each plan section will vary from plan to plan; however, all custom and built-in plan sections are used to set the fields and options that will be available in data entry mode when completing plans and reviews. While the labels and content will vary, the building blocks for each section is the same, enabling you to add/remove fields and options, label each as you need, and re-order various pieces to meet your workflow needs. Only the Goal section is unique, in that it is tiered and it can be configured but not fully customized.
NOTE: Specifics of each plan section will vary from plan to plan; however, all custom and built-in plan sections are used to set the fields and options that will be available in data entry mode when completing plans and reviews. While the labels and content will vary, the building blocks for each section is the same, enabling you to add/remove fields and options, label each as you need, and re-order various pieces to meet your workflow needs. Only the Goal section is unique, in that it is tiered and it can be configured but not fully customized.
Fields / Options
The bulk of each custom and built-in plan section is comprised of a series of fields and options. It is these fields and options which will be filled in by users during plan and review data entry, and which will be displayed with read-only values in plan/review reports.
The fields/options portion of any plan section is highly configurable; to do so, complete one or more of the following tasks as needed. Be sure to click Save at the bottom of the page to apply your changes after each task is completed.
![]() Change or set the name of the section heading - At the top of each section's field/options is a heading which defaults from the template with which the plan was created, or to "Custom" if you have added a new custom section. For example:
Change or set the name of the section heading - At the top of each section's field/options is a heading which defaults from the template with which the plan was created, or to "Custom" if you have added a new custom section. For example:
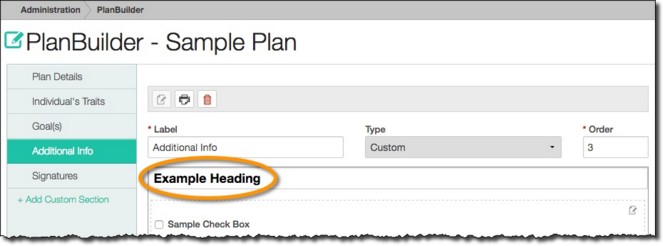
To change the name of the heading, select it and overwrite the existing text.
![]() Make this section optional - To do so, click the Make this Section Optional checkbox. When checked, an "+Add [Section Name]" option will be added to left-hand menu of the plans/reviews in data entry mode. If the section should be included in a given plan/review, this "+Add" option must be clicked during the plan/review data entry process in order for it to be displayed as part of the plan. When unchecked, this section is automatically listed in the plans/reviews data entry left-hand menu as part of the plan.
Make this section optional - To do so, click the Make this Section Optional checkbox. When checked, an "+Add [Section Name]" option will be added to left-hand menu of the plans/reviews in data entry mode. If the section should be included in a given plan/review, this "+Add" option must be clicked during the plan/review data entry process in order for it to be displayed as part of the plan. When unchecked, this section is automatically listed in the plans/reviews data entry left-hand menu as part of the plan.
![]() Add a new field/option - To do so, in the right-hand menu click the type of field/option to be added, drag it over to the location on the plan where it should be placed, and then drop it.
Add a new field/option - To do so, in the right-hand menu click the type of field/option to be added, drag it over to the location on the plan where it should be placed, and then drop it.
Available field/option types are as follows:
![]() Checkbox - Displays a single checkbox with the Field Label above it.
Checkbox - Displays a single checkbox with the Field Label above it.
![]() Checklist - Displays a series of checkboxes where one or more of the checkboxes can be checked off during the plan data entry process.
Checklist - Displays a series of checkboxes where one or more of the checkboxes can be checked off during the plan data entry process.
![]() Dynamic Section - Displays a section of the client's chart on the plan in report mode. The contents of that section are automatically updated when the corresponding portion of the client's chart is updated, unless/until the plan is locked with an effective date or is electronically signed. After a plan is completed and/or signed, updates to the information in the corresponding records will not impact the version of the information shown on the plan.
Dynamic Section - Displays a section of the client's chart on the plan in report mode. The contents of that section are automatically updated when the corresponding portion of the client's chart is updated, unless/until the plan is locked with an effective date or is electronically signed. After a plan is completed and/or signed, updates to the information in the corresponding records will not impact the version of the information shown on the plan.
![]() Instructions - Displays a text area fill-in field where instructions can be entered for completing another field/section of the plan. The text entered here will display in read-only report mode on the plan in the order in which it is configured.
Instructions - Displays a text area fill-in field where instructions can be entered for completing another field/section of the plan. The text entered here will display in read-only report mode on the plan in the order in which it is configured.
![]() Radio - Displays a series of radio buttons where only one value may be selected on the plan. Once a value is selected, it cannot be de-selected; instead, a different value must be chosen from those that are available.
Radio - Displays a series of radio buttons where only one value may be selected on the plan. Once a value is selected, it cannot be de-selected; instead, a different value must be chosen from those that are available.
![]() Selection List - Displays a drop-down list of values where only one value can be selected.
Selection List - Displays a drop-down list of values where only one value can be selected.
![]() Textbox - Displays a small text area fill-in field on the plan where up to 35 characters of text can be entered.
Textbox - Displays a small text area fill-in field on the plan where up to 35 characters of text can be entered.
![]() Textarea - Displays a text area fill-in field on the plan where up to 10 rows of text can be entered.
Textarea - Displays a text area fill-in field on the plan where up to 10 rows of text can be entered.
Once a new field/option has been dropped onto the plan, a pop-up window is displayed. This pop-up contains several tabs where configuration options can be set for the field/option. Configure these tabs as follows. When you've finished, click Done to close data entry and display the new field/option on the page in preview mode, and then click Save at the bottom of the page to apply your changes.
![]() Field Details Tab
Field Details Tab
- Field Label - In this field, type the label that should be shown for this field/option in the plan in data entry mode. If the field should be labeled differently for reporting purposes, click Add Report Field Label and enter a value for Report Field Label; otherwise the same label is used in both data entry and report modes.
- Description - In this field, type any hints that may be helpful to users as they work to complete the plan. The description entered here will be displayed to the - user as a mouseover when working in the plan in data entry mode.
- Field Type - Defaults to the type of field/option dragged over from the right-hand menu, but can be changed as needed by clicking the drop-down arrow and making a new selection.
- Field Value - Available when the field type is "Dynamic Section." Click this drop-down arrow and select the type of individual record information to be displayed on the plan. Available options are "Medications," "Diagnoses," "Vital Signs," "Providers," "Provider Appointments (Future)," "Diet Info," "Implantable Devices," " Diagnostic Tests," " Laboratory Orders," "Client Identifiers," and "Tasks."
- Validation Rule - Available when the field type is "Textbox." If the text that will be entered into this field on the plan should conform to a specific format, click this drop-down arrow and make a selection. Available options are "None," "Date," "Decimal," "Email," "Integer," and "Phone Number."
- Title - Available when the field type is "Radio," "Selection List," "Textbox," or "Textarea." Displays as the main field for a goal/object/intervention. When selected, this will be the field label that displays in a service plan linked note written against the plan/review.
- Disabled - Fields/options that have data saved in them in any plan are not available for deletion; however, if the field/option should no longer be available for data entry purposes, click the Disable checkbox. Moving forward the field/option will not be displayed in data entry mode, but any values previously entered in it will still be available for reporting purposes. (If it's ever necessary to re-enable this field/option in the future, uncheck the Disable checkbox.)
- Required - Click this checkbox if the field/option is to be required during plan data entry.
- Read Only - Available when the field type is "Textbox" or "Textarea." Click this checkbox if the specified default value is to be read-only during plan data entry.
- Show for Review only - Click this checkbox if the field/option should not be included on initial plans and should instead be limited to reviews only.
![]() TIP: If every field within a section is designed "Show for Reviews Only," that entire section will be hidden on initial plans and be visible only for plan reviews.
TIP: If every field within a section is designed "Show for Reviews Only," that entire section will be hidden on initial plans and be visible only for plan reviews.
- Value Type - Click this drop-down arrow and select "Calculated," "Dynamic," or "Other" to indicate the type of value to be recorded using this field/option. "Calculated" should be used in conjunction with "Calculation Type" (described below) when a calculation is required. "Dynamic" should be selected if this field/option is to pull in a variable from those available in the Demographics ReportBuilder. "Other" enables you to always have the field pre-populate with data, for example if you wanted a goal field to always default to "To find stable housing."
- Calculated - A Calculation Type drop-down is available when the Value Type is "Calculated." Click this drop-down arrow and select the type of calculation for the field. Available options are:
![]() COUNT - Calculates the number of times a certain response is given to the selected computation items on the form. When this option is selected, Computation Count Value is required. In that field, enter the value to be counted; for example counting the number of "yes" responses to a series of questions.
COUNT - Calculates the number of times a certain response is given to the selected computation items on the form. When this option is selected, Computation Count Value is required. In that field, enter the value to be counted; for example counting the number of "yes" responses to a series of questions.
![]() DIFFERENCE - Subtracts the value of one form field from another.
DIFFERENCE - Subtracts the value of one form field from another.
![]() NOTE: When this computation type is used, any fields without values in them will act as zeroes. Additionally, if the first number in the equation is less than the second number or zero, the computed value will be a negative number.
NOTE: When this computation type is used, any fields without values in them will act as zeroes. Additionally, if the first number in the equation is less than the second number or zero, the computed value will be a negative number.
![]() PRODUCT - Multiplies the value of one form field by another.
PRODUCT - Multiplies the value of one form field by another.
![]() NOTE: When this computation type is used, any fields without values in them will act as zeroes. Additionally, if any of the field values are zero, the computed value will also be zero.
NOTE: When this computation type is used, any fields without values in them will act as zeroes. Additionally, if any of the field values are zero, the computed value will also be zero.
![]() QUOTIENT - Divides the value of one form field from another.
QUOTIENT - Divides the value of one form field from another.
![]() NOTE: When this computation type is used, any fields without values in them will act as zeroes. Additionally, if the first value in the equation is zero, the computed value will also be zero. If the second value in the equation is zero, no calculation will be done and the computed value will be blank.
NOTE: When this computation type is used, any fields without values in them will act as zeroes. Additionally, if the first value in the equation is zero, the computed value will also be zero. If the second value in the equation is zero, no calculation will be done and the computed value will be blank.
![]() SUM - Adds together numeric responses to the selected computation items on the form, for example adding together the total "score" for a series of questions.
SUM - Adds together numeric responses to the selected computation items on the form, for example adding together the total "score" for a series of questions.
Once a selection is made, click the Fields drop-down arrow and select the name of the existing field/option to be used for calculation. "Other Value" is available when "Sum" or "Count" are selected as the calculation type; it enables you to add another number to your sum or count.
- Dynamic - A Default Value option is available when the field type is anything other than "Dynamic Section" AND the Value Type is set to "Dynamic." If the field/option should have a default value on the plan, specify that value here by using the type-ahead search field and then making a selection from the displayed results list. (Available selections include those data variables available on the Demographics ReportBuilder.) The value specified will populate this portion of the plan automatically, but can be overwritten as needed (unless the "Read Only" option has been checked for this field).
- Other - A Custom Default Value option is available when the Value Type is "Other." The value specified here will populate this portion of the plan/review automatically. Unless the "Read Only" option is checked for this field, this default value can be overwritten during plan/review data entry as needed.
![]() Display Options Tab
Display Options Tab
- Conditionally Displayed & Required - Based On - If the field/option being entered should only display based on a specific response to another field/option on the plan review, AND/OR if the field/option should only be required based on a specific response to another field/option, click this drop-down arrow and select the name of the existing field/option on which the requirement for this new field/option will be based.
![]() TIP: This option can only be selected if there is at least one other field/option in the plan section. In such cases, the Conditionally Displayed & Required selection list includes those fields/options previously added to that plan section.
TIP: This option can only be selected if there is at least one other field/option in the plan section. In such cases, the Conditionally Displayed & Required selection list includes those fields/options previously added to that plan section.
In the field below the selection list specify a response that, if entered in the conditional section of the plan, will cause this new field/option to be displayed and/or required. Click the corresponding Display and/or Require checkboxes as needed.
![]() TIP: For example, if field 1 is "Hospitalized this year?" and field 2 is "If so, which hospital?" these options can be used to set up field 2 so that it is displayed only if the answer to field 1 is "yes." To do so, when creating field 2 you'd make "Hospitalized this year?" the conditionally required selection, enter "yes" in the response field, and check off Display. If field 2 should also be required when field 1 is answered with "yes," you'd also check off Require here.
TIP: For example, if field 1 is "Hospitalized this year?" and field 2 is "If so, which hospital?" these options can be used to set up field 2 so that it is displayed only if the answer to field 1 is "yes." To do so, when creating field 2 you'd make "Hospitalized this year?" the conditionally required selection, enter "yes" in the response field, and check off Display. If field 2 should also be required when field 1 is answered with "yes," you'd also check off Require here.
Additional response fields/options will be made available by clicking Click to add.
![]() List Options Tab
List Options Tab
- Options List - Available when the field type is "Checklist," "Radio," or "Selection List." Click this drop-down arrow and select "Custom List" to create your own selections, or a "Predefined List" to use a standard set of selection options.
![]() NOTE: Predefined lists include "Service Types", "Group Linkage," and "Program," the latter of which is designed to assign goals to particular programs within a Care Plan during the data entry process. Keep in mind that when "Group Linkage" is selected it will be available on the goal/objectives/interventions level of the plan, and can only be assigned to one field/option on that plan.
NOTE: Predefined lists include "Service Types", "Group Linkage," and "Program," the latter of which is designed to assign goals to particular programs within a Care Plan during the data entry process. Keep in mind that when "Group Linkage" is selected it will be available on the goal/objectives/interventions level of the plan, and can only be assigned to one field/option on that plan.
When "Custom List" is chosen, the selection options must be defined using the Option, Code, and Order table. Click the first row to add an item. In the Option field type the value to be shown on the plan or selection list. If appropriate, specify a Code that corresponds to the value, and then specify its Order in the list. Repeat as needed until all options have been added. (To remove an option, click the green x to the right of the row to be deleted.)
![]() CCDA
CCDA
- CCDA Section Field - Available for programs using Interoperability. If "Goals" was selected using the CCDA Section option on the previous page, click this drop-down arrow and select "Goal Description" or "Health Concern Description." If "Health Concerns" was selected on the previous page, the only available selection here is "Health Concern Description." This option allows a PlanBuilder section to be associated with a related health concern or a specific dated health record if applicable (for example, a specific medication, a vital sign taken on a specific date, a specific allergy, a specific diagnosis). The specific concern is selected by the plan reviewer when working with individual plans/reviews.
Reminder, when you've finished configuring the above fields/options, click Done to close data entry and display the new field/option on the page in preview mode, and then click Save at the bottom of the page to apply your changes.
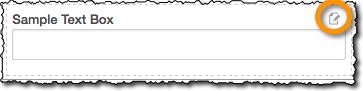
![]() Make changes to an existing field/option - To do so, click the edit icon corresponding to the field/option to be changed.
Make changes to an existing field/option - To do so, click the edit icon corresponding to the field/option to be changed.
The configuration pop-up window is displayed for the field/option to be edited. Make changes as necessary. When you've finished, click Done to close data entry and display the new field/option on the page in preview mode, and then click Save at the bottom of the page to apply your changes.
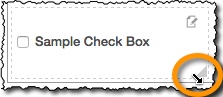
![]() Delete an existing field/option - To do so, click the field option's edit icon (shown in the image above) to open it in data entry mode, and then click the delete icon in the bottom-right corner. A confirmation pop-up is displayed. Click OK to proceed with the deletion, and then click Save to finalize the change to the plan section.
Delete an existing field/option - To do so, click the field option's edit icon (shown in the image above) to open it in data entry mode, and then click the delete icon in the bottom-right corner. A confirmation pop-up is displayed. Click OK to proceed with the deletion, and then click Save to finalize the change to the plan section.
![]() Re-order and/or re-size the section's fields/options - When a plan section has more than one field/option, they can be dragged and dropped on the page to re-order them. The order in which they are displayed here is how they will appear on the plan in data entry and report mode in the Plans and Reviews feature for users. Additionally, individual fields and options can be re-sized by hovering over the bottom-right corner to display the gray triangle, and then clicking and dragging the field/option until it is the appropriate size.
Re-order and/or re-size the section's fields/options - When a plan section has more than one field/option, they can be dragged and dropped on the page to re-order them. The order in which they are displayed here is how they will appear on the plan in data entry and report mode in the Plans and Reviews feature for users. Additionally, individual fields and options can be re-sized by hovering over the bottom-right corner to display the gray triangle, and then clicking and dragging the field/option until it is the appropriate size.
Label
In this field, type or make changes to the name of the plan section being worked with. The value entered her is what is displayed for the section in the left-hand menu while working with the plan throughout AWARDS.
Order
In this field, type or make changes to the numerical placement of the plan section on the left-hand menu; for example, if the section should be at the top (just below Plan Details," which is always listed first), a value of "1" should be specified here. The default order value for new custom sections is at the bottom of the left-hand menu, or just above the Signatures section (if one has been set up).
Available for programs using Interoperability. Click the drop-down arrow and select either "Goals" or "Health Concerns" to distinguish whether the plan component is a goal or health concern. If "Goals" is selected, the start date is the goal date. If "Health Conditions" is selected, further refinement of which health condition it is for will be available to the reviewer completing an individual plan/review.
Type
This is read-only information that reflects the type of plan section being worked with.
Return to the top of the page.
When a signature section is added to a plan using the + Add Signature Section option in the-left hand menu, the Signatures Index page is displayed. Each plan/review's signature section as configured on this page is comprised of three components:
![]() Order Levels - A signature section's order levels enable you to group like signatures together for organizational purposes. They also enable you to determine the workflow for signing by determining whether one or more signatures from a given order level must be applied to the plan before individuals within the second order level will be allowed to sign, and so on. Based on these requirements AWARDS will recognize which order levels are currently open for signing on any given plan, and notify relevant employees via AWARDS Messages.
Order Levels - A signature section's order levels enable you to group like signatures together for organizational purposes. They also enable you to determine the workflow for signing by determining whether one or more signatures from a given order level must be applied to the plan before individuals within the second order level will be allowed to sign, and so on. Based on these requirements AWARDS will recognize which order levels are currently open for signing on any given plan, and notify relevant employees via AWARDS Messages.
![]() Signature Lines - The signature lines for each order level are displayed in a sub-index beneath that order level's header and requirements information. It is here you will set which signatures are to be part of the plan/review, what type of individual is to sign in each case, and whether there are any requirements or optional settings allowed in each instance.
Signature Lines - The signature lines for each order level are displayed in a sub-index beneath that order level's header and requirements information. It is here you will set which signatures are to be part of the plan/review, what type of individual is to sign in each case, and whether there are any requirements or optional settings allowed in each instance.
![]() Signatures Set - The entirety of a plan/review's signature section is referred to as a "set." Each set can be comprised of one or more order levels, along with one or more signature lines within each of those order levels.
Signatures Set - The entirety of a plan/review's signature section is referred to as a "set." Each set can be comprised of one or more order levels, along with one or more signature lines within each of those order levels.
![]() IMPORTANT! If any portion of a signature set that has been used on a signed plan/review is changed in any way, AWARDS must inactivate the entire set (as of today's date). When you attempt to make a change in these instances a confirmation pop-up is displayed. To proceed with inactivating the signature set and creating a new duplicate set in which changes can be made, click Yes, and then click OK to acknowledge that your new set has been created. To inactivate the entire signature set WITHOUT creating a duplicate copy of that set, click No. The inactivated version of the set is kept as part of already signed plans/reviews, while moving forward the new active version of the set (if you have chosen to create one) is applied to all unsigned plans/reviews using this signature configuration.
IMPORTANT! If any portion of a signature set that has been used on a signed plan/review is changed in any way, AWARDS must inactivate the entire set (as of today's date). When you attempt to make a change in these instances a confirmation pop-up is displayed. To proceed with inactivating the signature set and creating a new duplicate set in which changes can be made, click Yes, and then click OK to acknowledge that your new set has been created. To inactivate the entire signature set WITHOUT creating a duplicate copy of that set, click No. The inactivated version of the set is kept as part of already signed plans/reviews, while moving forward the new active version of the set (if you have chosen to create one) is applied to all unsigned plans/reviews using this signature configuration.
![]() TIP: To toggle between viewing active and inactive signature sets on the Signatures Index page, use the Show Records options at the top of the page. Active signature sets are displayed by default.
TIP: To toggle between viewing active and inactive signature sets on the Signatures Index page, use the Show Records options at the top of the page. Active signature sets are displayed by default.
Order Levels
When a signature section is added to a plan/review, it initially has one default order level. Additional order levels can be added using the +Add Order Level link at the top of the page.
![]() IMPORTANT! If any portion of a signature set to which you are adding an order level has been used on a signed plan/review, AWARDS must inactivate the entire set (as of today's date). When you click +Add Order Level in these instances, a confirmation pop-up is displayed. Click Yes to proceed within inactivating the signature set and creating a new duplicate set, and then click OK to acknowledge that your new set has been created. The index page is then refreshed and you can proceed with adding your new order level, as well as making any other changes or additions that are needed. (Clicking No will inactivate the entire signature set WITHOUT creating a duplicate copy of that set.) Note that in all instances the inactivated version of a set is kept as part of already signed plans/reviews, while moving forward the new active version of the set, including your new order level, is applied to all unsigned plans/reviews using this signature configuration.
IMPORTANT! If any portion of a signature set to which you are adding an order level has been used on a signed plan/review, AWARDS must inactivate the entire set (as of today's date). When you click +Add Order Level in these instances, a confirmation pop-up is displayed. Click Yes to proceed within inactivating the signature set and creating a new duplicate set, and then click OK to acknowledge that your new set has been created. The index page is then refreshed and you can proceed with adding your new order level, as well as making any other changes or additions that are needed. (Clicking No will inactivate the entire signature set WITHOUT creating a duplicate copy of that set.) Note that in all instances the inactivated version of a set is kept as part of already signed plans/reviews, while moving forward the new active version of the set, including your new order level, is applied to all unsigned plans/reviews using this signature configuration.
For each order level, the following fields/options can be configured:
![]() Order Level Header - In this field, type or make changes to the overall label for the signatures being configured. This is an optional field that, if filled in, will be displayed above this group of signatures in the Plans and Reviews feature.
Order Level Header - In this field, type or make changes to the overall label for the signatures being configured. This is an optional field that, if filled in, will be displayed above this group of signatures in the Plans and Reviews feature.
![]() NOTE: All order level header data entry is saved automatically; no manual save is needed.
NOTE: All order level header data entry is saved automatically; no manual save is needed.
![]() Order Level - Defaults to the next numerical value based on the number of existing order levels, beginning with 1, but can be changed as needed to adjust the order level's display within the signature section; to do so, click the available drop-down arrow and select the correct number. Adjust the order level of any other signature sections for the plan accordingly so that there are no duplicate numbers.
Order Level - Defaults to the next numerical value based on the number of existing order levels, beginning with 1, but can be changed as needed to adjust the order level's display within the signature section; to do so, click the available drop-down arrow and select the correct number. Adjust the order level of any other signature sections for the plan accordingly so that there are no duplicate numbers.
![]() NOTE: All order level selections are saved automatically; no manual save is needed.
NOTE: All order level selections are saved automatically; no manual save is needed.
![]() IMPORTANT! If the order level of a signature section is changed, the ordering of other signature sections for the plan are NOT automatically adjusted to reflect the change; for example, if there are two signature sections and the order level for section 2 is changed to 1, the numbering on the section that was originally 1 must be manually changed to reflect that it is now 2.
IMPORTANT! If the order level of a signature section is changed, the ordering of other signature sections for the plan are NOT automatically adjusted to reflect the change; for example, if there are two signature sections and the order level for section 2 is changed to 1, the numbering on the section that was originally 1 must be manually changed to reflect that it is now 2.
![]() Require Before Next - Click this drop-down and make a selection to indicate how many (if any) signatures from this order level must be applied to the plan/review before individuals from the next order level will be able to sign. Available options are:
Require Before Next - Click this drop-down and make a selection to indicate how many (if any) signatures from this order level must be applied to the plan/review before individuals from the next order level will be able to sign. Available options are:
- One - When selected, only one of any of the signatures configured in this order level is required in order for individuals form the next order level to also sign the plan/review. As soon as one of these signatures has been applied, any employees from the next order level will be notified via an AWARDS Message that the plan is now available for their signatures. (Notifications require that the signature type for the signatures be set to "Employee.")
- All - When selected, all of the signatures configured in this order level are required in order for individuals from the next order level to also sign the plan/review. As soon as all of these signatures have been applied, any employees from the next order level will be notified via an AWARDS Message that the plan is now available for their signatures. (Notifications require that the signature type for the signatures be set to "Employee.")
![]() NOTE: During the Plans and Reviews data entry process, the plan/review will automatically display an "Other Signatures Required Before Signing is Available" note for any signature lines not yet open for signing based on the rules set here, and signing will be prevented until the rule requirement(s) are met.
NOTE: During the Plans and Reviews data entry process, the plan/review will automatically display an "Other Signatures Required Before Signing is Available" note for any signature lines not yet open for signing based on the rules set here, and signing will be prevented until the rule requirement(s) are met.
The default value is no selection - a blank - meaning that there are no requirements for that order level. Leaving this selection blank for all order levels should only be used in the event that you don't have any workflow specifications for the plan and any individual configured to sign can do so at any time. A blank requirement can also be set for the last order level on the plan in all instances.
![]() NOTE: All require before next selections are saved automatically; no manual save is needed.
NOTE: All require before next selections are saved automatically; no manual save is needed.
![]() IMPORTANT! Available for e-signing messages tip!
IMPORTANT! Available for e-signing messages tip!
When setting up your order levels, please take into consideration that when the signatures page is saved under Plans and Reviews for the first time, it will result in an automatically generated AWARDS message to any employee(s) configured to sign the plan as part of the first order level. Because the plan/review might not be fully ready for signing at that time we recommend limiting the first order level to only the employee who can designate that the plan/review is done, and setting the requirement for that order level to "All." That way, once they've signed the plan it will be locked from further edits and any employee(s) in the second and/or subsequent order levels will be notified that signing is now available to them (based on whatever requirement rules have been established for each of the plan's order levels).
For example, imagine that a program's workflow requires that the plan reviewer finalize and sign the plan. Once that's been done, either the client or his/her guardian must sign, and then as a final step in the process the reviewer's supervisor and/or the program director sign off on the plan as well. To configure the plan/review's signature section in this way, you'd want to set it up to look as follows:
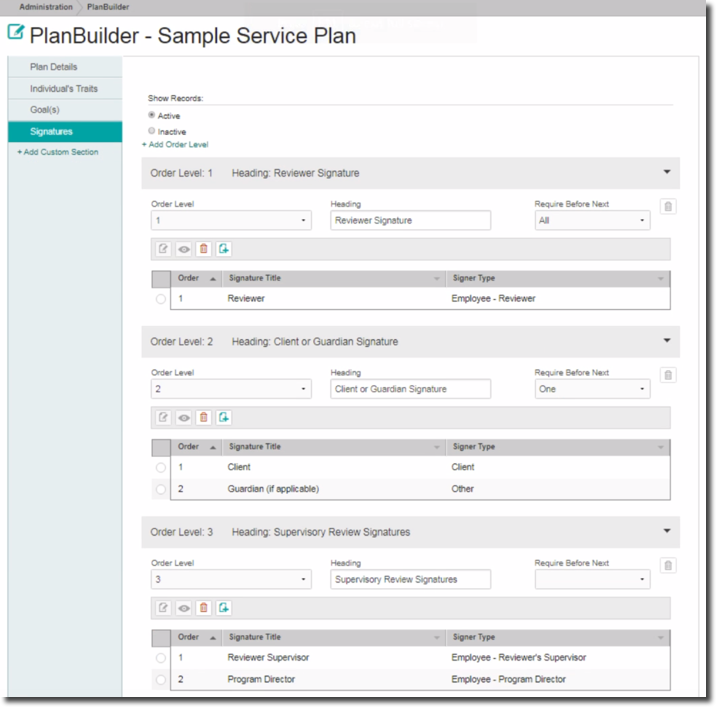
In this sample configuration Require Before Next is set to "All" for the first order level because in this scenario no one but the plan reviewer should be allowed to sign the plan initially. As soon as the signatures page of the plan has been saved under Plans and Reviews, the selected (or default) reviewer designated there will be notified that he/she can sign the plan. Once that signature has been applied, either the client OR the guardian must sign the plan, as indicated with a Require Before Next selection of "One" in the second order level. The application of that signature will result in the plan being opened for a supervisory review (represented by order level three), and at that time both the reviewer's supervisor and the program directory will receive an AWARDS message alerting them to that fact. Note that in order level three of this example, no Require Before Next selection was necessary because it's the last order level on the plan.
![]() TIP: When considering your e-signatures workflow and setting up signing requirements that will trigger notification messages, keep in mind that a corresponding Ready for E-Signature Notification option is available under Notifications for all users who have the Receive External Email Notifications permission assigned to them under System Setup > Permissions Maintenance. Users with this permission can receive external email notifications when an internal audit message is set to them within AWARDS letting them know when a note is available for signing. In order for those notifications to be sent, the Notifications feature must be configured.
TIP: When considering your e-signatures workflow and setting up signing requirements that will trigger notification messages, keep in mind that a corresponding Ready for E-Signature Notification option is available under Notifications for all users who have the Receive External Email Notifications permission assigned to them under System Setup > Permissions Maintenance. Users with this permission can receive external email notifications when an internal audit message is set to them within AWARDS letting them know when a note is available for signing. In order for those notifications to be sent, the Notifications feature must be configured.
Each order level also contains a sub-index of configured signature lines, along with an action bar for adding, editing, viewing, and deleting those signature lines. (Each of these actions and any corresponding data entry fields/options is detailed below). The order level itself also has a delete icon available for it; however, it's important to keep in mind that an order level cannot be deleted unless all of the signature lines it contains are deleted first.
Once a signature order level has been created, signatures can be added to it. Moving forward those signature lines can also be edited, viewed, and deleted using the following tools:
![]() IMPORTANT! If any portion of a signature set to which you are making a change has been used on a signed plan/review, AWARDS must inactivate the entire set (as of today's date) and then create a new copy, which be added to or edited as needed. When you click a signature radio button and click an action bar icon in these instances, a confirmation pop-up is displayed. To proceed with inactivating the signature set and creating a new duplicate set in which changes can be made, click Yes, and then click OK to acknowledge that your new set has been created. (The index is refreshed and you can then proceed with your edits.) To inactivate the entire signature set WITHOUT creating a duplicate copy of that set, click No. Note that in all instances the inactivated version of a set is kept as part of already signed plans/reviews, while moving forward the new active version of the set (if you have chosen to create one) is applied to all unsigned plans/reviews using this signature configuration.
IMPORTANT! If any portion of a signature set to which you are making a change has been used on a signed plan/review, AWARDS must inactivate the entire set (as of today's date) and then create a new copy, which be added to or edited as needed. When you click a signature radio button and click an action bar icon in these instances, a confirmation pop-up is displayed. To proceed with inactivating the signature set and creating a new duplicate set in which changes can be made, click Yes, and then click OK to acknowledge that your new set has been created. (The index is refreshed and you can then proceed with your edits.) To inactivate the entire signature set WITHOUT creating a duplicate copy of that set, click No. Note that in all instances the inactivated version of a set is kept as part of already signed plans/reviews, while moving forward the new active version of the set (if you have chosen to create one) is applied to all unsigned plans/reviews using this signature configuration.
![]()
![]() Add a new signature line - To do so, click the Add New icon from the action bar in the order level to which the signature line is being added. A new data entry page is displayed. Configure the fields and options on this page as needed, and then click Save. The signature line is saved and a confirmation page is displayed. This new signature line is now included as part of any unsigned instances of this plan under Plans and Reviews.
Add a new signature line - To do so, click the Add New icon from the action bar in the order level to which the signature line is being added. A new data entry page is displayed. Configure the fields and options on this page as needed, and then click Save. The signature line is saved and a confirmation page is displayed. This new signature line is now included as part of any unsigned instances of this plan under Plans and Reviews.
![]() TIP: For more information on each field/option available on the data entry page, see Signature Line Fields/Options below.
TIP: For more information on each field/option available on the data entry page, see Signature Line Fields/Options below.
![]()
![]() Edit an existing signature line - To do so, click the signature to be updated, or click the radio button to the left of that record, and then click the edit icon from the action bar corresponding to the order level you are working with. The data entry page is displayed. Make changes to the information on this page as needed, and then click Save. The signature line is saved and a confirmation page is displayed. Any changes made are included as part of any unsigned instances of this page under Plans and Reviews.
Edit an existing signature line - To do so, click the signature to be updated, or click the radio button to the left of that record, and then click the edit icon from the action bar corresponding to the order level you are working with. The data entry page is displayed. Make changes to the information on this page as needed, and then click Save. The signature line is saved and a confirmation page is displayed. Any changes made are included as part of any unsigned instances of this page under Plans and Reviews.
![]() TIP: For more information on each field/option available on the data entry page, see Signature Line Fields/Options below.
TIP: For more information on each field/option available on the data entry page, see Signature Line Fields/Options below.
![]()
![]() View or print an existing signature line's configuration - To do so, click the signature for which the configuration settings are to be viewed, or click the radio button to the left of that record, and then click the view icon from the action bar corresponding to the order level you are working with. A read-only version of the record is displayed and can be printed as needed using your browser's print option.
View or print an existing signature line's configuration - To do so, click the signature for which the configuration settings are to be viewed, or click the radio button to the left of that record, and then click the view icon from the action bar corresponding to the order level you are working with. A read-only version of the record is displayed and can be printed as needed using your browser's print option.
![]()
![]() Delete a signature line - To do so, click the signature to be deleted or click the radio button to the left of that record, and then click the delete icon from the action bar corresponding to the order level you are working with. A confirmation message is displayed. Click OK to proceed with the deletion. The signature line is deleted, the updated signatures index is displayed, and the signature line is no longer included as part of this plan under Plans and Reviews.
Delete a signature line - To do so, click the signature to be deleted or click the radio button to the left of that record, and then click the delete icon from the action bar corresponding to the order level you are working with. A confirmation message is displayed. Click OK to proceed with the deletion. The signature line is deleted, the updated signatures index is displayed, and the signature line is no longer included as part of this plan under Plans and Reviews.
![]() TIP: To return to the signatures index for the plan/review you are working with at any time, click Signatures from the left-hand menu.
TIP: To return to the signatures index for the plan/review you are working with at any time, click Signatures from the left-hand menu.
As noted above, when a signature line is added or edited, the signature configuration data entry page is displayed:
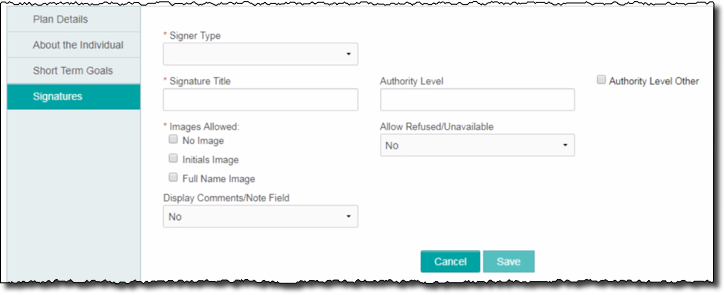
Configure the following fields/options on this page as needed (listed in order of their appearance on the page), and then click Save to complete the data entry process. The new/edited signature line is then saved, a confirmation page is displayed, and unsigned plans/reviews are automatically updated to reflect your work.
- Client - When selected, only the individual for whom a plan has been filled out can sign that plan with staff assistance.
- Employee - When selected, an employee selection list is placed on the plan when it is opened in data entry mode. The selection defaults to the individual meeting the selected Signer Role for this signature; however, changes can be made to that selection as needed. (A selection must be made from that list to enable the selected individual to sign there electronically. The list is comprised of any staff person with chart access to the program in which a plan/review is being completed.)
- Other - When selected, someone other than a client or employee can sign the plan. In order to do so, that individual must be assisted by a staff member with access to the plan.
![]() Default Signer Role - Only available when the Signer Type is set to "Employee." Click this drop-down arrow and select the type of individual who will be signing the plan. If a selection is made, the employee selection list placed on the plan for this signature when it is opened in data entry mode defaults to the appropriate individual; otherwise, a selection must be made from the list and saved to enable the selected individual to sign there electronically. Available options are:
Default Signer Role - Only available when the Signer Type is set to "Employee." Click this drop-down arrow and select the type of individual who will be signing the plan. If a selection is made, the employee selection list placed on the plan for this signature when it is opened in data entry mode defaults to the appropriate individual; otherwise, a selection must be made from the list and saved to enable the selected individual to sign there electronically. Available options are:
- Primary Worker - When selected, the primary service coordinator of the individual as of a plan's effective date (or as of the due date if there is no effective date) can electronically sign that plan. If a primary worker has not been set for the individual, this signature slot on the plan will be left blank with the option of manually selecting an employee for signing purposes.
![]() NOTE: Primary worker (service coordinator) information is maintained using the Services - Individual module's Service Coordinators feature.
NOTE: Primary worker (service coordinator) information is maintained using the Services - Individual module's Service Coordinators feature.
- Reviewer - When selected, the employee who has been set as the reviewer of a plan can electronically sign that plan.
- Reviewer's Supervisor - When selected, work supervisors can electronically sign the plan if one of their supervisees is set as the reviewer of that plan.
![]() NOTE: Work supervisor information is maintained using the Human Resources module Staff Information feature.
NOTE: Work supervisor information is maintained using the Human Resources module Staff Information feature.
- Program Director - When selected, the program director of the program in which a plan was completed can electronically sign that plan.
![]() NOTE: Program director assignments are maintained using the System Setup module, Agency Program Information, Configure Administration feature.
NOTE: Program director assignments are maintained using the System Setup module, Agency Program Information, Configure Administration feature.
- Program Deputy Director - When selected, the deputy program director of the program in which a plan was completed can electronically sign that plan.
![]() NOTE: Program deputy assignments are maintained using the System Setup module, Agency Program Information, Configure Administration feature. If more than one deputy has been configured for the program, the employee selection list for this signature slot will default to the first of those deputies; however, both will have the option of signing the plan until one is specifically saved as the signer during the signing process.
NOTE: Program deputy assignments are maintained using the System Setup module, Agency Program Information, Configure Administration feature. If more than one deputy has been configured for the program, the employee selection list for this signature slot will default to the first of those deputies; however, both will have the option of signing the plan until one is specifically saved as the signer during the signing process.
![]() Lock Employee Drop-Down - Click this drop-down arrow and select "Yes" to prevent the worker listed as the default signer on the plan from being changed when entering or signing the plan. If "No" is selected, or if this option is left at its default "blank" value, the default signer selection can be changed if needed.
Lock Employee Drop-Down - Click this drop-down arrow and select "Yes" to prevent the worker listed as the default signer on the plan from being changed when entering or signing the plan. If "No" is selected, or if this option is left at its default "blank" value, the default signer selection can be changed if needed.
![]() NOTE: This option is only available for signatures where the Signer Type is "Employee," AND the Default Signer Role option has been selected.
NOTE: This option is only available for signatures where the Signer Type is "Employee," AND the Default Signer Role option has been selected.
![]() Signature Title - In this field, type or make changes to the label to be placed on the plan for this electronic signature.
Signature Title - In this field, type or make changes to the label to be placed on the plan for this electronic signature.
![]() TIP: A title is not required if the Signer Type has been set to "Client." If one is not entered, the signature label defaults to the terminology set up for the program behind-the-scenes; for example, individual, client, consumer, member, etc., as reflected in Consumer name drop-downs throughout AWARDS.
TIP: A title is not required if the Signer Type has been set to "Client." If one is not entered, the signature label defaults to the terminology set up for the program behind-the-scenes; for example, individual, client, consumer, member, etc., as reflected in Consumer name drop-downs throughout AWARDS.
![]() Authority Level / Other Authority Level - In this field, type or make changes to the selected signer type's authority level. If the signer should be allowed to enter his or her own authority level information, check the corresponding Authority Level Other checkbox. If neither option is configured, the signer will not have an authority level associated with his/her signature during the signing process.
Authority Level / Other Authority Level - In this field, type or make changes to the selected signer type's authority level. If the signer should be allowed to enter his or her own authority level information, check the corresponding Authority Level Other checkbox. If neither option is configured, the signer will not have an authority level associated with his/her signature during the signing process.
![]() Message Notifications Suspended - By default when a record is ready for electronic signing an internal notification message is generated and sent to the anticipated signer via AWARDS Messages. In some agencies where signatures are applied immediately in all cases these notifications are not necessary. To have them turned off in such instances, click this toggle to set it to "Yes."
Message Notifications Suspended - By default when a record is ready for electronic signing an internal notification message is generated and sent to the anticipated signer via AWARDS Messages. In some agencies where signatures are applied immediately in all cases these notifications are not necessary. To have them turned off in such instances, click this toggle to set it to "Yes."
![]() Images Allowed - Only available when the Signer Type is set to "Employee" or "Client." Click the checkbox next to each image type to be available for use during the signing process when using a PIN and uploaded image. Available options are "No Image," "Initials Image," and "Full Name Image." At least one selection must be made.
Images Allowed - Only available when the Signer Type is set to "Employee" or "Client." Click the checkbox next to each image type to be available for use during the signing process when using a PIN and uploaded image. Available options are "No Image," "Initials Image," and "Full Name Image." At least one selection must be made.
![]() Allow Refused/Unavailable - By default the only option available to signers is to record a signature, with no way to indicate a refusal to sign or to allow anyone else to record that they may be unavailable to sign for any reason. To allow recording of such a refusal or unavailability for this signature, click this drop-down arrow and select "Yes." When "Yes" is selected the signing process will include a Click for Refused/Unavailable option that will enable anyone with access to the plan to record a refusal or unavailability, and to specify a corresponding Reason.
Allow Refused/Unavailable - By default the only option available to signers is to record a signature, with no way to indicate a refusal to sign or to allow anyone else to record that they may be unavailable to sign for any reason. To allow recording of such a refusal or unavailability for this signature, click this drop-down arrow and select "Yes." When "Yes" is selected the signing process will include a Click for Refused/Unavailable option that will enable anyone with access to the plan to record a refusal or unavailability, and to specify a corresponding Reason.
![]() NOTE: Recorded refusals/unavailability will be captured in the Audit Trail ReportBuilder.
NOTE: Recorded refusals/unavailability will be captured in the Audit Trail ReportBuilder.
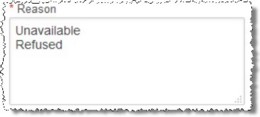
![]() Reason - Only available when Allow Refused/Unavailable is set to "Yes." In this text box type a list of the reasons to be available for selection when a signature is refused or a signer is unavailable. The default values are "Unavailable" and "Refused." Those options can be overwritten with a new list, or added to as needed. Each selection item must be recorded on a separate line.
Reason - Only available when Allow Refused/Unavailable is set to "Yes." In this text box type a list of the reasons to be available for selection when a signature is refused or a signer is unavailable. The default values are "Unavailable" and "Refused." Those options can be overwritten with a new list, or added to as needed. Each selection item must be recorded on a separate line.
![]() Display Comments/Note Field - If the signing process should include a Comments/Note field that can be used by the signer to record additional information pertaining to their signing of a plan, click this drop-down arrow and select "Yes."
Display Comments/Note Field - If the signing process should include a Comments/Note field that can be used by the signer to record additional information pertaining to their signing of a plan, click this drop-down arrow and select "Yes."
![]() Signature Order - Only available after the signature record has been saved at least once. Defaults to the next numerical value based on the number of existing signatures, beginning with 1, but can be changed as needed to adjust the signature's display order on the plan.
Signature Order - Only available after the signature record has been saved at least once. Defaults to the next numerical value based on the number of existing signatures, beginning with 1, but can be changed as needed to adjust the signature's display order on the plan.
![]() TIP: If a signature line is deleted, the ordering of other signatures in that order level is NOT automatically adjusted to reflect the change; for example, if there are two signatures and signature 1 is deleted, the numbering on signature 2 must be manually changed to reflect that it is now 1. Similarly, if no signatures are deleted but the numbering on signature 3 is changed to be number 2, the other signature orders must also be adjusted accordingly.
TIP: If a signature line is deleted, the ordering of other signatures in that order level is NOT automatically adjusted to reflect the change; for example, if there are two signatures and signature 1 is deleted, the numbering on signature 2 must be manually changed to reflect that it is now 1. Similarly, if no signatures are deleted but the numbering on signature 3 is changed to be number 2, the other signature orders must also be adjusted accordingly.
Return to the top of the page.
https://demodb.footholdtechnology.com/help/?12076
