|   |
| |
Please review the following tips and tricks regarding how best to design your forms and, once designed, how to create those forms in AWARDS.
Four Steps to "Translate" Your Forms Into FormBuilder
Form vs. Function When Designing Forms
Deciding When to Use the Radio Button Field Type vs. a Selection List
Testing FormBuilder Forms During the Form Creation Process
Take Advantage of Online Resources
Four Steps to "Translate" Your Forms Into FormBuilder
When evaluating each of your program's forms to decide how to build them in FormBuilder, follow the four steps detailed here.
Step 1: Determine whether or not you need to create the form in FormBuilder
![]() Is the information on the form already collected elsewhere in AWARDS? If so, you do not need to create the form.
Is the information on the form already collected elsewhere in AWARDS? If so, you do not need to create the form.
![]() If only a few pieces of information on your form are NOT collected in AWARDS, you can create a FormBuilder form with just those additional pieces of data.
If only a few pieces of information on your form are NOT collected in AWARDS, you can create a FormBuilder form with just those additional pieces of data.
![]() Is there a form that meets your needs in our AWARDS shared forms, or in the database of another agency that uses AWARDS? If such a form is found you can then make changes to it or clone it as needed. (In addition to using your Customer Success & Advocacy team representative as a reference for locating existing forms, you can also use the FormBuilder Search tool.)
Is there a form that meets your needs in our AWARDS shared forms, or in the database of another agency that uses AWARDS? If such a form is found you can then make changes to it or clone it as needed. (In addition to using your Customer Success & Advocacy team representative as a reference for locating existing forms, you can also use the FormBuilder Search tool.)
Step 2: Determine where to place the FormBuilder form in AWARDS
![]() At what point in your current workflow is this form usually filled out? Where will staff be in AWARDS at that point in your workflow?
At what point in your current workflow is this form usually filled out? Where will staff be in AWARDS at that point in your workflow?
![]() Who is it who usually fills out this form? Where in AWARDS will they be spending most of their time?
Who is it who usually fills out this form? Where in AWARDS will they be spending most of their time?
![]() How often do they fill out this form? If there is a due date you may want to put it on the charting timetable.
How often do they fill out this form? If there is a due date you may want to put it on the charting timetable.
![]() Do you need to keep a history of changes to the form, or multiple versions of the form for each client? If so, you will not want to place it on the face sheet or intake/admission, as you cannot keep a history of updates to forms that are placed here.
Do you need to keep a history of changes to the form, or multiple versions of the form for each client? If so, you will not want to place it on the face sheet or intake/admission, as you cannot keep a history of updates to forms that are placed here.
![]() Always place FormBuilder forms in a training program for testing and review before placing them into a live program.
Always place FormBuilder forms in a training program for testing and review before placing them into a live program.
Use the following table to help determine where to place your FormBuilder form in AWARDS:
|
LOCATION |
MODULE |
HISTORY? |
DESCRIPTION |
|
Intake/Admission linked form |
Intake/Admission |
No |
Form appears on the single-step admission form or multi-step referral form. Useful for collecting info to determine client eligibility/admission (i.e. if you have multi-step admission programs) or if you have a form that is ONLY relevant at the time of admission - something that needs to be in the client chart, but isn't referred to again (e.g. a rules and regs form that the client e-signs at admission). Programs using the multi-step referral form also have the option of requiring a form be completed prior to processing an admission. |
|
Single-Step Admission embedded form |
Intake/Admission |
No |
Form appears at the bottom of the single-step admission form. This location is best to use if your program requires that a form be completed prior to processing a client's admission. |
|
Face Sheet |
Profile > Face Sheet |
No |
Form appears at the top of the face sheet as a link. Because you are taken to the face sheet after you process an admission, this is a good place to put any admission forms that you need to fill out and refer back to. |
|
Discharge Fly-Out / Process Discharge |
Discharge |
Yes |
Form appears as a link on the Discharge fly-out. A second Discharge location also exists to include the form as a link on the Process Discharge feature's Client Selection page. This location is best to use if your program requires that a form be completed prior to processing a client's discharge. |
|
Jobs Fly-Out |
Employment |
Yes |
Form appears as a link on the Jobs fly-out. |
|
Services Fly-Out |
Services |
Yes |
Form appears as a link on the Services-Individual fly-out. |
|
Medical Fly-Out |
Medical |
Yes |
Form appears as a link on the Medical fly-out. |
|
Human Resources Fly-Out |
Human Resources |
Yes |
Form appears as a button on the Human Resources menu. Remember, this is for STAFF data, not client data. |
|
Service Plan coversheet |
Services > Service Plans |
Yes |
Form appears as the coversheet for a service plan. |
|
Included on Process Discharge |
Discharge > Process Discharge |
Yes |
You will have the option to include this form on the discharge form when discharging clients. |
|
Included on Progress Note |
Services > Progress Notes |
Yes |
You will have the option to include this form on any progress note you write in AWARDS. |
|
Included on a Group Note |
Services > Group Notes |
Yes |
You will have the option to include this form on any group note you write in AWARDS. This form will only be included in the group note, not in any individual addendums. |
|
Included on Medical Appointment Form |
Medical > Medical Appointment Form |
Yes |
You will have the option to include this form on any medical appointment form you fill out in AWARDS. |
|
Included on an Incident Report |
Incidents |
Yes |
You will have the option to include this form on any incident report you create in AWARDS. |
|
Included as a tab on the Staff Information page for all staff |
Human Resources |
No |
This will create the form as a tab on every staff member's staff information form. |
|
On the Charting Timetable |
Outcomes |
yes |
If the form is scheduled to be filled out on a regular basis (i.e. monthly, quarterly, etc.) you can place it on the charting timetable. Staff will receive reminders within AWARDS before the form is due to be filled out, and will continue to receive reminders if the form is not filled out after the due date. |
Step 3: Determine the best way to modify the fields/pieces of information on the FormBuilder form to make your data collection more efficient and accurate
![]() Can you make some fields into "Yes/No" questions?
Can you make some fields into "Yes/No" questions?
![]() Can you change any of your "free text" questions/fields to a drop-down field by coming up with a list of possible options for the answer?
Can you change any of your "free text" questions/fields to a drop-down field by coming up with a list of possible options for the answer?
![]() If you are creating a scored assessment, can you use a calculated field in AWARDS to calculate the score for you automatically?
If you are creating a scored assessment, can you use a calculated field in AWARDS to calculate the score for you automatically?
![]() Remember, if you are already collecting this info in AWARDS but you need it to display on a separate FormBuilder form, make sure to use dynamic fields and sections.
Remember, if you are already collecting this info in AWARDS but you need it to display on a separate FormBuilder form, make sure to use dynamic fields and sections.
Step 4: Determine who will be responsible for creating and vetting and testing each form - these are not necessarily the same people
![]() After the form is created in the FormBuilder, has it been tested by someone who uses the original version of the form regularly? Make sure staff who are familiar with the form walk through it to confirm that it meets their needs. (Check out our tip on Testing FormBuilder Forms During the Form Creation Process for more info on effective testing.)
After the form is created in the FormBuilder, has it been tested by someone who uses the original version of the form regularly? Make sure staff who are familiar with the form walk through it to confirm that it meets their needs. (Check out our tip on Testing FormBuilder Forms During the Form Creation Process for more info on effective testing.)
![]() Again, make sure you place the form in a training program first, and then have the staff member(s) test it out there before moving it into a live program.
Again, make sure you place the form in a training program first, and then have the staff member(s) test it out there before moving it into a live program.
Form vs. Function When Designing Forms
Many agencies ask us to help them build their forms in FormBuilder to look EXACTLY like the paper form they are used to using. There are some benefits to making your form look exactly like the original: staff are familiar with the old forms which may lead to a smoother transition from paper to electronic records; some auditors and funders are looking for an exact replica of their original form. However, one of the benefits of using an electronic version of the form is that it allows you to use the information collected in the form to generate aggregate data, something that may alter your approach to building your form. Here's an example of how this form versus function can come into play when building your forms...
An agency asked us to help them convert this paper form into a FormBuilder form in AWARDS:
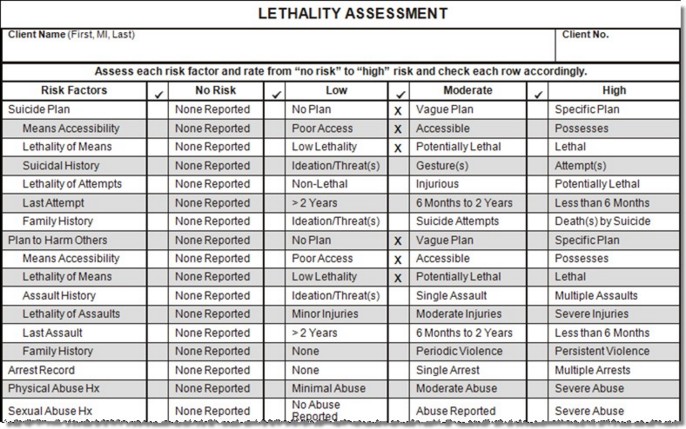
The best way to build this form in the FormBuilder is dependent on the answer to the old question: Which is more important? Form? Or function? Do you want the form to look exactly like the paper version? Or do you want to be able to report out on these data fields to run aggregate reports? You can create two versions of this form based on the answer to these questions.
Option 1: Form
This version of the form was designed using instruction fields and checkboxes to create a visually appealing form that looks very similar to the original form.
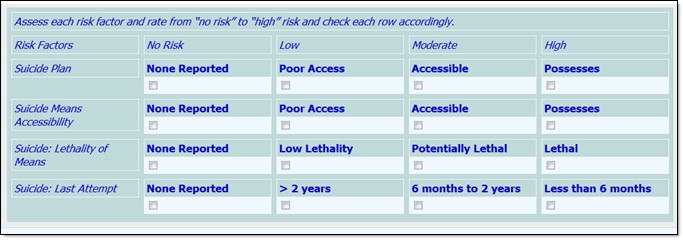
However, when you run a report on this form, the data is not easy to analyze as you will not be able to see the instructions:

Option 2: Function
This version of the form was designed using radio buttons. Although it is not as visually appealing, this format will give the agency better reporting options.
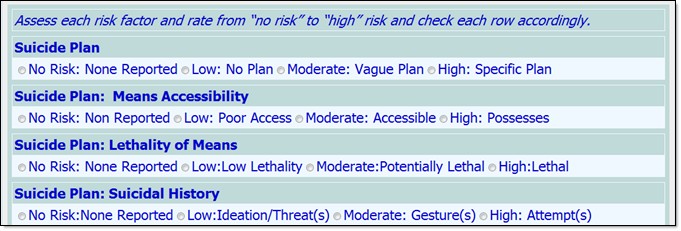
However, by using this version of the form, you can get great data that is easy to understand including meaningful summary tables.

Deciding When to Use the Radio Button Field Type vs. a Selection List
The "Radio" field type displays a series of radio buttons where only one value may be selected on the form.
The "Selection List" field type displays a drop-down list of values where only one value can be selected from the list.
These field types are very similar, both only allowing you to make one selection out of a few available choices. Both fields also allow you to select "Other" and enter in the other option. So what are the differences?
When you use the Radio field type all of the possible selection items display and are visible on the form. Below is a field from a Risk Assessment that inquires about a client having a Suicide Plan. The field question reads "Do you have a suicide plan?"

You can clearly see that "No Plan" was selected out of the choices "None Reported," "No Plan," "Vague Plan," and "Specific Plan."
Here we have the same question created as a Selection List instead.
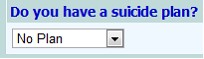
You can see that we can ONLY see the selection this client made. We do not see the other options available for selection.
If you want to be able to see the options that were chosen from, the Radio field type is best used in this instance. The drop-down list only shows the answer that was selected, therefore the field takes up less space on the page. If you are looking to make your form as short as possible and save some paper when you print, then the Selection List field type is best.
Testing FormBuilder Forms During the Form Creation Process
When you first create a form we recommend that you test it to make sure the form looks the way you want it to look, and to confirm that the data entry process using that form will be as seamless as possible for the end user. In regard to testing though, it's important to understand that once there is data in a field, you cannot delete the form. As a result, you'll want to make sure people don't begin to use it until your testing is complete. Here are some tips to help you create and test your forms without fear of other staff using the form before it's ready!
![]() On the General tab, keep the option "Where is this form located?" blank until you are ready to test your form.
On the General tab, keep the option "Where is this form located?" blank until you are ready to test your form.
![]() Place the form location only on a training program until you have completed your testing. Some agencies go as far as creating a training program that is only for testing FormBuilder forms. They then only give access to this program to the staff members who have access to the FormBuilder.
Place the form location only on a training program until you have completed your testing. Some agencies go as far as creating a training program that is only for testing FormBuilder forms. They then only give access to this program to the staff members who have access to the FormBuilder.
![]() The preview icon is a great tool for helping you look at the form as you are building it.
The preview icon is a great tool for helping you look at the form as you are building it.
![]() Once you think the preview view looks correct, you will want to test the form in a real location.
Once you think the preview view looks correct, you will want to test the form in a real location.
![]() Using the location "Profile - as a button at the top of client facesheets" is a great way to temporarily test your form because it is easy to access and you need to click the least number of buttons. Remember, you can always move the form to the real location you want it to live in once you know the form is fully complete.
Using the location "Profile - as a button at the top of client facesheets" is a great way to temporarily test your form because it is easy to access and you need to click the least number of buttons. Remember, you can always move the form to the real location you want it to live in once you know the form is fully complete.
![]() Review the form in the live location and practice filling out all of the fields and options. This is how you will catch spelling mistakes, help you decide if you want to change a field from a radio button or a drop-down, re-label a section button, etc.
Review the form in the live location and practice filling out all of the fields and options. This is how you will catch spelling mistakes, help you decide if you want to change a field from a radio button or a drop-down, re-label a section button, etc.
![]() If you plan on printing the form, be sure to test printing with data in the form. Remember, the form is going to look different based on how much data is entered into it, so you will want to try to enter the same kind of data in the test form as you would put in the live form.
If you plan on printing the form, be sure to test printing with data in the form. Remember, the form is going to look different based on how much data is entered into it, so you will want to try to enter the same kind of data in the test form as you would put in the live form.
![]() Once you have decided to make changes to the form, you may need to delete the data in the practice form. If you do not want to go through each field to delete the data, you can delete the fake client form the database. This will delete all of the data entered for this client including the FormBuilder form. For more information on deleting client records, click here.
Once you have decided to make changes to the form, you may need to delete the data in the practice form. If you do not want to go through each field to delete the data, you can delete the fake client form the database. This will delete all of the data entered for this client including the FormBuilder form. For more information on deleting client records, click here.
![]() Once you have completed the form you may want to ask another staff person (particularly someone who will be filling out the form) to review it. It is always good to get a second pair of eyes on the form.
Once you have completed the form you may want to ask another staff person (particularly someone who will be filling out the form) to review it. It is always good to get a second pair of eyes on the form.
![]() Send a message to staff that the new form is live and ready to be used! Make sure you include details of where the form is located and when to use it!
Send a message to staff that the new form is live and ready to be used! Make sure you include details of where the form is located and when to use it!
Take Advantage of Online Resources
When designing your forms take advantage of online resources showcasing existing works that could be replicated in AWARDS. These resources, like the University of Washington's Substance Use Screening & Assessment Instruments Database, can be used to access forms in the public domain, as well as those which must be obtained from a copyright holder.
https://demodb.footholdtechnology.com/help/?11616
