|   |
| |
Forms for which the location has been set as "Listed as a Charting Event, available under Services - Individual" can have schedules created for them, including initial and ongoing schedules for assessments based on intake or admission date, discharge date, the chart event's due or done dates, or the date on which the form is electronically signed for the first time.
A single assessment can also be scheduled at different intervals based on specific criteria that you define. This is done using filters created for saved report formats in the Demographics ReportBuilder. (Keep in mind that those saved report formats must be shared with other agency users, be saved for all programs, AND have at least one filter set for them.)
![]() IMPORTANT! As noted during the form building process, you MUST contact the Foothold Help Desk to have the form added to the list of events available in the charting timetable. If you have not already done so, please do so now. (When submitting your request, be sure to indicate which program type(s) the event should be available for.) Until this step is completed, any scheduling you do will NOT take effect.
IMPORTANT! As noted during the form building process, you MUST contact the Foothold Help Desk to have the form added to the list of events available in the charting timetable. If you have not already done so, please do so now. (When submitting your request, be sure to indicate which program type(s) the event should be available for.) Until this step is completed, any scheduling you do will NOT take effect.
To schedule a form as a charting event, or to make changes to an existing form schedule, complete the following steps from the AWARDS Home screen:
![]() TIP: Want to see a recording of the scheduling process in action? Check out our film FormBuilder - Creating Schedules for Charting Timetable Forms!
TIP: Want to see a recording of the scheduling process in action? Check out our film FormBuilder - Creating Schedules for Charting Timetable Forms!

This page contains a list of all existing forms associated with programs to which you have chart access permission.
![]() TIP: Because only those forms with a location of "Listed as a Charting Event, available under Services - Individual" can be scheduled, it may be helpful to sort the forms table by location. To do so, click the Location column heading and navigate to the portion of the list where the location is "Charting Timetable."
TIP: Because only those forms with a location of "Listed as a Charting Event, available under Services - Individual" can be scheduled, it may be helpful to sort the forms table by location. To do so, click the Location column heading and navigate to the portion of the list where the location is "Charting Timetable."
![]() TIP: To see at a glance which programs a form is associated with, click the arrow to the left of the form name on the index. A Programs pop-up is displayed, the contents of which are limited by your chart access permissions. Click Close when you are finished reviewing the programs list.
TIP: To see at a glance which programs a form is associated with, click the arrow to the left of the form name on the index. A Programs pop-up is displayed, the contents of which are limited by your chart access permissions. Click Close when you are finished reviewing the programs list.
![]()
![]() NOTE: When the calendar icon is gray, it indicates that the form does not yet have any schedules created for it. A black calendar icon indicates that the form already has at least one schedule.
NOTE: When the calendar icon is gray, it indicates that the form does not yet have any schedules created for it. A black calendar icon indicates that the form already has at least one schedule.
The FormBuilder Schedule page is displayed.
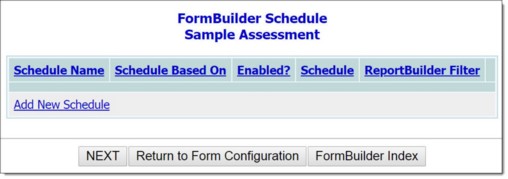
Any existing schedules previously created for the selected form are displayed at the top of the schedules table, sorted alphabetically by schedule name. An option to add a new schedule is available at the bottom of the table.
![]() Add a new schedule - To do so, click Add New Schedule. The FormBuilder Schedule - Data Entry page is displayed. Configure the fields and options on this page as necessary, and then click NEXT. The schedule is saved and the FormBuilder Schedule page is re-displayed.
Add a new schedule - To do so, click Add New Schedule. The FormBuilder Schedule - Data Entry page is displayed. Configure the fields and options on this page as necessary, and then click NEXT. The schedule is saved and the FormBuilder Schedule page is re-displayed.
![]() TIP: For more information on each field/option available on the data entry page, see FormBuilder Schedule Fields / Options below.
TIP: For more information on each field/option available on the data entry page, see FormBuilder Schedule Fields / Options below.
![]() Update an existing schedule - To do so, click the schedule to be updated. The data entry page is displayed. Make changes to the information on this page as needed, and then click NEXT. The schedule is saved and the FormBuilder Schedule page is re-displayed.
Update an existing schedule - To do so, click the schedule to be updated. The data entry page is displayed. Make changes to the information on this page as needed, and then click NEXT. The schedule is saved and the FormBuilder Schedule page is re-displayed.
![]() TIP: For more information on each field/option available on the data entry page, see FormBuilder Schedule Fields / Options below.
TIP: For more information on each field/option available on the data entry page, see FormBuilder Schedule Fields / Options below.
![]() Delete an existing schedule - To do so, click the delete icon for the schedule to be deleted.
Delete an existing schedule - To do so, click the delete icon for the schedule to be deleted.
![]()
A confirmation dialog box is displayed. Click OK. The schedule is deleted and the updated FormBuilder Schedule page is displayed.
![]() NOTE: To disable (turn off) a schedule rather than delete it, update the schedule record so that Enabled is set to "No." Doing so stops the schedule from being used but retains a history of it having been in place at one time.
NOTE: To disable (turn off) a schedule rather than delete it, update the schedule record so that Enabled is set to "No." Doing so stops the schedule from being used but retains a history of it having been in place at one time.
![]() TIP: If you determine that a form schedule does not need to be added, updated, or deleted at this time and you would instead like to make changes to the form itself, click NEXT at the bottom of the FormBuilder Schedule page. The Update Field Details per Section page is then displayed, from which you can work with the form contents as needed.
TIP: If you determine that a form schedule does not need to be added, updated, or deleted at this time and you would instead like to make changes to the form itself, click NEXT at the bottom of the FormBuilder Schedule page. The Update Field Details per Section page is then displayed, from which you can work with the form contents as needed.
The process of scheduling a form is now complete.
FormBuilder Schedule Fields / Options
Below is an alphabetical list of the fields and options located on the FormBuilder Schedule - Data Entry page. To jump directly to the information for a specific field or option, press <Ctrl+F> to access your browser's search field and enter the name of the field/option in question.
Description
In this field, type or make changes to the schedule description.
Click this drop-down arrow and make a selection to indicate whether or not the schedule should be enabled.
![]() Yes - When selected, the form is scheduled as a charting event when the schedule criteria are met.
Yes - When selected, the form is scheduled as a charting event when the schedule criteria are met.
![]() IMPORTANT! As noted during the form building process, you MUST contact the Foothold Help Desk to have the form added to the list of events available in the charting timetable. If you have not already done so, please do so now. (When submitting your request, be sure to indicate which program type(s) the event should be available for.) Until this step is completed, any scheduling you do will NOT take effect, even if "Yes" is selected here.
IMPORTANT! As noted during the form building process, you MUST contact the Foothold Help Desk to have the form added to the list of events available in the charting timetable. If you have not already done so, please do so now. (When submitting your request, be sure to indicate which program type(s) the event should be available for.) Until this step is completed, any scheduling you do will NOT take effect, even if "Yes" is selected here.
![]() No - The default value when adding a new schedule. When selected, the form is NOT be scheduled as a charting event, even if the schedule criteria are met.
No - The default value when adding a new schedule. When selected, the form is NOT be scheduled as a charting event, even if the schedule criteria are met.
![]() TIP: If you want to delete a schedule but can't because there are associated charting events scheduled for it, disabling the schedule by selecting "No" is a great alternative.
TIP: If you want to delete a schedule but can't because there are associated charting events scheduled for it, disabling the schedule by selecting "No" is a great alternative.
ReportBuilder Filter
The ReportBuilder Filter allows you to create different schedule intervals for the same assessment based on specific criteria. For example, if clients under the age of 18 require an assessment be completed every 6 months, and clients over the age of 18 require the same assessment be completed every 12 months, you can create a saved Demographics ReportBuilder report format that uses these filters, and then select it here. The assessment would then be automatically scheduled for the correct interval based on the client's age.
To apply a ReportBuilder Filter to this schedule, click this drop-down arrow and select the saved Demographics ReportBuilder report format to be used.
![]() NOTE: This selection list only includes saved formats that 1) are shared with other agency users, 2) are saved for all programs, AND 3) have at least one filter set.
NOTE: This selection list only includes saved formats that 1) are shared with other agency users, 2) are saved for all programs, AND 3) have at least one filter set.
![]() IMPORTANT! When scheduling a form based on a client's intake or admission, the saved Demographics ReportBuilder report format must include information collected at the time of his or her intake or admission to the program in order for the schedule to take effect. If the necessary data is not captured at intake or admission, the form will not be scheduled for the client.
IMPORTANT! When scheduling a form based on a client's intake or admission, the saved Demographics ReportBuilder report format must include information collected at the time of his or her intake or admission to the program in order for the schedule to take effect. If the necessary data is not captured at intake or admission, the form will not be scheduled for the client.
For example, if you schedule a form using a saved Demographic ReportBuilder report format with criteria "Monthly Income Less Than or Equal To $800," the client's monthly income must be filled out on his or her intake/admission form in order for the form to be scheduled.
![]() TIP: If a FormBuilder form has a location of "Intake/Admission - as a linked form on Intake/Admission form," and form fields have been set to be "Available on Related ReportBuilders," those fields can be used to create criteria using the Demographics ReportBuilder only if the form is filled out PRIOR to processing the client's intake or admission to the program
TIP: If a FormBuilder form has a location of "Intake/Admission - as a linked form on Intake/Admission form," and form fields have been set to be "Available on Related ReportBuilders," those fields can be used to create criteria using the Demographics ReportBuilder only if the form is filled out PRIOR to processing the client's intake or admission to the program
Schedule Based On | Schedule
Once you've made a selection, use the Schedule field and the corresponding drop-down options to further define the schedule. Specially, type or make changes to the number and scheduling period ("Days," "Weeks," or "Months,"), along with an After selection for the selected Schedule Based On option.
![]() NOTE: Keep in mind that the content of the After selection included in this portion of the data entry page varies depending on the selection you have made from the Schedule Based On list. Specific choices are detailed above.
NOTE: Keep in mind that the content of the After selection included in this portion of the data entry page varies depending on the selection you have made from the Schedule Based On list. Specific choices are detailed above.
For example, if you want an initial assessment to be scheduled 7 days after the client's admission date, you would configure these fields and options as follows:

Schedule Name
In this field, type or make changes to the schedule name. Each schedule configured for a form must have a unique name, and it is that name by which the schedule will be identified in the schedules index if it is necessary to make adjustments in the future.
https://demodb.footholdtechnology.com/help/?12233

 Initial Scheduling