The electronic signatures functionality enables staff and clients to sign progress notes for the purposes of approving their content and/or verifying their accuracy. Once signed, progress notes are locked from further editing.
Staff with the authority to sign notes do do so using a Click to Sign link available when viewing the note in report mode, and may also assist others (clients or other authorized individuals) in doing so when applicable. (Clients with AWARDS logins can also sign notes on their own without staff assistance if the program has been set up to allow them to do so.)
 IMPORTANT! There are currently two methods for establishing the rules that determine who has the authority to sign progress notes, when, and how:
 Business Rules - Available under System Setup > Business Rules > Electronic Signature Rules. Legacy functionality that enables agencies to set basic rules around who can sign progress notes and when, on an individual program basis.
Progress Notes E-Signatures Configuration - A more flexible and powerful tool made available in February 2019. Enables agencies to create custom signature sets for the purposes of designating who should sign progress notes, and which options they will have in the signing interface when doing so. Allows for the establishment of different signing rules for different note type and/or program type combinations, as well as for the creation of default signature sets to be used when rules are not defined.
Which of these two configuration options your agency uses may impact the options available during the signing process, detailed below. Differences are noted where applicable. If you are unsure which of the two configuration options your agency is currently using and would like to learn more, contact the Help Desk for assistance.
To access and electronically sign a progress note, or to assist a client or other individual in doing so, complete the following steps:
 NOTE: The process of electronically signing a progress note varies slightly for clients with their own AWARDS logins. Such clients can complete the signing process without assistance by selecting Client Records from the AWARDS Home screen, clicking Progress Notes, and then clicking the date link for the note to be signed. From there, there signing process is the same as that laid out beginning with step 8 below. Click here to skip ahead.
NOTE: The following instructions detail the process of generating a progress notes report to access a note for signing. Notes can also be accessed for signing purposes by going into the progress note index in data entry mode and clicking the underlined note date to open the individual note in report mode. The Client History Report in the Client Search module can also be used to access notes for signing. If you access a note in either of those ways, click here to skip ahead to step 8.
- From the navigation bar, click Reports (or the Reports icon). The Reports index page is displayed.

- Click the Program drop-down arrow and select the program or group of programs for which the report is to be viewed.
- If you previously bookmarked the Progress Notes Report it is displayed on the reports index by default; otherwise, from the left-hand menu bar, click All under "Show Reports."
- Use the navigation features in the bottom-right corner of the reports index to locate the Progress Notes Report, or enter "progress note" in the Search field in the upper-right corner.
- Click Progress Notes Report from the reports index. The Progress Notes Report Selections page is displayed.
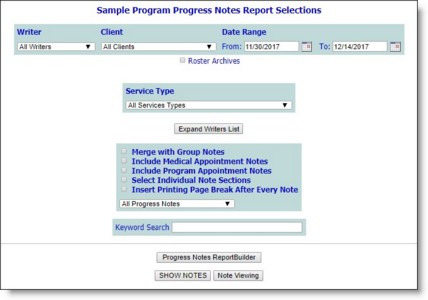
- Configure the report settings on this page as necessary so that the note to be signed will be included in the report contents.
 TIP: For more information on the available progress note report settings, see Viewing a Progress Notes Report.
- Click SHOW NOTES. The progress notes report is displayed and includes all notes meeting the selection criteria specified on the previous page.
- Navigate to the portion of the page containing the note you wish to sign, or wish to assist the client or other individual in signing.
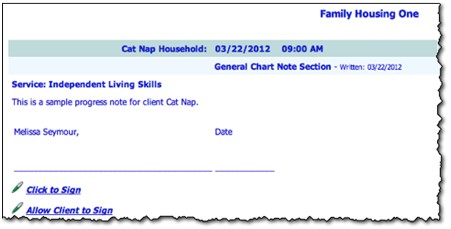
Based on how your agency has chosen to configure progress note e-signatures, along with who has or has not already signed the note, you will see one or more signing links on the page:
TIP: For more information on the ways in which progress note e-signatures can be configured, click here.
Click to Sign - Available for staff that are eligible to sign the note if they have not already done so.
Allow Client to Sign - Available for clients who are eligible to sign the note and who have an AWARDS login. Also available when staff are assisting eligible clients with the note signing process, as long as the staff member is also eligible to sign that note him/herself.
NOTE: When working with the records of a discharged client, only staff members can electronically sign progress notes using a PIN and saved images. The discharged clients themselves can only sign using the "Touch" option.
Allow Other to Sign - Available if the note was configured to include an electronic signature line for someone other than an employee or client. Displayed for all staff with access to the note so that they can assist the applicable "other" with the signing process.
NOTE: Only available if your agency is using the Progress Notes E-Signatures Configuration feature.
Click for Refused/Unavailable - Available if the note was configured to allow for recording of a signature refusal or signer unavailability for a given signature line.
NOTE: Only available if your agency is using the Progress Notes E-Signatures Configuration feature.
IMPORTANT! If, in place of one of the above links you see the note "Other Signatures Required Before Signing is Available," it is an indication that this type of note has been configured in such a way that one or more other signatures are required before action can be taken. If you are assigned to an employee signature line not yet available, you will be notified via AWARDS Messages when your signature is required.
NOTE: When viewing this page, please keep in mind the following if your agency is using the Progress Notes E-Signatures Configuration feature:
If a default authority level was specified for a particular signature line when the note was created, and the "other" option was not made available, the default level is displayed on the page; otherwise, no authority level information is shown.
Until a signature line has been used to electronically sign the note, a default blank line is displayed to allow for a manual signature in case the note needs to be printed before e-signing takes place.
Signature titles are only required during note configuration for the "Employee" signer type. If one was not specified for a "Client" or "Other" signature line, that line is identified by the signer type only.
- The note can now be electronically signed. To do so, click the appropriate signing link and complete the corresponding signing process, or assist the client and/or other individual in doing so:
 Click to Sign (for use by staff)
The Electronic Signatures Signing dialog box is displayed. Configure the options in that dialog box as follows:
NOTE: If, during the process of setting up your electronic signature, you specified default signature settings, those settings are reflected here. As a result, you may not need to configure the options below - with the exception of entering your PIN (which is always required) - unless it is necessary to adjust the defaults.
NOTE: Some of the signing options detailed here are optional and may not be available based on how your agency configured this signature line. Those that are available may offer selections that vary from those listed here, also based on the signature line's specific configuration.
Sign With - Notes can be signed using initials or full name images. Click the radio button next to the type of image with which you want to sign this note - "No Image," "Initials Image," or "Full Name Image."
NOTE: Sign with options are only available for the images you uploaded during the process of setting up your electronic signature that were also noted as allowed for this signature line by your agency. So, for example, if you only uploaded a full name image, the "Initials Image" option is not available here even if your agency has allowed signing the note in that way.
Comments/Note - In this text box type any comments or notes in regard to your signing of the note, if applicable.
Authority Level - Click the radio button or checkbox next to the statement that describes your authority level in relation to this note.
NOTE: The "I am the author..." option is only available when you wrote the note being signed.
TIP: For agencies using the E-Signatures Configurations feature, if this signature line was configured to use a default authority level, that authority level is pre-selected by default. If a default authority level was NOT configured, but the "Other" option is available for this signature line, it will be pre-selected instead. Either pre-selection can be unchecked as needed, but only one option can be checked at a time. If nothing is checked here, no authority level will be displayed with the signed record.
Date and Time Stamps - The Date and Time checkboxes are automatically selected by default so that a date and time stamp is included with your electronic signature. De-select one or both of these options if needed.
NOTE: If these checkboxes are not available, it is an indication that your agency has opted to have all electronic signatures date and time stamped automatically.
Credentials - Click the checkbox next to each credential to be included with your signature.
NOTE: This portion of the signing dialog box is only available when credentials have been specified for you in the Human Resources module Staff Information feature.
Job Title - Job title information is automatically taken from your Staff Information record in the Human Resources module and displayed in a field to the left of the PIN in the signing dialog box. If no job title is found it will instead display "<Insert Job Title to be saved with Signature>." Verify that the correct job title is in place, or overwrite the default title or placeholder with the correct value. If the "<Insert Job Title�>" value is left in place, no title is added to the signature.
PIN - In this field, type your five-digit PIN to confirm your identity.
Continue with step 10.
Allow Client / Other to Sign (for use by staff assisting clients/others in signing)
If the signer type is "Client" and a default signing method for clients was specified during your signature setup process, the Electronic Signatures Client Signing dialog box is immediately displayed, prompting the client to complete the corresponding signing process.
If the signer type is "Other," or if the signer type is "Client" but a default signing method was NOT specified and more than one signing method is available (as determined by "Touch" and/or "Signature Pad" selections under System Setup > Business Rules > global Electronic Signature Rules), a series of radio buttons on the page will note those methods. Click the appropriate radio button, click OK, and then complete the corresponding signing process.
NOTE: Some of the signing options detailed here are optional and may not be available based on how your agency configured this signature line. Those that are available may offer selections that vary from those listed here, also based on the signature line's specific configuration.
Signing by PIN - Notes can be signed using initials or full name images. Click the Sign With radio button next to the type of image with which the client is to sign this note - "No Image," "Initials Image," or "Full Name Image."
NOTE: Sign with options are only available for the images you uploaded during the process of setting up your electronic signature that were also noted as allowed for this signature line by your agency. So, for example, if you only uploaded a full name image, the "Initials Image" option is not available here even if your agency has allowed signing the note in that way.
IMPORTANT! If the client does not have a PIN, and you do not have the ability to assist him/her in setting one up, he/she will be prevented from signing the note using this method. If you DO have the ability to assist the client in setting up a PIN, click the Click here to Assign a PIN link displayed at this time.
In the PIN field, direct the client to type his/her five-digit PIN to confirm his/her identity.
To exit without signing the note, click Cancel.
Signing by Signature Pad - Direct the client to use the signature pad to enter his/her signature. Click Draw to give focus to the signing area before the client signs on the pad, Clear if you'd like to clear what has been entered using the pad, or Cancel to exit without signing the note.
Signing by Touch - Direct the client to use his/her finger or a stylus to enter his/her signature directly on the screen when using a tablet, touchpad, or other touch-enabled device, or to use the mouse to sign on the screen if the device is not directly touch-capable. Click Clear if you'd like to clear what has been entered, or Cancel to exit without signing the note.
On the e-signing interface the client or other individual may also be asked to select or supply authority level information, and in the case of other individuals, to enter his/her name and title on the page. A Comments/Note text box may also be available for the client or individual's use. Be sure to complete those data entry steps in addition to the actual signing described above.
Once the appropriate signing method has been used, including any corresponding data entry, continue with step 10 to complete the signing process.
Click for Refused / Unavailable (for use by staff or by staff assisting clients/others)
The Signer Refused/Unavailable dialog box is displayed. The content of this box will vary by signer type, and may include the following:
Name/Title - (Only available when the signer type is "Other.") - Enter the name and title of the individual who is refusing to sign, or is unavailable to sign, this note.
Refused/Unavailable Reason - Click this drop-down arrow and make a selection to indicate why the assigned employee, client, or other individual is not signing this note.
Comments/Note - In this text box type any comments or notes regarding this refusal or the circumstances of the assigned signer's unavailability.
Date and Time Stamps - (Only available when the signer type is "Employee") - The Date and Time checkboxes are selected by default so that a date and time stamp is included with your record of the signature refusal or signer unavailability. De-select one or both of these options if needed.
NOTE: If these checkboxes are not available, it is an indication that your agency has opted to have all electronic signatures date and time stamped automatically.
Job Title - (Only available when the signer type is "Employee") - Job title information is automatically taken from the Human Resources module Staff Information record for the employee assigned to this signature line. If no job title is found it will instead display "<Insert Job Title to be saved with Signature>." Verify that the correct job title is in place, or overwrite the default title or placeholder with the correct value. If the "<Insert Job Title...>" value is left in place, no title is added to the refused/unavailable record.
Configure the fields and options on this page as necessary, and then continue with step 10.
- Click SIGN NOW or have the client do so, if applicable.
IMPORTANT! Clicking the SIGN NOW button is an acknowledgment that the individual doing so is the authorized signer. An electronic signature constitutes a legally binding symbol that authenticates the document to which it is attached.
When SIGN NOW is clicked, the following takes place:
The note is signed and the electronic signature is displayed with that note on the progress notes report page (replacing the default blank signature line if you are the note writer). The signature for staff members is composed of authority level, follows by signer name and credentials (if included), job title, the signature or initials image if one was selected or the image captured with a touch device, and the date and time on which the note was signed if that information was set to be included. For clients, the signature includes the signature or initials image if one was selected or the image captured with a touch device, "Client" (or relevant label if clients are referred to differently in your AWARDS database), and the date and time on which the note was signed.
NOTE: Job title information is taken from your Staff Information record in the Human Resources module. If you are a staff member the signature will always display your job title as of the time the note was signed, regardless of whether that title changes in the future.
Keep in mind that if any other staff members or the client previously signed the same note, the new signature is added to those existing signatures. In such cases reviewer signatures are listed after the note writer's signature (or default blank signature line if the writer has not signed the note). If your agency is using the Progress Notes E-Signatures Configuration feature, the signatures will display on the note in the same order in which they were configured.
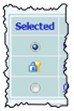
The note is locked from further edits. Notes that have been signed and locked in this manner are shown with a lock and key icon next to them in the progress notes index in data entry mode as shown here.
If your AWARDS database is configured to use the Interoperability Center and the Notes as Encounters on CCDA feature has been configured to trigger a CCDA for notes of this type written in this type of program, a CCDA encounter is now generated. If necessary, it can be viewed from within the Transmitted Messages component of the Interoperability Center, where it will be listed as an outbound CCDA.
The process of electronically signing a progress note is now complete.
https://demodb.footholdtechnology.com/help/?10790


