|   |
| |
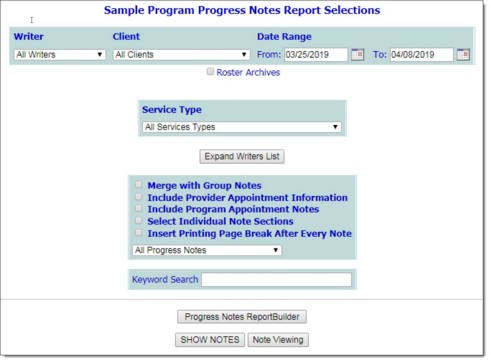
A read-only report of progress notes selected based on a variety of criteria is available from within the AWARDS Reports module. To view this report, complete the following steps:

![]() TIP: The Writer selection list is initially limited to users with caseloads in the selected program. Click Expand Writers List if it is necessary for the writer selections to include all users with chart access who have written a note for someone in the selected program in the last 90 days.
TIP: The Writer selection list is initially limited to users with caseloads in the selected program. Click Expand Writers List if it is necessary for the writer selections to include all users with chart access who have written a note for someone in the selected program in the last 90 days.
![]() TIP: If the report to be viewed is for a former (discharged) client, the Writer selection must be set to "All Writers."
TIP: If the report to be viewed is for a former (discharged) client, the Writer selection must be set to "All Writers."
![]() TIP: If the report to be viewed is for a former (discharged) client, first click Roster Archives beneath the client selection option. When Roster Archives is selected the Writer option referenced in step 6 must be set to "All Writers."
TIP: If the report to be viewed is for a former (discharged) client, first click Roster Archives beneath the client selection option. When Roster Archives is selected the Writer option referenced in step 6 must be set to "All Writers."
![]() TIP: If a specific writer was chosen in step 6, select "Worker Caseload" from the Client list to view only those progress notes written by that individual for the clients assigned to his/her caseload.
TIP: If a specific writer was chosen in step 6, select "Worker Caseload" from the Client list to view only those progress notes written by that individual for the clients assigned to his/her caseload.
![]() Merge With Group Notes - When this option is checked off, group notes for the selected consumer(s) are included in the progress notes report.
Merge With Group Notes - When this option is checked off, group notes for the selected consumer(s) are included in the progress notes report.
![]() Include Provider Appointment Information - When this option is selected, provider appointment information for the selected consumer(s) is included in the progress notes report.
Include Provider Appointment Information - When this option is selected, provider appointment information for the selected consumer(s) is included in the progress notes report.
![]() Include Program Appointment Notes - When this option is selected, program appointment notes for the selected consumer(s) are included in the progress notes report.
Include Program Appointment Notes - When this option is selected, program appointment notes for the selected consumer(s) are included in the progress notes report.
![]() Select Individual Note Sections - When this option is selected, individual notes and note sections are available for printing separately from the full report.
Select Individual Note Sections - When this option is selected, individual notes and note sections are available for printing separately from the full report.
![]() Insert Printing Page Break After Every Note - When this option is selected, a page break is inserted between every note when the report is printed.
Insert Printing Page Break After Every Note - When this option is selected, a page break is inserted between every note when the report is printed.
If the service plan linked notes only option was NOT selected in step 10, the progress notes report is displayed on the Individual Progress Notes page and the process of viewing a progress notes report is now complete.
![]() TIP: If the "Select Individual Note Sections" option was selected in step 9, click View This Note for any note section to open it individually in report mode.
TIP: If the "Select Individual Note Sections" option was selected in step 9, click View This Note for any note section to open it individually in report mode.
![]() NOTE: If the "Include Provider Appointment Information" option was checked in step 9, then all Provider Appointment information displays on the report even if the notes do not contain the text entered in the Keyword Search field in step 11, if any.
NOTE: If the "Include Provider Appointment Information" option was checked in step 9, then all Provider Appointment information displays on the report even if the notes do not contain the text entered in the Keyword Search field in step 11, if any.
If the service plan linked notes only option WAS selected in step 10, the progress notes report is displayed on the Service Plan Linked Individual Progress Notes page. Continue with step 13.
![]() NOTE: The "MC billing Notes Selection" permission - assigned using the Permissions Maintenance feature - is required in order to select those progress notes which report on contacts that are to be billed to Medicaid. Permissions are . If you do not have access to Permissions Maintenance and need the billing notes selection permission, please contact your supervisor or your local Help Desk for assistance.
NOTE: The "MC billing Notes Selection" permission - assigned using the Permissions Maintenance feature - is required in order to select those progress notes which report on contacts that are to be billed to Medicaid. Permissions are . If you do not have access to Permissions Maintenance and need the billing notes selection permission, please contact your supervisor or your local Help Desk for assistance.
The process of viewing a progress notes report and updating billing selection information is now complete.
https://demodb.footholdtechnology.com/help/?10342
