|   |
| |
To enter or update a supportive services checklist record, complete the following steps from the AWARDS Home screen:
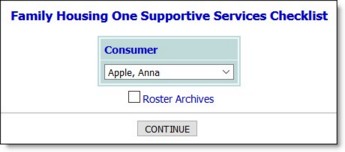
![]() TIP: If the checklist record to be entered or updated is for a former (discharged) consumer, first click the Roster Archives checkbox.
TIP: If the checklist record to be entered or updated is for a former (discharged) consumer, first click the Roster Archives checkbox.
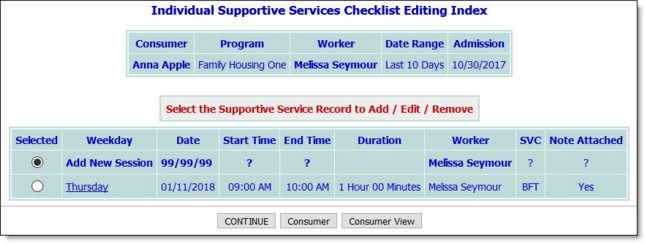
This page contains a list of all existing checklist records for the selected consumer that have dates within the editing window shown at the top of the page.
![]() NOTE: Records for which there is a corresponding progress note are indicated by a "Yes" value in the Note Attached column on this page; otherwise, that column contains "No."
NOTE: Records for which there is a corresponding progress note are indicated by a "Yes" value in the Note Attached column on this page; otherwise, that column contains "No."
![]() NOTE: A solid bullet next to a record indicates one or more of the following:
NOTE: A solid bullet next to a record indicates one or more of the following:
![]() That you are not the individual who recorded the contact. Only the user who entered the record or another user with the "Surrogate Data Entry - Contacts Log" permission can edit it.
That you are not the individual who recorded the contact. Only the user who entered the record or another user with the "Surrogate Data Entry - Contacts Log" permission can edit it.
![]() That the record falls outside of the editing window and the backdating data entry permission may be required to edit it.
That the record falls outside of the editing window and the backdating data entry permission may be required to edit it.
![]() That the record has been locked and cannot be opened for updating. If necessary, this type of record can be unlocked by users with the "Unlock Contact Log" permission, at which point it can be selected for editing as needed. (For more information, please refer to the Supportive Services Checklist Frequently Asked Questions.)
That the record has been locked and cannot be opened for updating. If necessary, this type of record can be unlocked by users with the "Unlock Contact Log" permission, at which point it can be selected for editing as needed. (For more information, please refer to the Supportive Services Checklist Frequently Asked Questions.)
![]() NOTE: A lock and key icon next to a record indicates that the progress note associated with it has been electronically signed, preventing further edits. Such records cannot be unlocked and cannot be selected for updating.
NOTE: A lock and key icon next to a record indicates that the progress note associated with it has been electronically signed, preventing further edits. Such records cannot be unlocked and cannot be selected for updating.
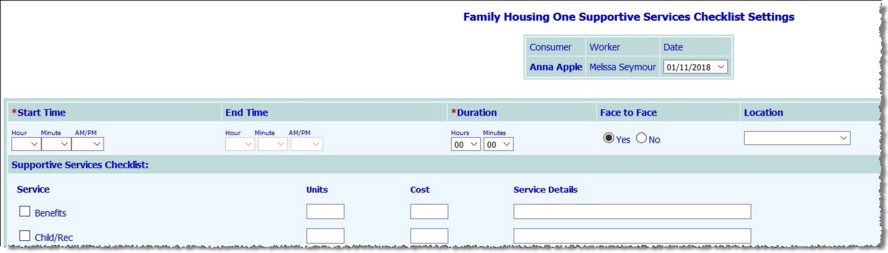
If End Time is required (as noted with a red asterisk), click the drop-down arrows and select or make changes to the time at which the contact ended. Duration will be a read-only value that is automatically calculated based on this time.
If Duration is required (as noted with a red asterisk), click the drop-down arrows and select or make changes to the length of contact in hours and/or minutes. End Time will be a read-only value that is automatically calculated based on this duration.
![]() TIP: A contact duration is not required if the "Face to Face" option referenced in step 12 is set to "No."
TIP: A contact duration is not required if the "Face to Face" option referenced in step 12 is set to "No."
![]() NOTE: The value selected here appears as the service type on any progress notes written for this contact. It also appears as the service type for the contact if viewing the Contacts Log Report. It is not reflected on the Supportive Services Delivery Report.
NOTE: The value selected here appears as the service type on any progress notes written for this contact. It also appears as the service type for the contact if viewing the Contacts Log Report. It is not reflected on the Supportive Services Delivery Report.
![]() Service - Click the checkbox next to each service provided to the consumer during this contact.
Service - Click the checkbox next to each service provided to the consumer during this contact.
![]() Units - In this field, type or make changes to the number of units of the selected service provided.
Units - In this field, type or make changes to the number of units of the selected service provided.
![]() NOTE: If no units value is entered at this time it will default to "1" when the record is saved.
NOTE: If no units value is entered at this time it will default to "1" when the record is saved.
![]() Cost - In this field, type or make changes to the total cost for the units of the corresponding service.
Cost - In this field, type or make changes to the total cost for the units of the corresponding service.
![]() NOTE: Cost is an optional field. If the cost field is not displayed in data entry mode and/or no cost is entered here, the unit rate entered for the selected service (if applicable) is multiplied by the number of units and the product is shown on the Supportive Services Delivery Report. (Unit rates are entered using the Fiscal module's Cost of Services feature.) If the cost field is displayed in data entry mode and you enter a value in that field, it is understood to be the "total" cost for the specified units and no multiplication is done.
NOTE: Cost is an optional field. If the cost field is not displayed in data entry mode and/or no cost is entered here, the unit rate entered for the selected service (if applicable) is multiplied by the number of units and the product is shown on the Supportive Services Delivery Report. (Unit rates are entered using the Fiscal module's Cost of Services feature.) If the cost field is displayed in data entry mode and you enter a value in that field, it is understood to be the "total" cost for the specified units and no multiplication is done.
![]() Service Details - In this field, type or make changes to any notes about the service provided as needed.
Service Details - In this field, type or make changes to any notes about the service provided as needed.
![]() Funding Source - Click this drop-down arrow and select the funding source for this service if applicable. The default value is "Unknown."
Funding Source - Click this drop-down arrow and select the funding source for this service if applicable. The default value is "Unknown."
![]() NOTE: Funding Source is not available for selection in all programs. It must have been configured behind-the-scenes in order to be included on this settings page.
NOTE: Funding Source is not available for selection in all programs. It must have been configured behind-the-scenes in order to be included on this settings page.
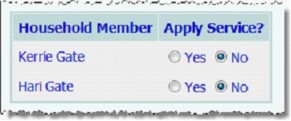
Select "Yes" for each household member this checklist information applies to, or leave the "No" option selected if it does not apply.
![]() NOTE: This option only displays when creating a new checklist and not when editing or deleting a checklist. If a checklist has been applied to a household member, an exact copy of the checklist appears on his or her Individual Supportive Services Checklist Editing Index page, as its own entry. If any edits or deletions are needed, it must be edited or deleted on each consumer's record, individually.
NOTE: This option only displays when creating a new checklist and not when editing or deleting a checklist. If a checklist has been applied to a household member, an exact copy of the checklist appears on his or her Individual Supportive Services Checklist Editing Index page, as its own entry. If any edits or deletions are needed, it must be edited or deleted on each consumer's record, individually.
![]() NOTE: Progress notes added using this method are saved as "general chart notes" and are available for data entry when using the Progress Notes feature in the Services - Individual module. They are also available in progress notes reports.
NOTE: Progress notes added using this method are saved as "general chart notes" and are available for data entry when using the Progress Notes feature in the Services - Individual module. They are also available in progress notes reports.
The process of entering or updating a supportive services checklist record is now complete.
https://demodb.footholdtechnology.com/help/?11468
