|   |
| |
Progress notes data entry includes entering, updating, and deleting progress notes. Additionally, as part of the process of entering progress notes the contacts log is automatically updated with a record for that contact. To enter or update a progress note, complete the following steps from the AWARDS Home screen:
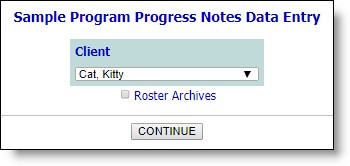
![]() TIP: If the progress note to be entered or updated is for a former (discharged) client, first click Roster Archives beneath the client selection option.
TIP: If the progress note to be entered or updated is for a former (discharged) client, first click Roster Archives beneath the client selection option.
![]() NOTE: If you have accessed the progress notes functionality from within the Discharge module's Follow Up Notes feature, the client selection list is automatically limited to discharged individuals.
NOTE: If you have accessed the progress notes functionality from within the Discharge module's Follow Up Notes feature, the client selection list is automatically limited to discharged individuals.
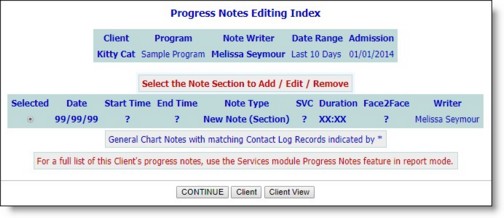
This page contains a list of all existing progress notes for the selected client that have dates which fall within the editing window date range shown at the top of the page. Progress notes with corresponding contacts log records are indicated by an asterisk (*).
![]() NOTE: By default the progress note index is limited to displaying only those notes you yourself wrote for the selected client; however, an option is available behind-the-scenes that expands the index to include all notes written for the client within the editing window, regardless of the writer. If you do not currently have the expanded view in place and would like to, please contact the Help Desk.
NOTE: By default the progress note index is limited to displaying only those notes you yourself wrote for the selected client; however, an option is available behind-the-scenes that expands the index to include all notes written for the client within the editing window, regardless of the writer. If you do not currently have the expanded view in place and would like to, please contact the Help Desk.
![]() NOTE: A solid bullet next to a note indicates one or more of the following:
NOTE: A solid bullet next to a note indicates one or more of the following:
![]() That you did not write the note and do not have the authority to access it in data entry mode. Only the user who entered the note, or someone with the "Surrogate Data Entry - Progress Notes" permission, can edit it.
That you did not write the note and do not have the authority to access it in data entry mode. Only the user who entered the note, or someone with the "Surrogate Data Entry - Progress Notes" permission, can edit it.
![]() That the note falls outside of the editing window. If you do not already have the "Backdated Progress Notes Data Entry" permission, having that assigned to you may enable you to make the necessary edits. If you do not have access to System Setup > Permissions Maintenance, please contact your supervisor or the Help Desk for assistance.
That the note falls outside of the editing window. If you do not already have the "Backdated Progress Notes Data Entry" permission, having that assigned to you may enable you to make the necessary edits. If you do not have access to System Setup > Permissions Maintenance, please contact your supervisor or the Help Desk for assistance.
![]() That it has been locked and cannot be opened for updating. If necessary, locked notes can be unlocked by users with the "Unlock Progress Notes" permission, at which point they can be selected for editing as needed. (For more information on unlocking, please refer to the Progress Notes Frequently Asked Questions.
That it has been locked and cannot be opened for updating. If necessary, locked notes can be unlocked by users with the "Unlock Progress Notes" permission, at which point they can be selected for editing as needed. (For more information on unlocking, please refer to the Progress Notes Frequently Asked Questions.
![]() NOTE: A lock and key icon next to a note indicates that it has been electronically signed, preventing edits. Such notes cannot be unlocked, and cannot be selected for updates.
NOTE: A lock and key icon next to a note indicates that it has been electronically signed, preventing edits. Such notes cannot be unlocked, and cannot be selected for updates.
![]() NOTE: For BillingBuilder clients - Progress notes used to generate invoices for procedures associated with configured Daily/Per Diem and Fee for Service billing types will be locked once invoices have been posted to A/R (Post Billings to A/R). The Progress Note Index page displays a dollar sign ($) next to notes that have been used for billing purposes. Edits can be made to all of the progress notes used to generate the invoices in a batch if the batch of invoices is unposted from A/R using the UNPOST BATCH button on the Create Insurance Claims page of the BillingBuilder. Users with the required permissions can also choose to unlock specific progress notes on the note editing index and this action will be recorded in the audit trail, noting whether the billed status was removed.
NOTE: For BillingBuilder clients - Progress notes used to generate invoices for procedures associated with configured Daily/Per Diem and Fee for Service billing types will be locked once invoices have been posted to A/R (Post Billings to A/R). The Progress Note Index page displays a dollar sign ($) next to notes that have been used for billing purposes. Edits can be made to all of the progress notes used to generate the invoices in a batch if the batch of invoices is unposted from A/R using the UNPOST BATCH button on the Create Insurance Claims page of the BillingBuilder. Users with the required permissions can also choose to unlock specific progress notes on the note editing index and this action will be recorded in the audit trail, noting whether the billed status was removed.
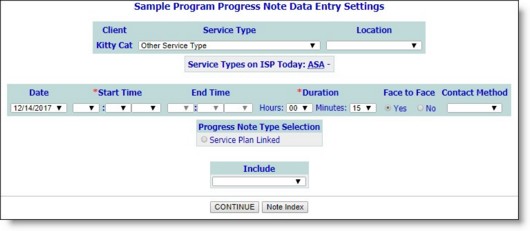
![]() Service Type - Click the drop-down arrow and select the type of service provided during the contact.
Service Type - Click the drop-down arrow and select the type of service provided during the contact.
![]() Location - Click the drop-down arrow and select the location at which the contact with the consumer occurred.
Location - Click the drop-down arrow and select the location at which the contact with the consumer occurred.
![]() Date - Click the drop-down arrow and select the date on which contact with the consumer occurred.
Date - Click the drop-down arrow and select the date on which contact with the consumer occurred.
![]() NOTE: If you have accessed the progress notes functionality from within the Discharge module's Follow Up Notes feature for the purposes of writing a follow up note for a discharged client, please be aware that the date selection list is not limited to dates on or after the consumer's discharge date; it is up to you to specify a date that is post-discharge in such cases. By default, if the date of discharge is within the date range in the date selection list, the discharge date is automatically used as the note date. If the discharge date is prior to the earliest date available in the selection list, the default note date is that earliest available date.
NOTE: If you have accessed the progress notes functionality from within the Discharge module's Follow Up Notes feature for the purposes of writing a follow up note for a discharged client, please be aware that the date selection list is not limited to dates on or after the consumer's discharge date; it is up to you to specify a date that is post-discharge in such cases. By default, if the date of discharge is within the date range in the date selection list, the discharge date is automatically used as the note date. If the discharge date is prior to the earliest date available in the selection list, the default note date is that earliest available date.
![]() Start Time - Click the drop-down arrows and select the time at which contact with the consumer began.
Start Time - Click the drop-down arrows and select the time at which contact with the consumer began.
![]() End Time / Duration - Either End Time or Duration will be required for the note (as noted with a red asterisk).
End Time / Duration - Either End Time or Duration will be required for the note (as noted with a red asterisk).
If End Time is required, click the drop-down arrows and select or make changes to the time at which the contact ended. Duration will be a read-only value that is automatically calculated based on this time.
If Duration is required, click the drop-down arrows and select or make changes to the length of contact in hours and/or minutes. (The default value is 15 minutes for day programs and 30 minutes for housing programs.) End Time will be a read-only value that is automatically calculated based on this duration.
![]() NOTE: The default duration value is configurable and may vary by program type. For more information, please see the Service Contacts - Implementation Request Form.
NOTE: The default duration value is configurable and may vary by program type. For more information, please see the Service Contacts - Implementation Request Form.
![]() Face to Face - Click either the "Yes" or "No" radio button to indicate whether the contact was face to face (in person).
Face to Face - Click either the "Yes" or "No" radio button to indicate whether the contact was face to face (in person).
![]() Contact Method - Click the drop-down arrow and select the contact method that applies to the progress note being recorded. The list contents include: In Person, Phone call, Postal Mail, Text, Email, and Fax.
Contact Method - Click the drop-down arrow and select the contact method that applies to the progress note being recorded. The list contents include: In Person, Phone call, Postal Mail, Text, Email, and Fax.
![]() Location - Click this drop-down arrow and select the group's location.
Location - Click this drop-down arrow and select the group's location.
![]() NOTE: This is an optional setting, not automatically available in all AWARDS databases. If configured, this list is shared with contacts log records, group notes, and progress notes, and is configurable by the agency. For more information, please see the Service Contacts - Implementation Request Form.
NOTE: This is an optional setting, not automatically available in all AWARDS databases. If configured, this list is shared with contacts log records, group notes, and progress notes, and is configurable by the agency. For more information, please see the Service Contacts - Implementation Request Form.
![]() Actual/Attempted Contact - If the progress note originated from a contact log record, this read-only field will display "Actual Contact" or "Attempted Contact" based on this setting on the contact log.
Actual/Attempted Contact - If the progress note originated from a contact log record, this read-only field will display "Actual Contact" or "Attempted Contact" based on this setting on the contact log.
![]() NOTE: This setting does not apply to notes written on the Supportive Services Checklist.
NOTE: This setting does not apply to notes written on the Supportive Services Checklist.
![]() # Units / Unit Type - If necessary, in the # Units field enter the number of units associated with the progress note being recorded. Whole numbers and decimals are accepted. When a value is entered, click the Unit Type drop-down arrow and select the type of unit to which this number applies.
# Units / Unit Type - If necessary, in the # Units field enter the number of units associated with the progress note being recorded. Whole numbers and decimals are accepted. When a value is entered, click the Unit Type drop-down arrow and select the type of unit to which this number applies.
![]() NOTE: By default the Unit Type selection list includes an option for "Miles;" however, this list is customizable using the ListBuilder's "Progress Note Unit Types" record.
NOTE: By default the Unit Type selection list includes an option for "Miles;" however, this list is customizable using the ListBuilder's "Progress Note Unit Types" record.
![]() NOTE: #Units and Unit Type are optional settings, not automatically available in all AWARDS databases. If these options are not currently displayed and you would like them to be, please contact the Help Desk for assistance.
NOTE: #Units and Unit Type are optional settings, not automatically available in all AWARDS databases. If these options are not currently displayed and you would like them to be, please contact the Help Desk for assistance.
![]() Progress Note Type Selection - Click one of the available radio buttons to indicate the type of the progress note being entered or updated.
Progress Note Type Selection - Click one of the available radio buttons to indicate the type of the progress note being entered or updated.
![]() NOTE: To enter a "Service Plan Linked" progress note, a service plan must already be set up for the selected consumer and service type. When the consumer has an active service plan, Service Types on ISP Today displays on the note settings page with a list of active service types. Keep in mind that in order to write a linked note, the Service Type selection (in step 13) must match one of the types displayed on this ISP Today list.
NOTE: To enter a "Service Plan Linked" progress note, a service plan must already be set up for the selected consumer and service type. When the consumer has an active service plan, Service Types on ISP Today displays on the note settings page with a list of active service types. Keep in mind that in order to write a linked note, the Service Type selection (in step 13) must match one of the types displayed on this ISP Today list.
![]() TIP: When working with a discharged client, available note types are governed by the Backdate Permit Max set under System Setup > Business Rules > Service Record Editing Rules, regardless of whether the writer has the backdating permission tied to that max backdating window. For more information, click here.
TIP: When working with a discharged client, available note types are governed by the Backdate Permit Max set under System Setup > Business Rules > Service Record Editing Rules, regardless of whether the writer has the backdating permission tied to that max backdating window. For more information, click here.
![]() Include - If necessary, click the drop-down arrow and select the form that is to be included in the header of the progress note.
Include - If necessary, click the drop-down arrow and select the form that is to be included in the header of the progress note.
![]() NOTE: This option is only displayed when forms created in the FormBuilder have been set to display in progress notes for the selected program.
NOTE: This option is only displayed when forms created in the FormBuilder have been set to display in progress notes for the selected program.
If "Service Plan Linked" is selected as the note type, continue with step 10. For all other note types, continue with step 12.
![]() NOTE: If the progress note being entered has the same note type, client, writer, date, face to face selection, and time of an already existing note, a pop-up message is displayed at this time, stating that a duplicate note exists, instructing you to change one of those settings, or to edit the existing note by selecting it from the editing index page. If the existing note is locked or e-signed, the note amendment feature is displayed instead of the pop-up message, allowing you to add an amendment to the existing note.
NOTE: If the progress note being entered has the same note type, client, writer, date, face to face selection, and time of an already existing note, a pop-up message is displayed at this time, stating that a duplicate note exists, instructing you to change one of those settings, or to edit the existing note by selecting it from the editing index page. If the existing note is locked or e-signed, the note amendment feature is displayed instead of the pop-up message, allowing you to add an amendment to the existing note.
![]() NOTE: Progress notes written with no start time entered are considered to be duplicates if the other note settings are the same (note type, client, writer, face to face selection, and date).
NOTE: Progress notes written with no start time entered are considered to be duplicates if the other note settings are the same (note type, client, writer, face to face selection, and date).
![]() NOTE: A DISCHARGE NOTE button is also available on the Progress Note Data Entry Settings page if the client has been discharged but it is still within the backdated progress note data entry window. Clicking this button instead of CONTINUE in step 12 opens the Discharge Note Composition screen from which you can record discharge notes that will be reflected in the corresponding portion of the individual's discharge record.
NOTE: A DISCHARGE NOTE button is also available on the Progress Note Data Entry Settings page if the client has been discharged but it is still within the backdated progress note data entry window. Clicking this button instead of CONTINUE in step 12 opens the Discharge Note Composition screen from which you can record discharge notes that will be reflected in the corresponding portion of the individual's discharge record.
![]() TIP: If you are writing a service plan linked note, the service type selected here must match one of the service types on the consumer's active service plan.
TIP: If you are writing a service plan linked note, the service type selected here must match one of the service types on the consumer's active service plan.
![]() NOTE: This option is not available for all progress note types.
NOTE: This option is not available for all progress note types.
![]() TIP: The "crisis" selection is primarily used for clinic billing purposes where a second service can be billed for a given day only if it is a crisis service. For general purpose use, the crisis designation does not have any actual functionality behind it and is used for labeling and reporting purposes only.
TIP: The "crisis" selection is primarily used for clinic billing purposes where a second service can be billed for a given day only if it is a crisis service. For general purpose use, the crisis designation does not have any actual functionality behind it and is used for labeling and reporting purposes only.
![]() NOTE: This option is only available when the "No Automatic Locking" option is selected in the System Setup module, Business Rules, Service Record Editing Rules feature.
NOTE: This option is only available when the "No Automatic Locking" option is selected in the System Setup module, Business Rules, Service Record Editing Rules feature.
![]() TIP: If electronic signatures functionality is enabled for progress notes and the signing rules indicate that the note should be available for you to sign at this time, you have the option to sign the note directly from the confirmation page. For instructions on electronically signing progress notes, click here.
TIP: If electronic signatures functionality is enabled for progress notes and the signing rules indicate that the note should be available for you to sign at this time, you have the option to sign the note directly from the confirmation page. For instructions on electronically signing progress notes, click here.
The process of entering or updating a progress note is now complete.
![]() NOTE: When a progress note is written the contacts log is automatically updated with a record for that contact.
NOTE: When a progress note is written the contacts log is automatically updated with a record for that contact.
https://demodb.footholdtechnology.com/help/?10399
