|   |
| |
When generating a ReportBuilder report, users have the ability to start a report format from scratch, which can then be saved for later use as needed. Alternately, reports can be generated from previously saved formats created using the same ReportBuilder. To generate a report using either of these methods - each of which is described in detail here - complete the following steps:
![]() TIP: The steps that follow use the Service Contacts ReportBuilder, accessed from within the Reports module, as an example.
TIP: The steps that follow use the Service Contacts ReportBuilder, accessed from within the Reports module, as an example.
An initial ReportBuilder Settings page is displayed.

![]() IMPORTANT! The specific options you see are based on the ReportBuilder you are currently working with. As a result, it may be useful to review the instructions for the relevant ReportBuilder in Online Help if you have questions about the date range setting(s) available here.
IMPORTANT! The specific options you see are based on the ReportBuilder you are currently working with. As a result, it may be useful to review the instructions for the relevant ReportBuilder in Online Help if you have questions about the date range setting(s) available here.
![]() Clients with Records - The default. Includes in the report all clients with records matching the report settings. Any client WITHOUT records matching the report settings is excluded.
Clients with Records - The default. Includes in the report all clients with records matching the report settings. Any client WITHOUT records matching the report settings is excluded.
![]() All Clients - Includes in the report all clients on the program roster, whether or not they have records that match the report settings. Those without matches will display "--" in the report for data variables where no match exists.
All Clients - Includes in the report all clients on the program roster, whether or not they have records that match the report settings. Those without matches will display "--" in the report for data variables where no match exists.
![]() Select Client - Limits report contents to those records for a single client only. Use the corresponding drop-down (automatically displayed when "Select Client" is selected) to choose the client for whom the report is to be viewed. (This allows you to easily run reports, including saved reports, for a single client without having to use the filter options in step 10.)
Select Client - Limits report contents to those records for a single client only. Use the corresponding drop-down (automatically displayed when "Select Client" is selected) to choose the client for whom the report is to be viewed. (This allows you to easily run reports, including saved reports, for a single client without having to use the filter options in step 10.)
![]() NOTE: In ReportBuilders that have a "One Row Per" setting, the availability of the Client option will, in some cases, be based on what is chosen for that setting. For example, in the Group Notes ReportBuilder, the Client option is displayed when one row per "Group Attendee" has been chosen, but not when one row per "Group Note" has been chosen.
NOTE: In ReportBuilders that have a "One Row Per" setting, the availability of the Client option will, in some cases, be based on what is chosen for that setting. For example, in the Group Notes ReportBuilder, the Client option is displayed when one row per "Group Attendee" has been chosen, but not when one row per "Group Note" has been chosen.
![]() NOTE: When available, the Client selection list is limited to those individuals in the selected program or program group who meet the roster date range criteria specified in step 2.
NOTE: When available, the Client selection list is limited to those individuals in the selected program or program group who meet the roster date range criteria specified in step 2.
![]() NOTE: This option is used to provide access to an ExportBuilder corresponding to the ReportBuilder with which you are working. AWARDS ExportBuilders - which are designed for use by individuals who are familiar with export files and formats, their design, and setup - harness the power of ReportBuilder functionality and take it a step further to meet a variety of outside reporting needs. With ExportBuilders, users can create customized data reports as they would with the ReportBuilder itself, and from those reports generate export files of a number of different types - CSV, TXT, XLS, or XML. Exported files can be saved to your computer, then uploaded into other data collection systems and/or worked with in other applications as needed. Additionally, as can be done with ReportBuilders, ExportBuilder formats can be saved and shared for future use.
NOTE: This option is used to provide access to an ExportBuilder corresponding to the ReportBuilder with which you are working. AWARDS ExportBuilders - which are designed for use by individuals who are familiar with export files and formats, their design, and setup - harness the power of ReportBuilder functionality and take it a step further to meet a variety of outside reporting needs. With ExportBuilders, users can create customized data reports as they would with the ReportBuilder itself, and from those reports generate export files of a number of different types - CSV, TXT, XLS, or XML. Exported files can be saved to your computer, then uploaded into other data collection systems and/or worked with in other applications as needed. Additionally, as can be done with ReportBuilders, ExportBuilder formats can be saved and shared for future use.
The instructions provided in this document detail use of ReportBuilders, and not their corresponding ExportBuilders. For more information on using ExportBuilders, click here.
![]() NOTE: When using this option the report will remain in your messages for one month, after which time it will be deleted. (The exact date of deletion will be displayed in red at the top of the report message for your reference.) If you know you will need the report content after that time, be sure to download the Excel file (Excel File.zip) or HTML content (Report Content.html) attached to the report message. If you don't download one of these attachments before the message is deleted, you will need to manually re-generate the report if you need access to it in the future.
NOTE: When using this option the report will remain in your messages for one month, after which time it will be deleted. (The exact date of deletion will be displayed in red at the top of the report message for your reference.) If you know you will need the report content after that time, be sure to download the Excel file (Excel File.zip) or HTML content (Report Content.html) attached to the report message. If you don't download one of these attachments before the message is deleted, you will need to manually re-generate the report if you need access to it in the future.
![]() Use a previously saved report format - To generate the report using a previously created and saved format (for this ReportBuilder), select that format from this drop-down. When using this method, you can immediately generate the report without changing any settings. Alternately, you can first review and modify the settings of the format by checking off the available Provide option to modify settings of saved report format checkbox.
Use a previously saved report format - To generate the report using a previously created and saved format (for this ReportBuilder), select that format from this drop-down. When using this method, you can immediately generate the report without changing any settings. Alternately, you can first review and modify the settings of the format by checking off the available Provide option to modify settings of saved report format checkbox.
![]() NOTE: This selection list is limited to formats created using the ReportBuilder you have specifically accessed.
NOTE: This selection list is limited to formats created using the ReportBuilder you have specifically accessed.
![]() Start from scratch, without using a previously saved report format - To create your own report format for single-time use or for saving and later re-use, leave the saved report format drop-down blank.
Start from scratch, without using a previously saved report format - To create your own report format for single-time use or for saving and later re-use, leave the saved report format drop-down blank.
![]() NOTE: If you (or another user) have previously saved a default report format for this ReportBuilder and program, that format is pre-selected here. Make changes to the selection as needed, or leave it at its default value.
NOTE: If you (or another user) have previously saved a default report format for this ReportBuilder and program, that format is pre-selected here. Make changes to the selection as needed, or leave it at its default value.
If you are using an existing report format and have NOT chosen to view/modify the settings of that format, you are now taken directly to the report page. Continue with step 18.
![]() NOTE: If you chose to send the report to yourself via the Messages module (in step 5), a notice is first displayed on the page to let you know that report generation is in process and that the report will be sent to your Messages module upon completion. You can then navigate away from the page, or wait for the report to complete, and then proceed with step 18.
NOTE: If you chose to send the report to yourself via the Messages module (in step 5), a notice is first displayed on the page to let you know that report generation is in process and that the report will be sent to your Messages module upon completion. You can then navigate away from the page, or wait for the report to complete, and then proceed with step 18.
If you did NOT use the Send to AWARDS Messages option (in step 5), you will be shown a loading message on the page while the report is being generated, and you will also be given the options to Cancel Report or Send to AWARDS Messages. To have the report displayed as planned, simply wait for it to finish loading and do not click either of these options. If it's necessary to navigate away from the page for any reason however, either of these two options can be used to do so. Cancel Report will stop the report and return you to the previous report settings page. Send to AWARDS Messages will send the report to your AWARDS inbox upon completion, allowing you to navigate away from the ReportBuilder now if needed. These options give you flexibility in instances where you're generating a larger report and don't end up having the time to wait for it, for example, or if you start generating a report and change your mind and want to stop the process for any reason.
In all other instances, the Options page is displayed. Continue with step 8.
![]() NOTE: When working with an existing report format the settings on this page default to those previously saved with that format.
NOTE: When working with an existing report format the settings on this page default to those previously saved with that format.
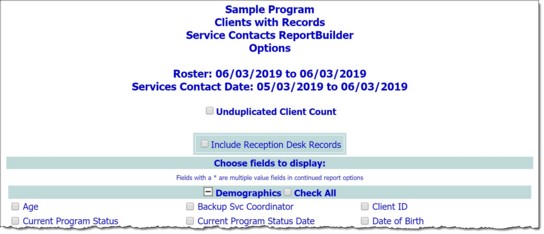
![]() Unduplicated Client Count - By default some reports will include all clients who were enrolled in the selected program(s) at some point during the date range specified in step 2. That may result in duplicate records in instances where a client has multiple histories in a single program, or a history in multiple programs.
Unduplicated Client Count - By default some reports will include all clients who were enrolled in the selected program(s) at some point during the date range specified in step 2. That may result in duplicate records in instances where a client has multiple histories in a single program, or a history in multiple programs.
When applicable to the current ReportBuilder, you will see an Unduplicated Client Count checkbox at the top of the page. Check off that option if you would like to filter out any duplicates, list each client only once in the report, and limit report contents to the most recent data for each included client.
![]() TIP: This option is not available/relevant for all ReportBuilders, based on the type of data being worked with. If you do not see this checkbox, please disregard and continue on to choosing the fields to display.
TIP: This option is not available/relevant for all ReportBuilders, based on the type of data being worked with. If you do not see this checkbox, please disregard and continue on to choosing the fields to display.
![]() Choose fields to display - The Options page contains a list of data variables related to the ReportBuilder you are working with, representing data collected in various AWARDS locations. Click the checkbox next to each variable to be included in the report, and/or use the available Check All options(s) as needed.
Choose fields to display - The Options page contains a list of data variables related to the ReportBuilder you are working with, representing data collected in various AWARDS locations. Click the checkbox next to each variable to be included in the report, and/or use the available Check All options(s) as needed.
![]() TIP: For more information on working with data variable options, click here.
TIP: For more information on working with data variable options, click here.
![]() TIP: Individual detail report options and/or summary table selections must be set before the report can be generated. For more information on using the various report options, see ReportBuilder Configuration Options.
TIP: Individual detail report options and/or summary table selections must be set before the report can be generated. For more information on using the various report options, see ReportBuilder Configuration Options.
![]() TIP: If it is not necessary to save the report format and you only want to generate the report itself, skip to step 17.
TIP: If it is not necessary to save the report format and you only want to generate the report itself, skip to step 17.
![]() TIP: We recommend that the title used be indicative of the report contents so that it is easily identifiable when selecting the format for the purposes of running the report in the future.
TIP: We recommend that the title used be indicative of the report contents so that it is easily identifiable when selecting the format for the purposes of running the report in the future.
When working with a previously saved format, the title defaults to the name of the selected report format. To save the modified report format as a new format and to leave the original format unchanged, enter a new title in this field. If the default title is not changed, the modifications being saved will be applied to the original format.
![]() NOTE: Please keep in mind that only the user who originally saved a format and individuals who can save formats for all users can modify that format. Others can save modified report formats under a new name, but cannot apply all the modifications to the original format.
NOTE: Please keep in mind that only the user who originally saved a format and individuals who can save formats for all users can modify that format. Others can save modified report formats under a new name, but cannot apply all the modifications to the original format.
![]() TIP: At present any descriptions entered using this new field will be for reference purposes in the individual ReportBuilder only; however, in the future this data will be a valuable component of the highly anticipated Saved Report Format ReportBuilder to be made available in a future product release.
TIP: At present any descriptions entered using this new field will be for reference purposes in the individual ReportBuilder only; however, in the future this data will be a valuable component of the highly anticipated Saved Report Format ReportBuilder to be made available in a future product release.
![]() Yourself - When selected, only the user saving the report format has the ability to use or modify that format.
Yourself - When selected, only the user saving the report format has the ability to use or modify that format.
![]() All Staff - When selected, all staff in the program(s) selected when accessing the ReportBuilder have the ability to view the report; however, only you and other individuals with the ability to save reports for all staff will be able to modify or delete that format.
All Staff - When selected, all staff in the program(s) selected when accessing the ReportBuilder have the ability to view the report; however, only you and other individuals with the ability to save reports for all staff will be able to modify or delete that format.
![]() NOTE: Users with the Save ReportBuilder Formats For All Staff permission (assigned under System Setup > Permissions Maintenance) have the ability to save report formats to be used by others. Users without this permission can only save report formats for themselves.
NOTE: Users with the Save ReportBuilder Formats For All Staff permission (assigned under System Setup > Permissions Maintenance) have the ability to save report formats to be used by others. Users without this permission can only save report formats for themselves.
![]() This Program - When selected, the report format being saved is available for use only by the program selected when accessing this ReportBuilder.
This Program - When selected, the report format being saved is available for use only by the program selected when accessing this ReportBuilder.
![]() All Programs - When selected, the report format being saved is available for use by all programs, regardless of which program was selected when accessing this ReportBuilder.
All Programs - When selected, the report format being saved is available for use by all programs, regardless of which program was selected when accessing this ReportBuilder.
![]() NOTE: The "Allow Report Format for" options are only available when a single program was selected when accessing this ReportBuilder. If a program group was selected, the format is saved for all programs in that group by default.
NOTE: The "Allow Report Format for" options are only available when a single program was selected when accessing this ReportBuilder. If a program group was selected, the format is saved for all programs in that group by default.
![]() NOTE: If you chose to send the report to yourself via the Messages module (in step 5), a notice is first displayed on the page to let you know that report generation is in process and that the report will be sent to your Messages module upon completion. You can then navigate away from the page, or wait for the report to complete, and then proceed with step 17.
NOTE: If you chose to send the report to yourself via the Messages module (in step 5), a notice is first displayed on the page to let you know that report generation is in process and that the report will be sent to your Messages module upon completion. You can then navigate away from the page, or wait for the report to complete, and then proceed with step 17.
If you did NOT use the Send to AWARDS Messages option (in step 5), you will be shown a loading message on the page while the report is being generated, and you will also be given the options to Cancel Report or Send to AWARDS Messages. To have the report displayed as planned, simply wait for it to finish loading and do not click either of these options. If it's necessary to navigate away from the page for any reason however, either of these two options can be used to do so. Cancel Report will stop the report and return you to the previous report settings page. Send to AWARDS Messages will send the report to your AWARDS inbox upon completion, allowing you to navigate away from the ReportBuilder now if needed. These options give you flexibility in instances where you're generating a larger report and don't end up having the time to wait for it, for example, or if you start generating a report and change your mind and want to stop the process for any reason.
The process of generating a ReportBuilder report is now complete.
https://demodb.footholdtechnology.com/help/?11749
