|   |
| |
The AWARDS Calendar Events ReportBuilder feature, located in the Reports module, enables you to run reports on each event in the Calendar, including reporting on attendees, status, whether documentation is present (for program appointments), recurring information, future events (if the report is run for future dates), and more!
To create and save a Calendar Events ReportBuilder report that can be re-run in the future, to generate a single-use report, or to use and/or update an existing report format to generate a report, complete the following steps:

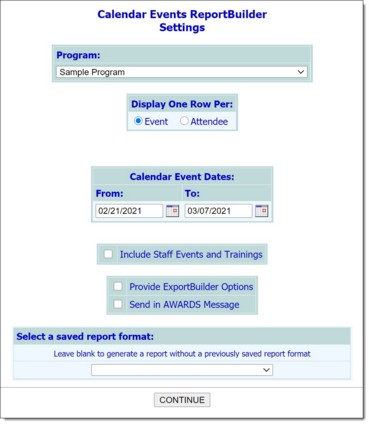
![]() Event - When this option is selected each appointment/event is listed only once in the report, regardless of how many attendees are set for it.
Event - When this option is selected each appointment/event is listed only once in the report, regardless of how many attendees are set for it.
![]() Attendee - When this option is selected each appointment/event is listed multiple times in the report, with one row for each attendee.
Attendee - When this option is selected each appointment/event is listed multiple times in the report, with one row for each attendee.
The default value is "Event." When running the report with one row per "Event," skip ahead to step 8. When one row per "Attendee" is selected, continue with step 7.
![]() Limit by Client/Worker - By default the report contents include all client and/or worker attendees. To limit the contents to a specific client and/or worker, click this check box and configure the related fields/options that are then displayed:
Limit by Client/Worker - By default the report contents include all client and/or worker attendees. To limit the contents to a specific client and/or worker, click this check box and configure the related fields/options that are then displayed:
![]() Client/Worker Date Range - By default the report contents include appointments/events scheduled for any client or worker active as of today's date. (In this context, active means that a client is currently on the roster of one or more programs, and a worker has an active payroll group status record in his/her Staff Information record.) To adjust the range of dates for the purposes of including events for discharged client and/or former employees, make changes to that default date range using the available From and To fields/date pickers. When doing so, please keep in mind that a two year period of your choosing is the maximum length of time that can be used for this date range.
Client/Worker Date Range - By default the report contents include appointments/events scheduled for any client or worker active as of today's date. (In this context, active means that a client is currently on the roster of one or more programs, and a worker has an active payroll group status record in his/her Staff Information record.) To adjust the range of dates for the purposes of including events for discharged client and/or former employees, make changes to that default date range using the available From and To fields/date pickers. When doing so, please keep in mind that a two year period of your choosing is the maximum length of time that can be used for this date range.
![]() IMPORTANT! When adjusting the date range for the purposes of viewing the audit history of a former staff member, note that the To date must be ON or BEFORE the last date of employment.
IMPORTANT! When adjusting the date range for the purposes of viewing the audit history of a former staff member, note that the To date must be ON or BEFORE the last date of employment.
![]() NOTE: In the event that you are creating a new report format that will be saved, please be aware that the date range specified here is not saved with the report; date ranges must be set each time the report is run.
NOTE: In the event that you are creating a new report format that will be saved, please be aware that the date range specified here is not saved with the report; date ranges must be set each time the report is run.
![]() Client - Click this drop-down arrow and make a selection to narrow report content to those events for the selected individual. The default value is "All Clients."
Client - Click this drop-down arrow and make a selection to narrow report content to those events for the selected individual. The default value is "All Clients."
![]() NOTE: The contents of the this drop-down reflect clients with one or more current program histories at some point during the date range specified above.
NOTE: The contents of the this drop-down reflect clients with one or more current program histories at some point during the date range specified above.
![]() Worker - Click this drop-down arrow and make a selection to narrow report content to those events for the selected individual. The default value is "All Workers."
Worker - Click this drop-down arrow and make a selection to narrow report content to those events for the selected individual. The default value is "All Workers."
![]() NOTE: The contents of the this drop-down reflect employees with an open payroll group status record (from HR > Staff Information) overlapping the date range specified above.
NOTE: The contents of the this drop-down reflect employees with an open payroll group status record (from HR > Staff Information) overlapping the date range specified above.
![]() NOTE: This option is used to provide access to an ExportBuilder corresponding to the ReportBuilder with which you are working. AWARDS ExportBuilders - which are designed for use by individuals who are familiar with export files and formats, their design, and setup - harness the power of ReportBuilder functionality and take it a step further to meet a variety of outside reporting needs. With ExportBuilders, users can create customized data reports as they would with the ReportBuilder itself, and from those reports generate export files of a number of different types - CSV, TXT, XLS, or XML. Exported files can be saved to your computer, then uploaded into other data collection systems and/or worked with in other applications as needed. Additionally, as can be done with ReportBuilders, ExportBuilder formats can be saved and shared for future use.
NOTE: This option is used to provide access to an ExportBuilder corresponding to the ReportBuilder with which you are working. AWARDS ExportBuilders - which are designed for use by individuals who are familiar with export files and formats, their design, and setup - harness the power of ReportBuilder functionality and take it a step further to meet a variety of outside reporting needs. With ExportBuilders, users can create customized data reports as they would with the ReportBuilder itself, and from those reports generate export files of a number of different types - CSV, TXT, XLS, or XML. Exported files can be saved to your computer, then uploaded into other data collection systems and/or worked with in other applications as needed. Additionally, as can be done with ReportBuilders, ExportBuilder formats can be saved and shared for future use.
The instructions provided here detail use of the Calendar ReportBuilder only, not the corresponding ExportBuilder. For more information on using ExportBuilders, click here.
![]() NOTE: When using this option the report will remain in your messages for one month, after which time it will be deleted. (The exact date of deletion will be displayed in red at the top of the report message for your reference.) If you know you will need the report content after that time, be sure to download the Excel file (Excel File.zip) or HTML content (Report Content.html) attached to the report message. If you don't download one of these attachments before the message is deleted, you will need to manually re-generate the report if you need access to it in the future.
NOTE: When using this option the report will remain in your messages for one month, after which time it will be deleted. (The exact date of deletion will be displayed in red at the top of the report message for your reference.) If you know you will need the report content after that time, be sure to download the Excel file (Excel File.zip) or HTML content (Report Content.html) attached to the report message. If you don't download one of these attachments before the message is deleted, you will need to manually re-generate the report if you need access to it in the future.
![]() Use a previously saved report format - To generate the report using a previously created and saved format, select that format from this drop-down. When using this method, you can immediately generate the report without changing any settings. Alternately, you can first review and modify the settings of the format by checking off the available Provide option to modify settings of saved report format checkbox.
Use a previously saved report format - To generate the report using a previously created and saved format, select that format from this drop-down. When using this method, you can immediately generate the report without changing any settings. Alternately, you can first review and modify the settings of the format by checking off the available Provide option to modify settings of saved report format checkbox.
![]() TIP: The saved report format list includes several built-in formats made available by Foothold Technology. These formats - each prefixed by "Foothold -" are designed to provide easy access to an equivalent of the summary tables information available when working with the previous version of the Calendar (prior to October 2020). Specifically, available formats include:
TIP: The saved report format list includes several built-in formats made available by Foothold Technology. These formats - each prefixed by "Foothold -" are designed to provide easy access to an equivalent of the summary tables information available when working with the previous version of the Calendar (prior to October 2020). Specifically, available formats include:
- Foothold Report - Client Summary Report - Displays a summary table listing, per client, the number of program appointments in the selected timeframe and their statuses.
- Foothold Report - Staff Summary Report - Displays a summary table listing, per staff member, the number of program appointments in the selected timeframe and their statuses.
- Foothold Report - Progress Note Summary - Displays one row per program appointment scheduled in the selected timeframe, including the client, staff, program, date, start time, and whether documentation is present.
![]() Start from scratch, without using a previously saved report format - To create your own report format for single-time use or for saving and later re-use, leave the saved report format drop-down blank.
Start from scratch, without using a previously saved report format - To create your own report format for single-time use or for saving and later re-use, leave the saved report format drop-down blank.
![]() NOTE: If you (or another user) have previously saved a default report format for this ReportBuilder and program, that format is pre-selected here. Make changes to the selection as needed, or leave it at its default value.
NOTE: If you (or another user) have previously saved a default report format for this ReportBuilder and program, that format is pre-selected here. Make changes to the selection as needed, or leave it at its default value.
If you are using an existing report format and have NOT chosen to view/modify the settings of that format, you are now taken directly to the report page. Continue with step 21.
![]() NOTE: If you chose to send the report to yourself via the Messages module (in step 11), a notice is first displayed on the page to let you know that report generation is in process and that the report will be sent to your Messages module upon completion. You can then navigate away from the page, or wait for the report to complete and then proceed with step 21. If you did NOT set that option, you can do so now by clicking Send to AWARDS Messages.
NOTE: If you chose to send the report to yourself via the Messages module (in step 11), a notice is first displayed on the page to let you know that report generation is in process and that the report will be sent to your Messages module upon completion. You can then navigate away from the page, or wait for the report to complete and then proceed with step 21. If you did NOT set that option, you can do so now by clicking Send to AWARDS Messages.
In all other instances, the Options page is displayed. Continue with step 14.
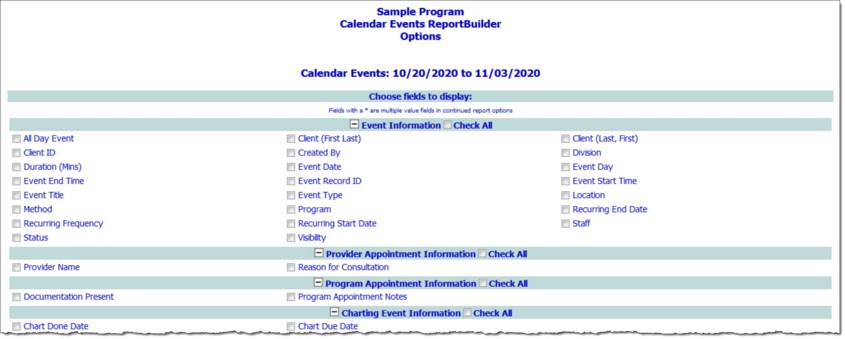
![]() NOTE: Data variables with an asterisk (*) next to them are those for which there may be multiple values for an individual appointment/event. Corresponding results will be displayed in a comma-delimited list on the report.
NOTE: Data variables with an asterisk (*) next to them are those for which there may be multiple values for an individual appointment/event. Corresponding results will be displayed in a comma-delimited list on the report.
Click the checkbox next to each variable for which data is to be included in the report, and/or use the available Check All options as needed.
![]() TIP: Individual detail report options and/or summary table selections must be set before the report can be generated. For more information on using the various report options, please click here.
TIP: Individual detail report options and/or summary table selections must be set before the report can be generated. For more information on using the various report options, please click here.
![]() TIP: If it is not necessary to save the report format and you wish only to view the report contents, please skip to step 20.
TIP: If it is not necessary to save the report format and you wish only to view the report contents, please skip to step 20.
![]() TIP: For more information on using the save report format options, please click here.
TIP: For more information on using the save report format options, please click here.
![]() NOTE: If you chose to send the report to yourself via the Messages module (in step 11), a notice is displayed on the page to let you know that report generation is in process and that the report will be sent to your Messages module upon completion. You can then navigate away from the page, or wait for the report to complete, and then proceed with step 20. If you did NOT set that option, you can do so now by clicking Send to AWARDS Messages.
NOTE: If you chose to send the report to yourself via the Messages module (in step 11), a notice is displayed on the page to let you know that report generation is in process and that the report will be sent to your Messages module upon completion. You can then navigate away from the page, or wait for the report to complete, and then proceed with step 20. If you did NOT set that option, you can do so now by clicking Send to AWARDS Messages.
![]() NOTE: When working with report data, please keep in mind the following:
NOTE: When working with report data, please keep in mind the following:
![]() When the report includes multiple value characteristics (those with an asterisk next to them on the initial Report Options page), the individual detail for each appointment/event includes a list of the values separated by commas. Additionally, because each appointment/event may have more than one value, the summary table totals information for any multiple value data variable may not add up to the total number of appointments/events.
When the report includes multiple value characteristics (those with an asterisk next to them on the initial Report Options page), the individual detail for each appointment/event includes a list of the values separated by commas. Additionally, because each appointment/event may have more than one value, the summary table totals information for any multiple value data variable may not add up to the total number of appointments/events.
![]() When a report is long enough to require you to scroll down the page to view all of its content, the header row of the data table (individual detail and/or summary) "freezes" at the top of the page. Similarly, when printing a report that covers more than one page, the header row of any tables split between pages is shown at the top of each page.
When a report is long enough to require you to scroll down the page to view all of its content, the header row of the data table (individual detail and/or summary) "freezes" at the top of the page. Similarly, when printing a report that covers more than one page, the header row of any tables split between pages is shown at the top of each page.
The process of generating a Calendar Events ReportBuilder report is now complete.
https://demodb.footholdtechnology.com/help/?12360
