|   |
| |
![]() IMPORTANT! Plans and reviews are highly configurable; as a result, they will vary from agency to agency and program to program. The instructions below illustrate working with a plan that has been configured to use electronic signatures; however, your plans/reviews may vary.
IMPORTANT! Plans and reviews are highly configurable; as a result, they will vary from agency to agency and program to program. The instructions below illustrate working with a plan that has been configured to use electronic signatures; however, your plans/reviews may vary.
To electronically sign a plan or review, complete the following steps from the AWARDS Home screen:
![]() TIP: The following instructions detail electronically signing plans and reviews from within the record to be signed. Signatures can also be applied to plans and reviews by running the Plans and Reviews ReportBuilder and clicking the magnifying glass icon in the right-hand column of the report results. If you access a plan for signing in this way, skip ahead to step 13 below.
TIP: The following instructions detail electronically signing plans and reviews from within the record to be signed. Signatures can also be applied to plans and reviews by running the Plans and Reviews ReportBuilder and clicking the magnifying glass icon in the right-hand column of the report results. If you access a plan for signing in this way, skip ahead to step 13 below.
![]() TIP: To e-sign the plans/reviews for a former (discharged) individual, first click the Roster Archives toggle to the right of the client selection list.
TIP: To e-sign the plans/reviews for a former (discharged) individual, first click the Roster Archives toggle to the right of the client selection list.
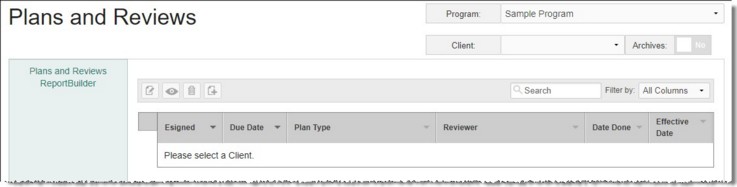
The page is automatically refreshed to display any existing plans/reviews for the selected client.
![]() TIP: When working on the index page, plans/reviews are easily accessible using the following tools and navigation features:
TIP: When working on the index page, plans/reviews are easily accessible using the following tools and navigation features:
![]() Navigation options - 10 records are displayed on the page by default. To access records on subsequent pages of the index (when applicable), click the arrows in the bottom-right corner of the table. To display 25 or 50 records at a time, click the Show drop-down to the left of the record count, also in the bottom-right corner, and make a selection.
Navigation options - 10 records are displayed on the page by default. To access records on subsequent pages of the index (when applicable), click the arrows in the bottom-right corner of the table. To display 25 or 50 records at a time, click the Show drop-down to the left of the record count, also in the bottom-right corner, and make a selection.
Once you select records on the index, a count of how many total records are selected is displayed in the action bar. Selections are maintained while moving from one page of the index to the next; meaning, you can select records on the first page (showing records 1-10 by default) and move to the next page (displaying records 11-20) without losing the selections made on the first page. Links for Show all selected records and Uncheck All are available beneath the index table for easy navigation.
![]() Sorting options - Records in the index are sorted chronologically by due date with the oldest plans listed last. Click a column header in the table to sort the index by a different type of data instead. Click the heading again to reverse the sort.
Sorting options - Records in the index are sorted chronologically by due date with the oldest plans listed last. Click a column header in the table to sort the index by a different type of data instead. Click the heading again to reverse the sort.
![]() Search and filtering options - A Search field is available on the action bar along with a corresponding Filter by drop-down list. To search the contents of the index (including those records not currently displayed on the page), enter a value in the Search field. The index is automatically updated as you type. To further narrow your search, use the Filter by selection to indicate whether the search should look at data in "All Columns" (the default) or a specific column.
Search and filtering options - A Search field is available on the action bar along with a corresponding Filter by drop-down list. To search the contents of the index (including those records not currently displayed on the page), enter a value in the Search field. The index is automatically updated as you type. To further narrow your search, use the Filter by selection to indicate whether the search should look at data in "All Columns" (the default) or a specific column.
![]() In addition, the Plans and Reviews ReportBuilder link on the left-hand menu bar provides a shortcut to access the ReportBuilder for this feature. For instructions on using that ReportBuilder, click here.
In addition, the Plans and Reviews ReportBuilder link on the left-hand menu bar provides a shortcut to access the ReportBuilder for this feature. For instructions on using that ReportBuilder, click here.
![]() IMPORTANT! In the event that the form contains "Employee" electronic signatures, the individual employee names must be selected for each signature during the data entry process. Steps 6 through 10 take you through this process; if you previously updated the Signatures portion of the plan to make those selections, skip ahead to step 10.
IMPORTANT! In the event that the form contains "Employee" electronic signatures, the individual employee names must be selected for each signature during the data entry process. Steps 6 through 10 take you through this process; if you previously updated the Signatures portion of the plan to make those selections, skip ahead to step 10.
![]() NOTE: If you do not see a Signatures option on the left-hand menu it is an indication that this type of plan has not been configured by your AWARDS administrators to use e-signing. Unless/until a Signatures section is added to the plan in the future, the remainder of the steps will not apply.
NOTE: If you do not see a Signatures option on the left-hand menu it is an indication that this type of plan has not been configured by your AWARDS administrators to use e-signing. Unless/until a Signatures section is added to the plan in the future, the remainder of the steps will not apply.
![]() TIP: The employee selection list is comprised of staff with chart access permission to the program in which the plan/review is being completed.
TIP: The employee selection list is comprised of staff with chart access permission to the program in which the plan/review is being completed.
![]() NOTE: When the signatures page is saved in data entry mode for the first time, an automatically generated AWARDS message is sent to any employee(s) configured to sign the plan as part of the first order level. (For more information on signing order levels and workflow, click here.)
NOTE: When the signatures page is saved in data entry mode for the first time, an automatically generated AWARDS message is sent to any employee(s) configured to sign the plan as part of the first order level. (For more information on signing order levels and workflow, click here.)
![]() NOTE: Keep in mind that although signing a form locks the contents of that plan from further edits, employee selections can still be made and changed as needed after an electronic signature has been placed on the plan, as long as the employee signature line itself has not yet been used to sign the plan/review. In this context, a record of refusal/unavailability for a signature (if the plan/review has been configured to allow for it) is not considered a signature and notes not prevent selection of a new/different employee at this time.
NOTE: Keep in mind that although signing a form locks the contents of that plan from further edits, employee selections can still be made and changed as needed after an electronic signature has been placed on the plan, as long as the employee signature line itself has not yet been used to sign the plan/review. In this context, a record of refusal/unavailability for a signature (if the plan/review has been configured to allow for it) is not considered a signature and notes not prevent selection of a new/different employee at this time.
![]() IMPORTANT! In order for all of the necessary information to be collected for a signature row on the Plans and Reviews ReportBuilder, the signatures tab of the plan/review must have been saved in data entry mode to reflect any employee selections (even if it is only to accept the default values). If any employee signature line is appended with "([signer role] selected)," it is an indication that the default value has NOT been changed or saved, and you should do so now.
IMPORTANT! In order for all of the necessary information to be collected for a signature row on the Plans and Reviews ReportBuilder, the signatures tab of the plan/review must have been saved in data entry mode to reflect any employee selections (even if it is only to accept the default values). If any employee signature line is appended with "([signer role] selected)," it is an indication that the default value has NOT been changed or saved, and you should do so now.
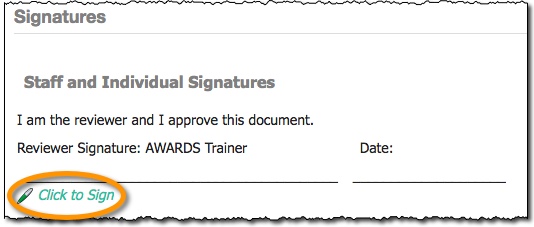
![]() Click to Sign - Available if the plan was configured to include an electronic signature line with a signer type of "Employee," AND if you were specified as the relevant employee,either automatically based on a configured signer role, or manually during the plan data entry process.
Click to Sign - Available if the plan was configured to include an electronic signature line with a signer type of "Employee," AND if you were specified as the relevant employee,either automatically based on a configured signer role, or manually during the plan data entry process.
![]() Allow Client to Sign - Available if the plan was configured to include an electronic signature line with a signer type of "Client." Displayed for all staff with access to the plan so that they can assist the applicable client with the signing process.
Allow Client to Sign - Available if the plan was configured to include an electronic signature line with a signer type of "Client." Displayed for all staff with access to the plan so that they can assist the applicable client with the signing process.
![]() Allow Other to Sign - Available if the plan was configured to include an electronic signature line with a signer type of "Other." Displayed for all staff with access to the plan so that they can assist the applicable other person with the signing process.
Allow Other to Sign - Available if the plan was configured to include an electronic signature line with a signer type of "Other." Displayed for all staff with access to the plan so that they can assist the applicable other person with the signing process.
![]() Click for Refused/Unavailable - Available if the plan was configured to allow for recording of a signature refusal or signer unavailability for a given signature line. Displayed for all staff with access to the plan so that they can record this information when necessary.
Click for Refused/Unavailable - Available if the plan was configured to allow for recording of a signature refusal or signer unavailability for a given signature line. Displayed for all staff with access to the plan so that they can record this information when necessary.
![]() IMPORTANT! If, in place of one of the above links you see the note "Other Signatures Required Before Signing is Available," it is an indication that this type of plan/review has been configured in such a way that one or more other signatures are required before action can be taken. If you are assigned to an employee signature line not yet available, you will be notified via AWARDS Messages when your signature is required.
IMPORTANT! If, in place of one of the above links you see the note "Other Signatures Required Before Signing is Available," it is an indication that this type of plan/review has been configured in such a way that one or more other signatures are required before action can be taken. If you are assigned to an employee signature line not yet available, you will be notified via AWARDS Messages when your signature is required.
![]() NOTE: When viewing this page, please keep in mind the following:
NOTE: When viewing this page, please keep in mind the following:
![]() If a default authority level was specified for a particular signature line when the plan was created, and the "other" option was not made available, the default level is displayed on the page; otherwise, no authority level information is shown.
If a default authority level was specified for a particular signature line when the plan was created, and the "other" option was not made available, the default level is displayed on the page; otherwise, no authority level information is shown.
![]() Until a signature line has been used to electronically sign the plan, a default blank line is displayed to allow for a manual signature in case the plan needs to be printed before e-signing takes place.
Until a signature line has been used to electronically sign the plan, a default blank line is displayed to allow for a manual signature in case the plan needs to be printed before e-signing takes place.
![]() Signature titles are only required during plan configuration for the "Employee" signer type. If one was not specified for a "Client" or "Other" signature line, that line is identified by the signer type only.
Signature titles are only required during plan configuration for the "Employee" signer type. If one was not specified for a "Client" or "Other" signature line, that line is identified by the signer type only.
 Click to Sign (for use by staff)
Allow client / other to sign (for use by staff assisting clients/others in signing)
Click for Refused / Unavailable (for use by staff or by staff assisting clients/others)
![]() IMPORTANT! Clicking the SIGN NOW button is an acknowledgment that the individual doing so is the authorized signer. An electronic signature constitutes a legally binding symbol that authenticates the document to which it is attached.
IMPORTANT! Clicking the SIGN NOW button is an acknowledgment that the individual doing so is the authorized signer. An electronic signature constitutes a legally binding symbol that authenticates the document to which it is attached.
When SIGN NOW is clicked, the plan is signed and the electronic signature is displayed with that plan in the Signatures section (replacing the default blank signature line). The signature is composed of the signature title (if applicable), authority level, signer name, job title (if applicable), signer credentials (for employees, if included), comments/notes (if applicable), the signature or initials image if one was selected or the image was captured with the signature pad, and the date and time on which the form was signed if that information was set to be included.
When SAVE is clicked, a record of signature refusal or signer unavailability is affixed to the plan in the Signatures section (above the default blank signature line). This record is composed of the signature title (if applicable), assigned signer's name and title (if applicable), a note that he/she "did not sign," the reason for refusal/unavailability, and any comments/notes (if applicable). As the person who recorded the refusal/unavailability, your name and the date and time you saved the information are also included as part of this record.
In all instances - whether the plan has been signed or a refusal/unavailability has been recorded - the plan is locked from further edits (with the exception of selecting additional/different staff members for available Employee signature lines, if applicable, and the ability to set an effective date if one has not already been entered). Plans that have been signed and locked by signatures or refusals/unavailability are shown with a lock and key icon next to them in the plans and reviews index.
Additionally, note that when a signature (or refusal/signer unavailability) is affixed to a plan/review, if doing so meets workflow requirements set for that plan in the PlanBuilder, an automatically generated AWARDS message is sent to any employee(s) configured to sign the plan as part of the next order level. (For more information on signing order levels and workflow, click here.)
The process of electronically signing a plan is now complete.
https://demodb.footholdtechnology.com/help/?12080
