|   |
| |
![]() IMPORTANT! Plans and reviews are highly configurable; as a result, they will vary from agency to agency and program to program. The instructions below illustrate working with a basic goal plan/review with plan tiers that use the default labels of "Goal," "Objective," and "Intervention;" however, your plans/reviews may be configured differently, including the use of one or more custom sections.
IMPORTANT! Plans and reviews are highly configurable; as a result, they will vary from agency to agency and program to program. The instructions below illustrate working with a basic goal plan/review with plan tiers that use the default labels of "Goal," "Objective," and "Intervention;" however, your plans/reviews may be configured differently, including the use of one or more custom sections.
To schedule, complete, delete, or view/print a plan or review, complete the following steps from the AWARDS Home screen:
![]() TIP: To work with the plans/reviews for a former (discharged) individual, first click the Roster Archives toggle to the right of the client selection list.
TIP: To work with the plans/reviews for a former (discharged) individual, first click the Roster Archives toggle to the right of the client selection list.
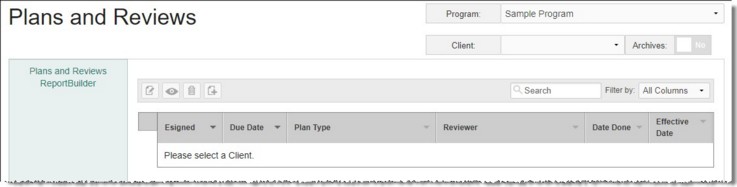
The page is automatically refreshed to display any existing plans/reviews for the selected client.
![]() TIP: When working on the index page, plans/reviews are easily accessible using the following tools and navigation features:
TIP: When working on the index page, plans/reviews are easily accessible using the following tools and navigation features:
![]() Navigation options - 10 records are displayed on the page by default. To access records on subsequent pages of the index (when applicable), click the arrows in the bottom-right corner of the table. To display 25 or 50 records at a time, click the Show drop-down to the left of the record count, also in the bottom-right corner, and make a selection.
Navigation options - 10 records are displayed on the page by default. To access records on subsequent pages of the index (when applicable), click the arrows in the bottom-right corner of the table. To display 25 or 50 records at a time, click the Show drop-down to the left of the record count, also in the bottom-right corner, and make a selection.
Once you select records on the index, a count of how many total records are selected is displayed in the action bar. Selections are maintained while moving from one page of the index to the next; meaning, you can select records on the first page (showing records 1-10 by default) and move to the next page (displaying records 11-20) without losing the selections made on the first page. Links for Show all selected records and Uncheck All are available beneath the index table for easy navigation.
![]() Sorting options - Records in the index are sorted chronologically by due date with the oldest plans listed last. Click a column header in the table to sort the index by a different type of data instead. Click the heading again to reverse the sort.
Sorting options - Records in the index are sorted chronologically by due date with the oldest plans listed last. Click a column header in the table to sort the index by a different type of data instead. Click the heading again to reverse the sort.
![]() Search and filtering options - A Search field is available on the action bar along with a corresponding Filter by drop-down list. To search the contents of the index (including those records not currently displayed on the page), enter a value in the Search field. The index is automatically updated as you type. To further narrow your search, use the Filter by selection to indicate whether the search should look at data in "All Columns" (the default) or a specific column.
Search and filtering options - A Search field is available on the action bar along with a corresponding Filter by drop-down list. To search the contents of the index (including those records not currently displayed on the page), enter a value in the Search field. The index is automatically updated as you type. To further narrow your search, use the Filter by selection to indicate whether the search should look at data in "All Columns" (the default) or a specific column.
![]() In addition, the Plans and Reviews ReportBuilder link on the left-hand menu bar provides a shortcut to access the ReportBuilder for this feature. For instructions on using that ReportBuilder, click here.
In addition, the Plans and Reviews ReportBuilder link on the left-hand menu bar provides a shortcut to access the ReportBuilder for this feature. For instructions on using that ReportBuilder, click here.
![]()
![]() Schedule and fill out a new plan / review - To do so, click the add new icon from the action bar above the plans/reviews table. A new data entry page is displayed. Configure the fields and options on this page as follows:
Schedule and fill out a new plan / review - To do so, click the add new icon from the action bar above the plans/reviews table. A new data entry page is displayed. Configure the fields and options on this page as follows:
![]() Due Date - In this field, type the due date for the plan using mm/dd/yyyy format, or select it using the available date picker drop-down arrow.
Due Date - In this field, type the due date for the plan using mm/dd/yyyy format, or select it using the available date picker drop-down arrow.
![]() Type - Click this drop-down arrow and select the plan type. The selection list options will vary based on the type of plan configured for use with this program. In a basic Goal Plan that uses the default plan labels, the options will be "Service Plan - Initial Plan" and "Service Plan - Plan Review." (Keep in mind that once the plan has been saved the type can no longer be changed.)
Type - Click this drop-down arrow and select the plan type. The selection list options will vary based on the type of plan configured for use with this program. In a basic Goal Plan that uses the default plan labels, the options will be "Service Plan - Initial Plan" and "Service Plan - Plan Review." (Keep in mind that once the plan has been saved the type can no longer be changed.)
![]() Reviewer - Click this drop-down arrow and select the worker responsible for the plan/review being scheduled. The contents of this list include users with chart access permission to the program selected in step 1.
Reviewer - Click this drop-down arrow and select the worker responsible for the plan/review being scheduled. The contents of this list include users with chart access permission to the program selected in step 1.
Click Save.
If you're scheduling a review a pop-up is displayed asking if you'd like to copy review data. If you want to pull data in from the initial plan (in the case of the first review) or the previous review (in the case of subsequent reviews), click Copy Data; otherwise, click Return to Index. (Note that the copy option is only made available when the last plan has a due date that is prior to the due date of the new plan.)
If you scheduled an initial plan or a review using the Copy Data option, the plan/review is now opened for data entry. To fill out the plan/review at this time, continue with step 9; otherwise, the scheduling process is complete.
![]()
![]() Update or complete an existing plan / review - To do so, click the checkbox to the left of the plan/review to be worked with, and then click the edit icon from the action bar above the plans/reviews table. The plan is opened in data entry mode.
Update or complete an existing plan / review - To do so, click the checkbox to the left of the plan/review to be worked with, and then click the edit icon from the action bar above the plans/reviews table. The plan is opened in data entry mode.
Use the options on the left-hand menu bar to navigate through the plan and to make changes or additions as needed. Be sure to click Save at the bottom of each page you've made edits to before proceeding. Use the Show Discontinued Items radio button/filter to set which plan items to display. Select "Yes" to work with the entire plan, or "No" to hide discontinued items and only work with active plan components.
When the plan/review is fully complete, click the Attributes option in the left-hand menu and enter a value in the Effective Date field. Doing so finalizes and locks the plan, preventing further edits (aside from the application of electronic signatures if the plan has been set up to use them). Click Save to apply your change.
![]() NOTE: If the plan is locked, the Due Date can only be updated if you have the "Plans and Reviews - Modify Due Date on Locked Plans" permission assigned using Permissions Maintenance. If you have this permission can you change the Due Date to any date between the previous plan's due date and the subsequent plan's due date.
NOTE: If the plan is locked, the Due Date can only be updated if you have the "Plans and Reviews - Modify Due Date on Locked Plans" permission assigned using Permissions Maintenance. If you have this permission can you change the Due Date to any date between the previous plan's due date and the subsequent plan's due date.
![]() NOTE: If the plan is unlocked, and your agency is configured to require the optional "Plans and Reviews - Modify Due Date on Unlocked Plans" permission, that permission must be assigned to you using Permissions Maintenance in order for you to change the plan's Due Date.
NOTE: If the plan is unlocked, and your agency is configured to require the optional "Plans and Reviews - Modify Due Date on Unlocked Plans" permission, that permission must be assigned to you using Permissions Maintenance in order for you to change the plan's Due Date.
The process of updating or complete an existing plan/review is now complete. The remaining steps do not apply.
![]()
![]() View or print an existing plan / review - To do so, click the checkbox to the left of the plan/review to be viewed/printed, and then click the view icon from the action bar above the plans/reviews table. A read-only version of the plan/review is displayed and can be printed as needed using your browser's print option.
View or print an existing plan / review - To do so, click the checkbox to the left of the plan/review to be viewed/printed, and then click the view icon from the action bar above the plans/reviews table. A read-only version of the plan/review is displayed and can be printed as needed using your browser's print option.
![]() TIP: It is from the read-only version of the plan/review that electronic signing also takes place if the plan has been configured to include a Signatures section. For more information on the signing process, see Electronically Signing a Plan / Review.
TIP: It is from the read-only version of the plan/review that electronic signing also takes place if the plan has been configured to include a Signatures section. For more information on the signing process, see Electronically Signing a Plan / Review.
The process of viewing or printing an existing plan/review is now complete. The remaining steps do not apply.
![]()
![]() Delete an existing plan / review - To do so, click the checkbox(es) to the left of the record(s) to be deleted, and then click the delete icon from the action bar above the plans/reviews table. A confirmation message is displayed. Click OK to proceed with the deletion. The selected record(s) are deleted and the updated index is displayed.
Delete an existing plan / review - To do so, click the checkbox(es) to the left of the record(s) to be deleted, and then click the delete icon from the action bar above the plans/reviews table. A confirmation message is displayed. Click OK to proceed with the deletion. The selected record(s) are deleted and the updated index is displayed.
![]() TIP: A plan/review can only be deleted if there is currently no effective date set for it, it has not been e-signed, and the content of no later plan/review has been copied from it.
TIP: A plan/review can only be deleted if there is currently no effective date set for it, it has not been e-signed, and the content of no later plan/review has been copied from it.
![]() NOTE: If your agency has the optional "Plans and Reviews Deletion" permission turned on, you must have that permission assigned to you under Permissions Maintenance in order to delete unlocked plans that meet the criteria for deletion.
NOTE: If your agency has the optional "Plans and Reviews Deletion" permission turned on, you must have that permission assigned to you under Permissions Maintenance in order to delete unlocked plans that meet the criteria for deletion.
The process of deleting an existing plan/review is now complete. The remaining steps do not apply.
![]()
![]() Return to the Plans and Reviews index - To do so, click the To Index icon from the action bar while working in a record to return to the index page. You can also return to the index page at any time by clicking Plans and Reviews from the breadcrumbs trail below the AWARDS navigation bar.
Return to the Plans and Reviews index - To do so, click the To Index icon from the action bar while working in a record to return to the index page. You can also return to the index page at any time by clicking Plans and Reviews from the breadcrumbs trail below the AWARDS navigation bar.
a) Fill in the Goal Statement and Rationale for Goal text boxes.
b) Beneath the goal click + Add Objective to add related objectives.
c) Fill in the Individual's Objective.
d) Repeat b and c until all objectives related to this goal have been entered.
e) Beneath each objective click + Intervention to add related interventions detail.
f) Fill in the Staff Interventions information as completely as possible.
g) Repeat e and f until all interventions for each objective have been entered.
h) Click Save. The goal and related data is saved and the left-hand menu is updated (reflecting the name of the new goal).
![]() TIP: If you prefer to save your work more frequently, you can do so after entering data at any point in step 8.
TIP: If you prefer to save your work more frequently, you can do so after entering data at any point in step 8.
![]() TIP: If at any time you need to delete a goal, objective, or intervention, click the delete icon corresponding to that plan component. Keep in mind that deleting a component will also delete related items; for example, deleting a goal will also delete any associated objectives and interventions. Similarly, if it's necessary to discontinue a goal, objective, or intervention on a review, click the discontinue (file cabinet) icon corresponding to that plan component. As with deleting, discontinuing a component will also discontinue related items; for example, discontinuing a goal will also discontinue any associated objectives and interventions.
TIP: If at any time you need to delete a goal, objective, or intervention, click the delete icon corresponding to that plan component. Keep in mind that deleting a component will also delete related items; for example, deleting a goal will also delete any associated objectives and interventions. Similarly, if it's necessary to discontinue a goal, objective, or intervention on a review, click the discontinue (file cabinet) icon corresponding to that plan component. As with deleting, discontinuing a component will also discontinue related items; for example, discontinuing a goal will also discontinue any associated objectives and interventions.
![]() TIP: You cannot enter an Effective Date that falls on or before the date of existing linked records (service plan linked notes or linked group notes). If such a date is entered, an error message is displayed with the first available date.
TIP: You cannot enter an Effective Date that falls on or before the date of existing linked records (service plan linked notes or linked group notes). If such a date is entered, an error message is displayed with the first available date.
![]() NOTE: Effective dates cannot be more than 60 days in the future.
NOTE: Effective dates cannot be more than 60 days in the future.
Click Save to apply your change.
![]() NOTE: If the plan's done date has not already been entered, AWARDS automatically populates the done date field with the effective date specified here. For information on the difference between done and effective dates, click here.
NOTE: If the plan's done date has not already been entered, AWARDS automatically populates the done date field with the effective date specified here. For information on the difference between done and effective dates, click here.
The process of working with plans and reviews is now complete.
https://demodb.footholdtechnology.com/help/?12079
