|   |
| |
To work with entitlements records during the intake/admission process, complete the following steps from the AWARDS Home screen:
![]() TIP: You can also choose to re-process intake/admission in order to adjust the entitlement information entered previously; however, if you have access to the Certified Entitlements feature it is recommended that such changes be made there instead, as it allows for more detailed data entry.
TIP: You can also choose to re-process intake/admission in order to adjust the entitlement information entered previously; however, if you have access to the Certified Entitlements feature it is recommended that such changes be made there instead, as it allows for more detailed data entry.
If the program you're working with is configured to use Consent Forms during the intake/Admission process, the Consent Form page is displayed; continue with step 3. If the program is NOT configured to use the Consent Form, the Certified Entitlements page is displayed; skip ahead to step 4.
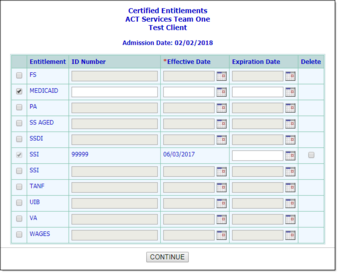
The Certified Entitlements data entry page contains a list of entitlements configured by your agency for the program type with which you are working.
![]() NOTE: When processing an intake, room reservation, or admission for a client who has an existing program history in AWARDS, whether in the same program you're working with or in a different program, the client’s current entitlements will automatically display the ID Number and Effective Date in read-only mode.
NOTE: When processing an intake, room reservation, or admission for a client who has an existing program history in AWARDS, whether in the same program you're working with or in a different program, the client’s current entitlements will automatically display the ID Number and Effective Date in read-only mode.
![]() TIP: You may complete any combination of these tasks for multiple entitlements without navigating away from the page.
TIP: You may complete any combination of these tasks for multiple entitlements without navigating away from the page.
![]() TIP: To bypass the entitlement data entry process, for example if you do not have the necessary information at the time of intake/admission, skip ahead to step 5.
TIP: To bypass the entitlement data entry process, for example if you do not have the necessary information at the time of intake/admission, skip ahead to step 5.
![]() Add a new entitlement record - Check the box to the left of the entitlement type to be added, and then configure the fields on this page as necessary.
Add a new entitlement record - Check the box to the left of the entitlement type to be added, and then configure the fields on this page as necessary.
![]() Update an existing entitlement record - Check the box to the left of the entitlement to be updated, and then make changes to the information on this page as necessary.
Update an existing entitlement record - Check the box to the left of the entitlement to be updated, and then make changes to the information on this page as necessary.
![]() TIP: If a client has existing current entitlements during the intake/admission process, you can either close the entitlement by entering an Expiration Date, or you can delete the entitlement, if you have the Entitlement Deletion data entry/access permission, as noted below. The entitlement ID Number and Effective Date are not editable.
TIP: If a client has existing current entitlements during the intake/admission process, you can either close the entitlement by entering an Expiration Date, or you can delete the entitlement, if you have the Entitlement Deletion data entry/access permission, as noted below. The entitlement ID Number and Effective Date are not editable.
![]() Delete an existing entitlement record - Check the Delete checkbox to the right of the entitlement to be deleted. A confirmation pop-up is displayed. Click OK to confirm the deletion and apply the delete check mark, indicating that this entitlement will be deleted when you proceed with step 5.
Delete an existing entitlement record - Check the Delete checkbox to the right of the entitlement to be deleted. A confirmation pop-up is displayed. Click OK to confirm the deletion and apply the delete check mark, indicating that this entitlement will be deleted when you proceed with step 5.
![]() NOTE: The Delete option is only available if you have the Entitlements Deletion data entry/access permission assigned using Permissions Maintenance. If you do not have access to that feature and need this permission, please contact your supervisor or your local Help Desk for assistance.
NOTE: The Delete option is only available if you have the Entitlements Deletion data entry/access permission assigned using Permissions Maintenance. If you do not have access to that feature and need this permission, please contact your supervisor or your local Help Desk for assistance.
If the program you're working with is configured to use the Household Composition feature, the Household Composition page is now displayed; otherwise, you are taken to the client's face sheet.
The process of working with entitlements at intake/admission is now complete.
https://demodb.footholdtechnology.com/help/?12216
