|   |
| |
To process consumer intake/admission into a program using the single-step intake form, complete the following steps:
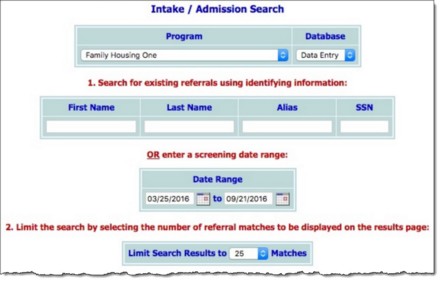
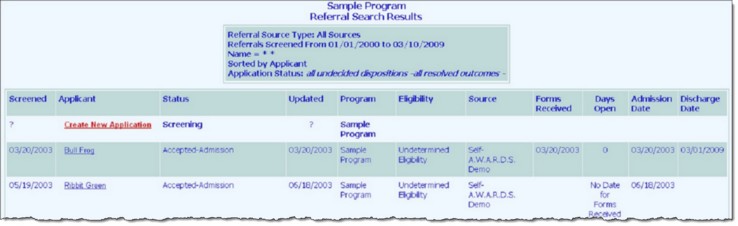
This page contains a list of any existing intake records for which the identifying information matches that entered on the Intake Records Search page.
![]() TIP: Click the heading of any column in the results table to sort the contents by that variable.
TIP: Click the heading of any column in the results table to sort the contents by that variable.
![]() If the consumer has an existing intake record with an admission date and no discharge date, he or she is currently on the program roster and a new intake/admission should not be processed.
If the consumer has an existing intake record with an admission date and no discharge date, he or she is currently on the program roster and a new intake/admission should not be processed.
![]() If the consumer has an existing intake record with both an admission and discharge date, and he or she is being re-admitted to the program, a new intake/admission must be processed. Continue with step 12.
If the consumer has an existing intake record with both an admission and discharge date, and he or she is being re-admitted to the program, a new intake/admission must be processed. Continue with step 12.
![]() If the consumer does not have an existing intake record, one must be created before intake/admission can be processed. Continue with step 12.
If the consumer does not have an existing intake record, one must be created before intake/admission can be processed. Continue with step 12.
![]() NOTE: It is also possible for a referral to appear in these results, if the admission process was started via the Household Composition re-direct to admit a household member, but the form was never processed. In that case, open the referral and continue to step 13.
NOTE: It is also possible for a referral to appear in these results, if the admission process was started via the Household Composition re-direct to admit a household member, but the form was never processed. In that case, open the referral and continue to step 13.
![]() TIP: Residential programs that are set to collect household information contain a Residence drop-down list that is separated into two sections: Vacant Units and Occupied Units. The beds listed under Vacant Units belong to apartments/units were all beds are listed as vacant. The beds listed under Occupied Units belong to apartments/units where at least one bed is already occupied. Selecting a bed listed under Occupied Units places the client in a unit with roommates, which may be other household members.
TIP: Residential programs that are set to collect household information contain a Residence drop-down list that is separated into two sections: Vacant Units and Occupied Units. The beds listed under Vacant Units belong to apartments/units were all beds are listed as vacant. The beds listed under Occupied Units belong to apartments/units where at least one bed is already occupied. Selecting a bed listed under Occupied Units places the client in a unit with roommates, which may be other household members.
![]() NOTE: Programs set to submit the HUD APR require more data entry at intake/admission than non-APR programs, so the fields and options on the admission form may be different from program-to-program.
NOTE: Programs set to submit the HUD APR require more data entry at intake/admission than non-APR programs, so the fields and options on the admission form may be different from program-to-program.
![]() Admit the consumer - Click HOUSING ADMISSION or PROCESS ADMISSION (which label is used for this button is determined by the program type - residential or non-residential, respectively). The consumer's admission form is saved, he or she is admitted to the selected program, and a read-only report version of the admission form is displayed if the program does not collect household information. If the program is set to collect household information, the Household Composition page is displayed and you can place the consumer into a new or existing household. For instructions on that process and on working with household information more generally, click here.
Admit the consumer - Click HOUSING ADMISSION or PROCESS ADMISSION (which label is used for this button is determined by the program type - residential or non-residential, respectively). The consumer's admission form is saved, he or she is admitted to the selected program, and a read-only report version of the admission form is displayed if the program does not collect household information. If the program is set to collect household information, the Household Composition page is displayed and you can place the consumer into a new or existing household. For instructions on that process and on working with household information more generally, click here.
![]() Reject the consumer - Click Not Accepted Into Program. The consumer's admission form is then saved with the application status of rejected.
Reject the consumer - Click Not Accepted Into Program. The consumer's admission form is then saved with the application status of rejected.
![]() TIP: To make changes to the intake/admission information at this time, click DATA ENTRY to return to the Admission Form data entry page.
TIP: To make changes to the intake/admission information at this time, click DATA ENTRY to return to the Admission Form data entry page.
![]() NOTE: If any data entry errors are found by AWARDS after HOUSING ADMISSION / PROCESS ADMISSION or Not Accepted Into Program is clicked, the admission/rejection process is halted and the errors are listed in red at the top and the page. In the event that an error is received, make any necessary corrections, and click the appropriate button again before proceeding.
NOTE: If any data entry errors are found by AWARDS after HOUSING ADMISSION / PROCESS ADMISSION or Not Accepted Into Program is clicked, the admission/rejection process is halted and the errors are listed in red at the top and the page. In the event that an error is received, make any necessary corrections, and click the appropriate button again before proceeding.
If the listed default referral source is correct, the intake/admission process is now complete. However, if the referral source needs to be updated, continue with step 15.
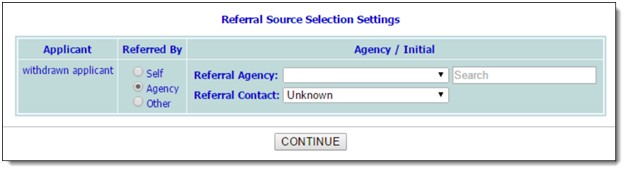
![]() NOTE: Referral source information must be entered before intake or admission can be processed for a referral.
NOTE: Referral source information must be entered before intake or admission can be processed for a referral.
![]() Self - If the client was self-referred, click this radio button and continue with step 17.
Self - If the client was self-referred, click this radio button and continue with step 17.
![]() Other - If the client was referred in another way, click this radio button and continue with step 17.
Other - If the client was referred in another way, click this radio button and continue with step 17.
![]() Agency - If the client was referred by another agency, click this radio button and continue with step 18.
Agency - If the client was referred by another agency, click this radio button and continue with step 18.
![]() NOTE: The agency select list includes those agencies specified for inclusion as Admission Referral Sources in the Referral Agencies feature.
NOTE: The agency select list includes those agencies specified for inclusion as Admission Referral Sources in the Referral Agencies feature.
To first narrow the contents of the selection list, type the first few letters of the agency's name or street address in the corresponding Search field.
![]() TIP: New referring agencies and contacts cannot be added from within a a referral/admission record. If it is necessary to have an addition made and you do not have access to the Referral Agencies module, contact your local Help Desk team for assistance. They can assist you or put you in touch with someone with the necessary access.
TIP: New referring agencies and contacts cannot be added from within a a referral/admission record. If it is necessary to have an addition made and you do not have access to the Referral Agencies module, contact your local Help Desk team for assistance. They can assist you or put you in touch with someone with the necessary access.
The intake/admission process is now complete.
https://demodb.footholdtechnology.com/help/?11315
