|   |
| |
To access the Calendar, click Calendar from the navigation bar at the top of any AWARDS page:
The Calendar is then displayed, showing you either:
![]() The default settings - Defaults will vary based on how you've configured your Calendar settings. The system default is comprised of your scheduled appointments/events in all agency programs for the current business week and business hours, with weekends reflected if you have turned on that optional setting. Alternatively, you can set one of your saved views as the default. If such a default has been set, it will be displayed the first time you access the Calendar upon logging in.
The default settings - Defaults will vary based on how you've configured your Calendar settings. The system default is comprised of your scheduled appointments/events in all agency programs for the current business week and business hours, with weekends reflected if you have turned on that optional setting. Alternatively, you can set one of your saved views as the default. If such a default has been set, it will be displayed the first time you access the Calendar upon logging in.
![]() The last settings you used - If you navigated away from the Calendar and are now returning to it, it displays with the settings you were previously using intact.
The last settings you used - If you navigated away from the Calendar and are now returning to it, it displays with the settings you were previously using intact.
From there, you can adjust your view as needed, customizing it in a variety of ways. Read on to learn more!
![]() TIP: See a green bar moving across the top of your Calendar? It's an indication that the Calendar page is in the process of loading.
TIP: See a green bar moving across the top of your Calendar? It's an indication that the Calendar page is in the process of loading.
Calendar Navigation Basics
Understanding the basics of how the Calendar is structured will provide you with the foundation for your work there. The following screenshot highlights some of the key navigation components you'll be working with.
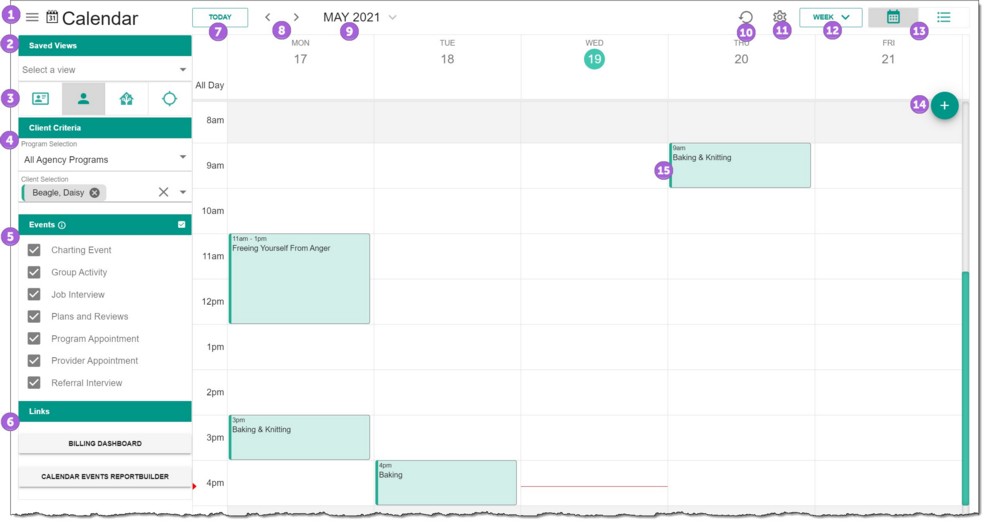
Use the numbers shown in the image above as a way of cross-referencing pieces of the Calendar page with the corresponding detailed descriptions that follow to learn more about what each piece does. Alternately, scroll through the full list of available settings and Calendar actions for a comprehensive look at Calendar navigation. You can also press <Ctrl+F> to access your browser's search feature and enter the name of a setting or action to jump directly to it.
![]() TIP: Not all viewing options detailed here are available to all users; the options you see are limited based on your role and designated access within the AWARDS database. For example, staff without chart access permission to any programs only have Staff and Location views available to them and cannot access Program or Client level data.
TIP: Not all viewing options detailed here are available to all users; the options you see are limited based on your role and designated access within the AWARDS database. For example, staff without chart access permission to any programs only have Staff and Location views available to them and cannot access Program or Client level data.
![]() Collapse / expand the settings menu - Click the menu icon to collapse or expand the left-hand settings menu pane of the Calendar. This can be helpful in the event that you'd like more screen real estate for viewing purposes.
Collapse / expand the settings menu - Click the menu icon to collapse or expand the left-hand settings menu pane of the Calendar. This can be helpful in the event that you'd like more screen real estate for viewing purposes.
![]() TIP: When working with saved views, keep in mind the following helpful hints...
TIP: When working with saved views, keep in mind the following helpful hints...
![]() Each user is limited to a maximum of 10 saved views.
Each user is limited to a maximum of 10 saved views.
![]() The saved views list is alphabetized using the names you specified when each view was saved.
The saved views list is alphabetized using the names you specified when each view was saved.
![]() Saved views for selected staff or clients may take a few extra seconds to load.
Saved views for selected staff or clients may take a few extra seconds to load.
![]() Dates are not included in saved views. The Calendar will always display with current dates, not those in place when a view was saved.
Dates are not included in saved views. The Calendar will always display with current dates, not those in place when a view was saved.
![]() The weekend setting is not included in saved views. The Calendar will always display or hide weekends based on your user settings.
The weekend setting is not included in saved views. The Calendar will always display or hide weekends based on your user settings.
![]() The management of previously saved views (for example, deleting a view or setting one as default) can also be done from your user settings.
The management of previously saved views (for example, deleting a view or setting one as default) can also be done from your user settings.
![]() Switching to a saved view - To update the Calendar display to reflect the settings of a saved view, click the saved views drop-down arrow in the left-hand settings pane and select the appropriate view. The Calendar is automatically refreshed. If the saved view you've chosen is for selected staff or clients it may take a few extra seconds to load.
Switching to a saved view - To update the Calendar display to reflect the settings of a saved view, click the saved views drop-down arrow in the left-hand settings pane and select the appropriate view. The Calendar is automatically refreshed. If the saved view you've chosen is for selected staff or clients it may take a few extra seconds to load.
![]() TIP: If you select a saved view and make changes to the Calendar setting, the saved view name will be replaced with "Save or replace view" in the saved views list as a heads up that you have made adjustments you may want to consider saving. If you don't wish to save the adjusted view or replace the saved view with these new settings, this can be ignored and you can navigate away from the Calendar as needed.
TIP: If you select a saved view and make changes to the Calendar setting, the saved view name will be replaced with "Save or replace view" in the saved views list as a heads up that you have made adjustments you may want to consider saving. If you don't wish to save the adjusted view or replace the saved view with these new settings, this can be ignored and you can navigate away from the Calendar as needed.
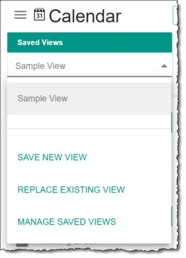
![]() Saving a new view - To save a view, adjust the Calendar to use all of the settings to be saved for that view. Click the saved views drop-down in the left-hand settings pane and select "Save New View." Specify a name for the view and then click SAVE.
Saving a new view - To save a view, adjust the Calendar to use all of the settings to be saved for that view. Click the saved views drop-down in the left-hand settings pane and select "Save New View." Specify a name for the view and then click SAVE.
![]() TIP: If the view name you specify is exactly the same as that of an existing view, the existing view will be replaced with the current settings. Be sure to use a unique name unless you prefer to replace the existing view.
TIP: If the view name you specify is exactly the same as that of an existing view, the existing view will be replaced with the current settings. Be sure to use a unique name unless you prefer to replace the existing view.
Keep in mind that you are limited to 10 saved views. If you already have 10, you must delete one before proceeding, or replace one of the existing views with new/adjusted settings
![]() Replacing an existing view with new settings - To adjust the settings of an existing view, click the saved views drop-down arrow in the left-hand settings pane and select the appropriate view. The Calendar is automatically refreshed. Make the necessary settings changes, and then click the saved views drop-down once again, this time choosing "Replace Existing View." Click REPLACE to proceed.
Replacing an existing view with new settings - To adjust the settings of an existing view, click the saved views drop-down arrow in the left-hand settings pane and select the appropriate view. The Calendar is automatically refreshed. Make the necessary settings changes, and then click the saved views drop-down once again, this time choosing "Replace Existing View." Click REPLACE to proceed.
![]() Renaming a view - Renaming an existing view is a two-step process: 1) Select the view from the saved views list, and then choose Save As New. Specify the new name for the view and continue. 2) Delete the old version of the view using the deletion instructions below.
Renaming a view - Renaming an existing view is a two-step process: 1) Select the view from the saved views list, and then choose Save As New. Specify the new name for the view and continue. 2) Delete the old version of the view using the deletion instructions below.
![]() Deleting a saved view - To delete a saved view, click the saved views drop-down arrow in the left-hand settings pane and select "Manage Saved Views." Click the ellipse icon
Deleting a saved view - To delete a saved view, click the saved views drop-down arrow in the left-hand settings pane and select "Manage Saved Views." Click the ellipse icon ![]() to the right of the view to be deleted, and then click DELETE. To complete the process, confirm the deletion on the pop-up that follows.
to the right of the view to be deleted, and then click DELETE. To complete the process, confirm the deletion on the pop-up that follows.
![]() Setting/unsetting your default view - To set a saved view as your default so that it is always displayed the first time you access the Calendar after logging into AWARDS, click the saved views drop-down arrow in the left-hand settings pane and select "Manage Saved Views." Click the ellipse icon
Setting/unsetting your default view - To set a saved view as your default so that it is always displayed the first time you access the Calendar after logging into AWARDS, click the saved views drop-down arrow in the left-hand settings pane and select "Manage Saved Views." Click the ellipse icon ![]() to the right of the view to be used, and then click SET AS DEFAULT. If you previously had another view set as the default, this action replaces that selection. To unset a view as the default and return to the system default, an UNSET AS DEFAULT option is also available.)
to the right of the view to be used, and then click SET AS DEFAULT. If you previously had another view set as the default, this action replaces that selection. To unset a view as the default and return to the system default, an UNSET AS DEFAULT option is also available.)
![]() TIP: Not all viewing options detailed here are available to all users; the options you see are limited based on your role and designated access within the AWARDS database. For example, staff without chart access permission to any programs only have Staff and Location views available to them and cannot access Program or Client level data.
TIP: Not all viewing options detailed here are available to all users; the options you see are limited based on your role and designated access within the AWARDS database. For example, staff without chart access permission to any programs only have Staff and Location views available to them and cannot access Program or Client level data.
![]()
![]() Staff View - When selected, the Calendar only includes those appointments/events scheduled for a staff member or members of your choosing.
Staff View - When selected, the Calendar only includes those appointments/events scheduled for a staff member or members of your choosing.
![]() TIP: Only active staff members are available in Staff View. To view events scheduled for former employees use an alternate view; for example, Client View for events that also have an active client assigned to them, or the Calendar ReportBuilder.
TIP: Only active staff members are available in Staff View. To view events scheduled for former employees use an alternate view; for example, Client View for events that also have an active client assigned to them, or the Calendar ReportBuilder.
![]()
![]() Client View - When selected, the Calendar only includes those appointments/events scheduled for a client or clients of your choosing, based on your chart access.
Client View - When selected, the Calendar only includes those appointments/events scheduled for a client or clients of your choosing, based on your chart access.
![]()
![]() Program View - When selected, the Calendar only includes those appointments/events scheduled for a selected program or program group, based on your chart access.
Program View - When selected, the Calendar only includes those appointments/events scheduled for a selected program or program group, based on your chart access.
![]()
![]() Location View - When selected, the Calendar includes only those appointments/events scheduled to take place at a location or locations of your choosing.
Location View - When selected, the Calendar includes only those appointments/events scheduled to take place at a location or locations of your choosing.
![]() TIP: When making your View selection, keep in mind the following helpful hints...
TIP: When making your View selection, keep in mind the following helpful hints...
![]() Staff and Client views are recommended when drilling down into smaller Calendar segments; for example, when looking at the Calendar for a specific person or a small group.
Staff and Client views are recommended when drilling down into smaller Calendar segments; for example, when looking at the Calendar for a specific person or a small group.
![]() Program view is recommended to view all clients or all staff in a particular program or program group.
Program view is recommended to view all clients or all staff in a particular program or program group.
![]() For visual and loading purposes, Program view is recommended when there are many multi-attendee events being included; for example, group activities.
For visual and loading purposes, Program view is recommended when there are many multi-attendee events being included; for example, group activities.
![]() List view only displays days where there is an appointment/event scheduled.
List view only displays days where there is an appointment/event scheduled.
Once you've made a view selection the page is automatically refreshed to update several of the other viewing options and the Calendar display based on your choice. You can then proceed with making any other adjustments needed to the Calendar's settings.
![]() Make criteria selections specific to your "View" - The criteria options are used in conjunction with the selected View to further narrow what you see on the Calendar. Once a view has been chosen, the page automatically refreshes to match the two available selection criteria for that view. As a selection is made from the first list, the page is refreshed to match the second criteria's list to your selection. It is from that second list which you will ultimately make the final determination of which staff member(s), client(s), program/program group, or location will be shown on the Calendar.
Make criteria selections specific to your "View" - The criteria options are used in conjunction with the selected View to further narrow what you see on the Calendar. Once a view has been chosen, the page automatically refreshes to match the two available selection criteria for that view. As a selection is made from the first list, the page is refreshed to match the second criteria's list to your selection. It is from that second list which you will ultimately make the final determination of which staff member(s), client(s), program/program group, or location will be shown on the Calendar.
![]() TIP - Working with multi-select lists... Scope and Selection options are comprised of drop-down selection lists and/or multi-select lists. Currently, multi-select lists are limited to choosing more than one client or staff member in the corresponding Views. (Selection of more than one program requires use of a custom or program grouping.)
TIP - Working with multi-select lists... Scope and Selection options are comprised of drop-down selection lists and/or multi-select lists. Currently, multi-select lists are limited to choosing more than one client or staff member in the corresponding Views. (Selection of more than one program requires use of a custom or program grouping.)
When working with a multi-select list, the drop-down remains open after you make an initial choice to allow you to make additional selections. Once all appropriate selections have been made, click the small up arrow to its right to close it. If it's necessary to remove a selection first, click the "x" icon to the immediate right of the staff member to be removed. Clicking the large "x" in the upper-right corner of the client clears all selections at once.
In addition to scrolling through the multi-select list, you can also narrow down the available values by beginning to type in who/what you're looking for.
![]()
![]() Setting "Staff Criteria" - When working in Staff view, the criteria selections are Program Selection, from which a single program or program group must be selected, followed by Staff Selection. Staff selection allows you to choose multiple staff members for simultaneous display on the Calendar. Each staff member displays with a unique color band to the left of their name once chosen to allow you to easily see which events on the display belong to which individuals.
Setting "Staff Criteria" - When working in Staff view, the criteria selections are Program Selection, from which a single program or program group must be selected, followed by Staff Selection. Staff selection allows you to choose multiple staff members for simultaneous display on the Calendar. Each staff member displays with a unique color band to the left of their name once chosen to allow you to easily see which events on the display belong to which individuals.
![]() NOTE: The Staff selection list is based on the program selected and includes all current staff members who have chart access to that program. If "All Agency Programs" is chosen, the list includes all staff members with logins, regardless of chart access permissions.
NOTE: The Staff selection list is based on the program selected and includes all current staff members who have chart access to that program. If "All Agency Programs" is chosen, the list includes all staff members with logins, regardless of chart access permissions.
![]()
![]() Setting "Client Criteria" - When working in Client view, the criteria selections are Program Selection, from which a single program or program group must be selected, followed by Client Selection. Client Selection allows you to choose multiple clients for simultaneous display on the Calendar. Each client displays with a unique color band to the left of their name once chosen to allow you to easily see which events on the display belong to which individuals.
Setting "Client Criteria" - When working in Client view, the criteria selections are Program Selection, from which a single program or program group must be selected, followed by Client Selection. Client Selection allows you to choose multiple clients for simultaneous display on the Calendar. Each client displays with a unique color band to the left of their name once chosen to allow you to easily see which events on the display belong to which individuals.
![]() NOTE: The Client selection list is based on the census of the selected program or program group as of the dates currently displayed on the Calendar. When viewing future dates the full current census is available.
NOTE: The Client selection list is based on the census of the selected program or program group as of the dates currently displayed on the Calendar. When viewing future dates the full current census is available.
![]() TIP: Client View includes any clients that were on the roster at any point during the range of dates displayed on the Calendar. To view events scheduled for former (discharged) clients, adjust the Calendar time period before making your Client selection.
TIP: Client View includes any clients that were on the roster at any point during the range of dates displayed on the Calendar. To view events scheduled for former (discharged) clients, adjust the Calendar time period before making your Client selection.
![]()
![]() Setting "Program Criteria" - When working in Staff view, the criteria selections are Program Scope, followed by Program Selection. The Program Scope list includes selections for "All Staff and Clients," "All Clients," and "All Staff." (In this context, clients are those on the current roster of a program. Staff are users who have chart access to a program.) From the Program Selection list select the program or group of programs for whose staff and/or clients the Calendar is to be viewed.
Setting "Program Criteria" - When working in Staff view, the criteria selections are Program Scope, followed by Program Selection. The Program Scope list includes selections for "All Staff and Clients," "All Clients," and "All Staff." (In this context, clients are those on the current roster of a program. Staff are users who have chart access to a program.) From the Program Selection list select the program or group of programs for whose staff and/or clients the Calendar is to be viewed.
![]() NOTE: Program selections are only available for those programs to which you have chart access.
NOTE: Program selections are only available for those programs to which you have chart access.
![]()
![]() Setting "Location Criteria" - When working in Location view, the criteria selections are Program Selection, from which a single program or program group must be selected, followed by Location Selection. Available selections include each agency-wide location, "All Locations," and "Unspecified." If a specific program or program group was set for Program Selection, the locations list also includes those configured for that program/group using the System Setup module, Agency Program Information, Configure Locations feature.
Setting "Location Criteria" - When working in Location view, the criteria selections are Program Selection, from which a single program or program group must be selected, followed by Location Selection. Available selections include each agency-wide location, "All Locations," and "Unspecified." If a specific program or program group was set for Program Selection, the locations list also includes those configured for that program/group using the System Setup module, Agency Program Information, Configure Locations feature.
![]() NOTE: Program selections are only available for those programs to which you have chart access.
NOTE: Program selections are only available for those programs to which you have chart access.
![]() NOTE: When "Unspecified" is chosen, the Calendar includes those events to which a specific location is not assigned such as staff events, external provider appointments, and client chart events. Those appointment/event types are also included when "All Locations" is selected.
NOTE: When "Unspecified" is chosen, the Calendar includes those events to which a specific location is not assigned such as staff events, external provider appointments, and client chart events. Those appointment/event types are also included when "All Locations" is selected.
![]() Select events to display on the Calendar - By default the Calendar displays several common appointment/event types based on the view you have chosen. Once you have made a view selection you can expand or narrow the list of included appointments/events by checking or un-checking one or more of the Events checkboxes, respectively. Appointment/event type selections and the views for which they are available are as follows:
Select events to display on the Calendar - By default the Calendar displays several common appointment/event types based on the view you have chosen. Once you have made a view selection you can expand or narrow the list of included appointments/events by checking or un-checking one or more of the Events checkboxes, respectively. Appointment/event type selections and the views for which they are available are as follows:
|
evenT | view |
Staff |
Client |
Program |
Location |
|
Charting Event |
x |
x |
x |
|
|
Group Activity |
x |
x |
x |
x |
|
Job Interview |
x |
x |
x |
|
|
Plans and Reviews |
x |
x |
x |
|
|
Program Appointment |
x |
x |
x |
x |
|
Provider Appointment |
x |
x |
x |
|
|
Referral Interview |
x |
x |
x |
x |
|
Staff Event |
x |
|
x * |
x |
|
Staff Training |
x |
|
x * |
x |
![]() NOTE: Exceptions to the detail provided in this table are as follows:
NOTE: Exceptions to the detail provided in this table are as follows:
![]() If you do not have chart access, only "staff" appointments/events are available for selection.
If you do not have chart access, only "staff" appointments/events are available for selection.
![]() Referral Interviews pertain only to programs set up to use the multi-step intake form.
Referral Interviews pertain only to programs set up to use the multi-step intake form.
![]() When using Staff view, client provider appointments are only displayed on the Calendar when they have staff escorts assigned to them.
When using Staff view, client provider appointments are only displayed on the Calendar when they have staff escorts assigned to them.
![]() * When using Program view with a scope of "All Clients," staff events and staff are not included in the Calendar display.
* When using Program view with a scope of "All Clients," staff events and staff are not included in the Calendar display.
![]() Access related functionality - This portion of the Calendar settings provides quick access to key related functionality; for example, the Calendar Events ReportBuilder or the BillingBuilder Dashboard (for AWARDS BillingBuilder customers). Click a button here to navigate away from the Calendar to the corresponding feature.
Access related functionality - This portion of the Calendar settings provides quick access to key related functionality; for example, the Calendar Events ReportBuilder or the BillingBuilder Dashboard (for AWARDS BillingBuilder customers). Click a button here to navigate away from the Calendar to the corresponding feature.
![]() Return the Calendar to today - Click Today to jump the Calendar from wherever you may have navigated to back to today's date in your preferred viewing period (week, month, day, or list).
Return the Calendar to today - Click Today to jump the Calendar from wherever you may have navigated to back to today's date in your preferred viewing period (week, month, day, or list).
![]() Navigate forward and back through time - Jump ahead or back a week, month, or day (based on your chosen viewing period) by clicking the < and > arrows to the right of the Today button.
Navigate forward and back through time - Jump ahead or back a week, month, or day (based on your chosen viewing period) by clicking the < and > arrows to the right of the Today button.
![]() Adjust the Calendar's viewing dates - The drop-down arrow to the right of the Calendar's current date range information opens a date picker that can be used to navigate to a different period in time as needed. This is especially useful for larger jumps or when it's helpful to get a sense of where in a particular month a specific date or week lands.
Adjust the Calendar's viewing dates - The drop-down arrow to the right of the Calendar's current date range information opens a date picker that can be used to navigate to a different period in time as needed. This is especially useful for larger jumps or when it's helpful to get a sense of where in a particular month a specific date or week lands.
![]() Reset the Calendar back to its default settings - Click the refresh icon to return the Calendar to its default criteria and event type selections.
Reset the Calendar back to its default settings - Click the refresh icon to return the Calendar to its default criteria and event type selections.
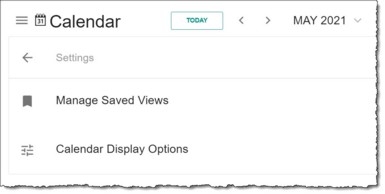
![]() Manage Saved Views - Only applicable when you have saved Calendar views.
Manage Saved Views - Only applicable when you have saved Calendar views.
![]() Deleting a saved view - To delete a saved view, click the saved views drop-down arrow in the left-hand settings pane and select "Manage Saved Views." Click the ellipse icon
Deleting a saved view - To delete a saved view, click the saved views drop-down arrow in the left-hand settings pane and select "Manage Saved Views." Click the ellipse icon ![]() to the right of the view to be deleted, and then click DELETE. The view will be deleted immediately - there is no confirmation required!
to the right of the view to be deleted, and then click DELETE. The view will be deleted immediately - there is no confirmation required!
![]() Setting/unsetting your default view - To set a saved view as your default so that it is always displayed the first time you access the Calendar after logging into AWARDS, click the ellipse icon
Setting/unsetting your default view - To set a saved view as your default so that it is always displayed the first time you access the Calendar after logging into AWARDS, click the ellipse icon ![]() to the right of the view to be used, and then click SET AS DEFAULT. If you previously had another view set as the default, this action replaces that selection. (To unset a view as the default and return to the system default, an UNSET AS DEFAULT option is also available.)
to the right of the view to be used, and then click SET AS DEFAULT. If you previously had another view set as the default, this action replaces that selection. (To unset a view as the default and return to the system default, an UNSET AS DEFAULT option is also available.)
![]() Reviewing view details - To see a read-only list of the settings used for a particular view, click the ellipse icon
Reviewing view details - To see a read-only list of the settings used for a particular view, click the ellipse icon ![]() to the right of the view, and then click VIEW DETAILS.
to the right of the view, and then click VIEW DETAILS.
![]() Calendar Display Options - By default the Calendar excludes weekends and all event blocks are displayed shaded in light green with black text. Both the weekend setting and event colors are customizable. To make changes to either, click on Calendar Display Options to expand that portion of the page. Check the Show Weekends checkbox if the Calendar display should NOT be limited to the traditional workweek. To adjust Event Type Colors, click the text and/or fill icons to the right of an event type to adjust your preferences for it. Each event type is listed separately and is configurable individually. All of the settings adjusted on this page will be saved automatically and remembered even after you log out of and back into AWARDS.
Calendar Display Options - By default the Calendar excludes weekends and all event blocks are displayed shaded in light green with black text. Both the weekend setting and event colors are customizable. To make changes to either, click on Calendar Display Options to expand that portion of the page. Check the Show Weekends checkbox if the Calendar display should NOT be limited to the traditional workweek. To adjust Event Type Colors, click the text and/or fill icons to the right of an event type to adjust your preferences for it. Each event type is listed separately and is configurable individually. All of the settings adjusted on this page will be saved automatically and remembered even after you log out of and back into AWARDS.
![]() NOTE: When using List view, event blocks are not displayed; instead, any colors you specify in your settings are reflected as a bullet to help you differentiate between event types.
NOTE: When using List view, event blocks are not displayed; instead, any colors you specify in your settings are reflected as a bullet to help you differentiate between event types.
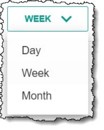
![]() Set the calendar viewing period/format - By default the Calendar is displayed for the current work week (plus or minus weekends depending on your personal Calendar settings). Other available viewing periods/formats are "Day" and "Month." Click the drop-down arrow and choose your preferred viewing period to automatically refresh the display.
Set the calendar viewing period/format - By default the Calendar is displayed for the current work week (plus or minus weekends depending on your personal Calendar settings). Other available viewing periods/formats are "Day" and "Month." Click the drop-down arrow and choose your preferred viewing period to automatically refresh the display.
![]() Toggle between "calendar" and "list" formats - By default the Calendar is displayed in calendar format, with blocks for appointments/events. To instead view a list of scheduled appointments/events only, click the list format icon (right). Use this icon and the calendar format icon (left) to toggle back and forth between the two formats quickly and easily as needed.
Toggle between "calendar" and "list" formats - By default the Calendar is displayed in calendar format, with blocks for appointments/events. To instead view a list of scheduled appointments/events only, click the list format icon (right). Use this icon and the calendar format icon (left) to toggle back and forth between the two formats quickly and easily as needed.
![]()
![]() Schedule a new appointment/event - To schedule an appointment/event, click the green + icon in the upper-right corner of the Calendar display. A pop-up is then displayed providing you with scheduling options. For more information, see Scheduling an Appointment/Event.
Schedule a new appointment/event - To schedule an appointment/event, click the green + icon in the upper-right corner of the Calendar display. A pop-up is then displayed providing you with scheduling options. For more information, see Scheduling an Appointment/Event.
![]()
![]() TIP: Clicking on a date/time block on the Calendar when using Week or Day display also opens the scheduling pop-up, and for certain events the selected Date and Start Time (in hour increments) appear as the default on the form. Clicking on a day in the Month display also opens the scheduling pop-up, and the selected Date appears as the default on the form. These defaults apply to program appointments, staff events, and staff trainings.
TIP: Clicking on a date/time block on the Calendar when using Week or Day display also opens the scheduling pop-up, and for certain events the selected Date and Start Time (in hour increments) appear as the default on the form. Clicking on a day in the Month display also opens the scheduling pop-up, and the selected Date appears as the default on the form. These defaults apply to program appointments, staff events, and staff trainings.
![]() View and/or Work with existing appointment/event blocks - Existing appointments/events are shown on the Calendar in blocks. To make changes to any of these blocks, click it in the Calendar display. A pop-up is then displayed providing you with options relevant to the appointment/event type. For more information see Making Changes to an Appointment/Event.
View and/or Work with existing appointment/event blocks - Existing appointments/events are shown on the Calendar in blocks. To make changes to any of these blocks, click it in the Calendar display. A pop-up is then displayed providing you with options relevant to the appointment/event type. For more information see Making Changes to an Appointment/Event.
![]() TIP: When the Calendar display includes appointments/events for more than one client or staff person, each individual's events display with a unique color band on the left-hand border. Those colors match up with corresponding bands next to each selected individual's name in the left-hand settings menu so that you can easily see which events belong to whom.
TIP: When the Calendar display includes appointments/events for more than one client or staff person, each individual's events display with a unique color band on the left-hand border. Those colors match up with corresponding bands next to each selected individual's name in the left-hand settings menu so that you can easily see which events belong to whom.
![]() TIP: The Calendar includes the following visual indicators for quickly noting the status of existing events:
TIP: The Calendar includes the following visual indicators for quickly noting the status of existing events:
- Check icon - Displays on event blocks where the status is "Kept" or "Held."
- Strikethrough - Displays on event blocks where the status is "Cancelled" or "No Show."
Any event blocks with neither of the above indicate that the event's Status is currently blank or set to "Planned" (in the case of staff events).

https://demodb.footholdtechnology.com/help/?12361
