|   |
| |
![]() Has your agency transitioned to the new AWARDS E-Prescribing, available as of February 2020? If so, please click here instead!
Has your agency transitioned to the new AWARDS E-Prescribing, available as of February 2020? If so, please click here instead!
![]() In addition to the instructions provided here, be sure to take a look at our 7 minute E-Prescribing: Submitting a Prescription training film!
In addition to the instructions provided here, be sure to take a look at our 7 minute E-Prescribing: Submitting a Prescription training film!
Once you, as a registered medical professional, access Digital Rx for a patient, you can complete a prescription and send the order to a pharmacy to be filled from within a client's Medication records. To do so, complete the following steps from the AWARDS Home screen:
![]() TIP: If you are already viewing the client's Medication records, skip ahead to step 5.
TIP: If you are already viewing the client's Medication records, skip ahead to step 5.
![]() NOTE: If you have not yet registered with Digital Rx, you must do so before you can send a prescription. See Registering a User with Digital Rx.
NOTE: If you have not yet registered with Digital Rx, you must do so before you can send a prescription. See Registering a User with Digital Rx.
![]() TIP: If the medication records to be worked with are for a former (discharged) client, first click the Archives toggle to the right of the client selection option.
TIP: If the medication records to be worked with are for a former (discharged) client, first click the Archives toggle to the right of the client selection option.
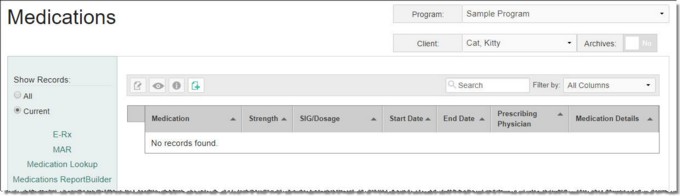
The index page is automatically refreshed to display any existing medication records for the selected client.
![]() TIP: When working on the index page, medication records are easily accessible using the following tools and navigation features:
TIP: When working on the index page, medication records are easily accessible using the following tools and navigation features:
![]() "Show Records" display options - By default the index displays all current medication records (those with a start date prior to today AND no end date, or with an end date that is in the future). To expand the display to include all existing medication records for the client instead, click All under "Show Records" in the left-hand menu. An Available for Deletion option is also available there for users with the "Medication Data Deletion" permission.
"Show Records" display options - By default the index displays all current medication records (those with a start date prior to today AND no end date, or with an end date that is in the future). To expand the display to include all existing medication records for the client instead, click All under "Show Records" in the left-hand menu. An Available for Deletion option is also available there for users with the "Medication Data Deletion" permission.
![]() Sorting options - By default the index is sorted alphabetically by medication name, from A-Z. To adjust the sorting click a column header in the table to sort by that data variable instead. Clicking a column heading a second time reverses the sort order.
Sorting options - By default the index is sorted alphabetically by medication name, from A-Z. To adjust the sorting click a column header in the table to sort by that data variable instead. Clicking a column heading a second time reverses the sort order.
![]() Navigation options - 10 records are displayed on the page by default. To access records on subsequent pages of the index (when applicable), click the arrows in the bottom-right corner of the table. To display 25 or 50 records at a time, click the Show drop-down to the left of the record count, also in the bottom-right corner, and make a selection.
Navigation options - 10 records are displayed on the page by default. To access records on subsequent pages of the index (when applicable), click the arrows in the bottom-right corner of the table. To display 25 or 50 records at a time, click the Show drop-down to the left of the record count, also in the bottom-right corner, and make a selection.
Once you select records on the index, a count of how many total records are selected is displayed in the action bar. Selections are maintained while moving from one page of the index to the next; meaning, you can select records on the first page (showing records 1-10 by default) and move to the next page (displaying records 11-20) without losing the selections made on the first page. Links for Show all selected records and Uncheck All are available beneath the index table for easy navigation.
![]() Search and filtering options - A Search field is available on the action bar along with a corresponding Filter by drop-down list. To search the contents of the index (including those records not currently displayed on the page), enter a value in the Search field. The index is automatically updated as you type. To further narrow your search, use the Filter by selection to indicate whether the search should look at data in "All Columns" (the default) or a specific column.
Search and filtering options - A Search field is available on the action bar along with a corresponding Filter by drop-down list. To search the contents of the index (including those records not currently displayed on the page), enter a value in the Search field. The index is automatically updated as you type. To further narrow your search, use the Filter by selection to indicate whether the search should look at data in "All Columns" (the default) or a specific column.
![]() Related features access - Links to one or more of the following related pieces of functionality may be available in the left-hand menu, based on your agency's configuration:
Related features access - Links to one or more of the following related pieces of functionality may be available in the left-hand menu, based on your agency's configuration:
- Medications ReportBuilder - A shortcut to the ReportBuilder for this feature. For instructions, click here.
- E-Rx - For agencies using E-Prescribing. Opens DigitalRx for users with the necessary permission.
- Medication Lookup - Opens RxList from which users can access medication lookup information. (The label and website may vary, based on agency settings.)
- MAR - Opens multi-medication administration data entry for agencies set to use the MAR. For instructions, click here.
![]() IMPORTANT! Please be mindful that:
IMPORTANT! Please be mindful that:
![]() Some values must be entered on a client's face sheet in order to access the Digital Rx system to prescribe medications for that client (specifically: First Name, Last Name, Address, City, State, Zip, Date of Birth, Gender, and Phone). If any of the required information is not present, you will receive a pop-up notification at this time and must navigate to Census > Profile > Face Sheet for the client to complete the necessary data entry before you will be able to proceed.
Some values must be entered on a client's face sheet in order to access the Digital Rx system to prescribe medications for that client (specifically: First Name, Last Name, Address, City, State, Zip, Date of Birth, Gender, and Phone). If any of the required information is not present, you will receive a pop-up notification at this time and must navigate to Census > Profile > Face Sheet for the client to complete the necessary data entry before you will be able to proceed.
![]() If your browser is set to use a pop-up blocker it may prevent the Digital Rx window from being opened correctly.
If your browser is set to use a pop-up blocker it may prevent the Digital Rx window from being opened correctly.
![]() When Digital Rx is displayed in the second browser window, AWARDS will continue to be active in the initial browser window. It should be left open.
When Digital Rx is displayed in the second browser window, AWARDS will continue to be active in the initial browser window. It should be left open.

![]() NOTE: If "None" displays here unexpectedly, click Patient Profile and verify that the correct demographic information is entered for the consumer. If errors are present, the corresponding information should be corrected in AWARDS, and Digital Rx will update with the correct information the next time it is accessed for that consumer.
NOTE: If "None" displays here unexpectedly, click Patient Profile and verify that the correct demographic information is entered for the consumer. If errors are present, the corresponding information should be corrected in AWARDS, and Digital Rx will update with the correct information the next time it is accessed for that consumer.
![]() NOTE: The benefit information in Digital Rx is not tied to AWARDS entitlement records, and does not share information with AWARDS. Benefit information in Digital Rx is provided by Surescripts, who operates the nation's largest health information network.
NOTE: The benefit information in Digital Rx is not tied to AWARDS entitlement records, and does not share information with AWARDS. Benefit information in Digital Rx is provided by Surescripts, who operates the nation's largest health information network.
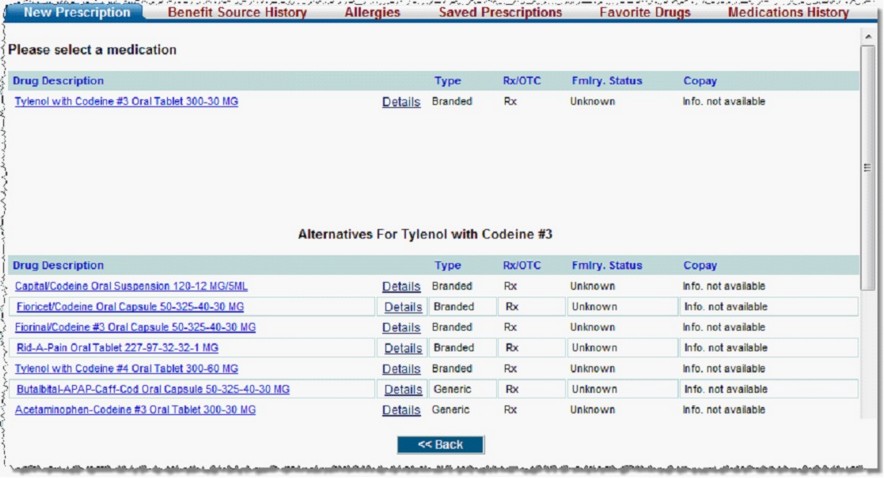
This table contains the drug description, type (branded or generic), Rx/OTC information, formulary status, and copay information. Each drug listed also has a corresponding Details link that opens a new window containing strength and dosage.
![]() NOTE: The information displayed under formulary status indicates whether the corresponding drug is reimbursable by the benefit source and at what level. The formulary level rates the level of preference for the drug using the following scale:
NOTE: The information displayed under formulary status indicates whether the corresponding drug is reimbursable by the benefit source and at what level. The formulary level rates the level of preference for the drug using the following scale:
U - Unknown
0 - Not reimbursable
1 - Non formulary
2 - Not preferred (on formulary)
3 - Preferred level 1
4 - Preferred level 2
5 - Preferred level 3
Up to 99 - Highest preferred level

If necessary, the default information can be modified in one of the following ways:
Select the updated SIG information from the drop-down lists above the SIG field: Delivery, Dose, Units, and Frequency. As selections are made, the text in the SIG field will automatically update to display the new information. To also add a time value to the SIG information, click Time. A pop-up window is displayed containing a check list with several options. Check all that apply, and then click Done. The selected times will also be added to the SIG information.
Alternately, click use free text to open the SIG field in data entry mode (it is locked by default), and type the updated SIG information directly into the SIG field. This also disables the drop-down lists available above the SIG field. To switch back to using the drop-down lists, click use codified SIG.

![]() Qualifier - If necessary, click this drop-down arrow and select the appropriate item.
Qualifier - If necessary, click this drop-down arrow and select the appropriate item.
![]() Quantity - In this field, enter the number of qualifiers selected above to be prescribed to the patient.
Quantity - In this field, enter the number of qualifiers selected above to be prescribed to the patient.
![]() Refill - In this field, enter the number of refills to be applied to this prescription. The default value is zero (0).
Refill - In this field, enter the number of refills to be applied to this prescription. The default value is zero (0).
![]() Substitutions - Click this drop-down arrow and make a selection to indicate whether or not drug substitutions are allowed for this prescription.
Substitutions - Click this drop-down arrow and make a selection to indicate whether or not drug substitutions are allowed for this prescription.
![]() Diy Max Dose - If needed, in this field enter the daily maximum dose that the patient should not exceed.
Diy Max Dose - If needed, in this field enter the daily maximum dose that the patient should not exceed.
![]() Days Supply - If needed, in this field enter the number of days this prescription will supply the patient with the selected drug.
Days Supply - If needed, in this field enter the number of days this prescription will supply the patient with the selected drug.
![]() Diagnosis - Click this drop-down arrow and select an active ICD-10 diagnosis.
Diagnosis - Click this drop-down arrow and select an active ICD-10 diagnosis.
![]() NOTE: The optional WC/XFR option can be skipped; it was added for another partner of H2H Solutions.
NOTE: The optional WC/XFR option can be skipped; it was added for another partner of H2H Solutions.
![]() TIP: When searching for pharmacies, keep in mind that:
TIP: When searching for pharmacies, keep in mind that:
![]() When the Type is set to "All" or "Retain," a value must be entered in the State field.
When the Type is set to "All" or "Retain," a value must be entered in the State field.
![]() When the Type is set to "All," and search criteria are entered, those search parameters are only used for non-mail order pharmacies. All mail order pharmacies are returned irrespective of the city, state, or zip specified for the search. If a name or partial name are entered though, that criteria is used for filtering mail order pharmacies.
When the Type is set to "All," and search criteria are entered, those search parameters are only used for non-mail order pharmacies. All mail order pharmacies are returned irrespective of the city, state, or zip specified for the search. If a name or partial name are entered though, that criteria is used for filtering mail order pharmacies.
![]() "Fax Only" pharmacies are those that are not available in the Surescripts network; instead, they have been manually added to the pharmacy database within Digital Rx by user request. Prescriptions sent to these pharmacies are sent via fax.
"Fax Only" pharmacies are those that are not available in the Surescripts network; instead, they have been manually added to the pharmacy database within Digital Rx by user request. Prescriptions sent to these pharmacies are sent via fax.
![]() If more than ten pharmacies meet the search criteria, results are displayed on multiple pages.
If more than ten pharmacies meet the search criteria, results are displayed on multiple pages.
![]() If the patient's preferred pharmacy is not listed in the Digital Rx system, please submit a request to the Foothold Help Desk requesting that it be added. Provide as much pharmacy information as possible, including name, phone number, fax number, address, and any other relevant details.
If the patient's preferred pharmacy is not listed in the Digital Rx system, please submit a request to the Foothold Help Desk requesting that it be added. Provide as much pharmacy information as possible, including name, phone number, fax number, address, and any other relevant details.
Once a pharmacy is selected, the page refreshes to display the updated New Prescription page containing the pharmacy information.
![]() Record another prescription for the consumer - To create a second prescription for the consumer, click Next Prescription and repeat steps 8 through 21. When using Next Prescription, the read-only Rx No. automatically advances from the default of "1" to "2" when the second medication is entered, and so on.
Record another prescription for the consumer - To create a second prescription for the consumer, click Next Prescription and repeat steps 8 through 21. When using Next Prescription, the read-only Rx No. automatically advances from the default of "1" to "2" when the second medication is entered, and so on.
![]() Confirm the prescription(s) for this consumer - To confirm that the prescriptions have been entered correctly and then proceed with the submission process, click Confirm Prescription(s). The page refreshes and a summary of the prescription(s) is displayed in a numbered table, as shown here, including any allergy or drug interactions (listed at the top of the page).
Confirm the prescription(s) for this consumer - To confirm that the prescriptions have been entered correctly and then proceed with the submission process, click Confirm Prescription(s). The page refreshes and a summary of the prescription(s) is displayed in a numbered table, as shown here, including any allergy or drug interactions (listed at the top of the page).
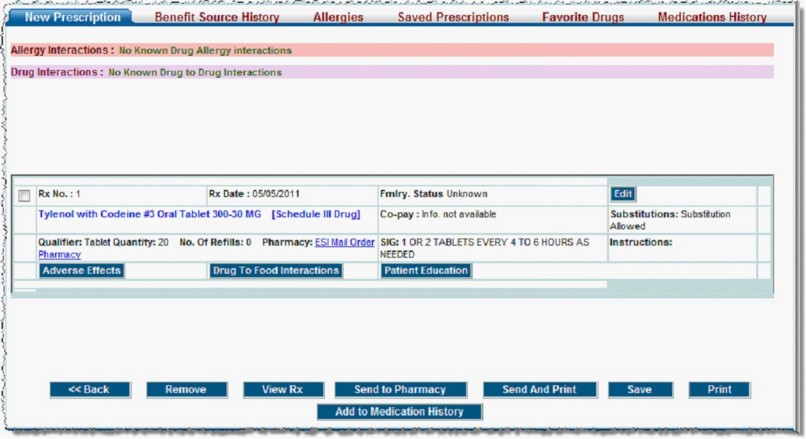
If a controlled substance was prescribed, and you are already a registered prescriber, you will be directed to the Symantec system where further verification will be required. Log into that site and enter the verification code provided by the app or token, as applicable. If you are not yet registered, Digital Rx will instead display a pop-up prompting you to do so now. For more information on this process, refer to our Electronic Prescribing of Controlled Substances (EPCS) training film.
For non-controlled substances the prescription is now sent to the pharmacy, and if you chose to use the Send And Print option a printable PDF of the prescription is also opened for your use.
![]() NOTE: Only those medications that have been sent to a pharmacy using Send to Pharmacy or Send And Print in step 20, or that have been Printed Only or Added to Medication History are displayed in AWARDS. Medications that are only saved are not displayed in the AWARDS Medications - Index.
NOTE: Only those medications that have been sent to a pharmacy using Send to Pharmacy or Send And Print in step 20, or that have been Printed Only or Added to Medication History are displayed in AWARDS. Medications that are only saved are not displayed in the AWARDS Medications - Index.
The process of sending a prescription to a pharmacy is now complete.
![]() NOTE: To easily prescribe the same medication in the future, click Medications History in Digital Rx, select the prescriptions to be sent to a pharmacy, click Confirm Prescription(s), and repeat steps 20 through 21 above. Keep in mind that if a medication is active for a patient and the same medication is prescribed again with the same strength and unit, the existing prescription record is automatically inactivated, and only the new one displays as active.
NOTE: To easily prescribe the same medication in the future, click Medications History in Digital Rx, select the prescriptions to be sent to a pharmacy, click Confirm Prescription(s), and repeat steps 20 through 21 above. Keep in mind that if a medication is active for a patient and the same medication is prescribed again with the same strength and unit, the existing prescription record is automatically inactivated, and only the new one displays as active.
https://demodb.footholdtechnology.com/help/?11915
