Scheduling a Staff Event


Previous Topic  Next Topic 

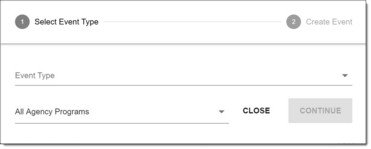
To schedule a staff event - whether a personal event or a meeting for yourself and/or others - complete the following steps:

    1. From the navigation bar at the top of any AWARDS page, click Calendar.  The Calendar is displayed.
    2. Click the green + icon in the top-right corner of the page or click a Calendar block directly.

The scheduling pop-up is displayed.

  TIP: When scheduling by clicking a Calendar block some information (date and, in some instances, time) will be pre-populated for the appointment in the scheduling pop-up.

    1. Click the Event Type drop-down arrow and select "Staff Event."
    2. Click CONTINUE.  A Staff Event pop-up is displayed.

    1. In the Title field, type the name of the event being scheduled.  Keep in mind that the title will be used to identify the event in the Calendar display; for example, if "Team Meeting" is entered it will be shown on the Calendar as "Staff Event - Team Meeting."
    2. The event Date defaults to today's date.  To make changes, click the date field to open a picker from which the correct date should be selected.  (Dates cannot be typed in manually.)

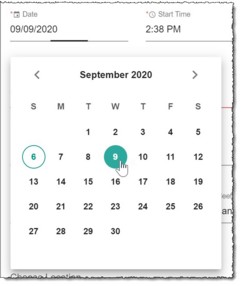
Once you've set your date, click anywhere outside of the date picker to close it and return to the scheduling pop-up.
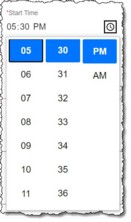
    1. To set the event Start Time, click into the field and type the time, or click the picker icon at the right of the field to choose the time from a list (shown below).  When using the pick list, after you've made your selections click anywhere outside of the time picker to close it and return to the scheduling pop-up.

    1. By default the event length is set to 60 minutes.  If necessary, click in the Duration field and adjust the event length by typing in the correct value, or using the up/down arrows to the right of the field to increase/decrease the amount of time.
    2. Click the Staff Selection drop-down arrow and select the staff member(s) for whom this event is being scheduled, or click the All Staff toggle to select all staff members at once.  The selection list includes all staff with AWARDS logins.

  TIP: In addition to scrolling through the multi-select list, you can also narrow down the available values by beginning to type in any part of the name of the staff member you're looking for.

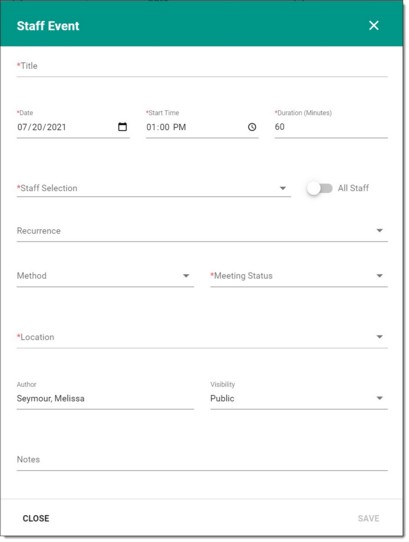
After you make an initial staff selection, the drop-down remains to allow you to make additional selections.  Once all appropriate staff members have been chosen, click outside of the drop-down to close it.  If it's necessary to remove a selection first, click the "x" icon to the immediate right of the staff member to be removed.  Clicking the large "x" in the upper-right corner of the client clears all selections at once.

  TIP: You can use this feature to schedule events for other staff members without including yourself as an attendee during the staff selection process.  Keep in mind that regardless, your name is displayed on the event record as the read-only Author.

    1. By default the Recurrence option is set to "Do Not Repeat."  If this is correct for your event, skip ahead to step 11; otherwise, click this drop-down arrow and make a new selection.  Available recurrence options are "Daily," "Weekly on this day," and "Custom." If "Custom" is selected a Recurrence pop-up is displayed to collect additional details.  Specify the frequency of recurrence using the Repeat Every options, and then specify an End Date if known.  Click CONTINUE to save your changes.

  TIP: For guidance on making changes to recurring appointments/events after they've been scheduled, see the Calendar Frequently Asked Questions.

    1. Click the Method drop-down arrow and make a selection to reflect the type of event being scheduled; for example, "In Person," "Phone Call," or "Email."  (Use of this setting is optional.)
    2. By default the status of all new events is set to "Planned."  If necessary, click the Meeting Status drop-down arrow and make a different selection; for example, "Held" or "Cancelled."
    3. Click the Location drop-down arrow and choose the location at which the event is to take place.  To select a location not included on the list, click "Other," type the location name in the corresponding field, and then click the + icon.  (Locations added in this way are intended for single-use, and are not saved to the agency locations list.)

  TIP: The locations available for selection here are those that have been configured using the System Setup module, Agency Program Information, Configure Locations feature. 

    1. Event Visibility defaults to "Public," meaning that the event block and the details, including title, are available for viewing by anyone looking at the Calendar of the scheduled staff member(s).  If the event should only be shown as "busy" on relevant Calendars without the details, click the drop-down arrow and change this selection to "Private."
    2. To record additional information on the event, click into Notes and enter all relevant detail.  This information is not displayed directly on the Calendar, but will be visible to any users scheduled to attend the event.  If the event's visibility is set to "Public," these details will also be accessible to other staff as well.
    3. When all event detail has been recorded, click SAVE to proceed.  The event is scheduled, a read-only confirmation pop-up is displayed, and a "MEETING SCHEDULED" internal notification message is automatically sent to the meeting's attendees.
    4. To make changes to the event at this time, click EDIT on the confirmation pop-up; otherwise, click CLOSE to return to the Calendar display.

The process of scheduling a staff event is now complete.        

  https://demodb.footholdtechnology.com/help/?12372