|   |
| |
The electronic signatures functionality enables staff to sign group notes for the purposes of approving their content and/or verifying their accuracy. Once signed, group notes are locked from further editing.
To access and electronically sign a group note, complete the following steps from the AWARDS Home screen:
![]() NOTE: The following instructions detail the process of generating a group notes report to access a note for signing. Group notes can also be accessed for signing purposes by going into the group note index in data entry mode and clicking the underlined note date to open the individual note in report mode. The Client History Report in the Client Search module can also be used to access notes for signing. If you access a note in either of those ways, skip ahead to step 8.
NOTE: The following instructions detail the process of generating a group notes report to access a note for signing. Group notes can also be accessed for signing purposes by going into the group note index in data entry mode and clicking the underlined note date to open the individual note in report mode. The Client History Report in the Client Search module can also be used to access notes for signing. If you access a note in either of those ways, skip ahead to step 8.

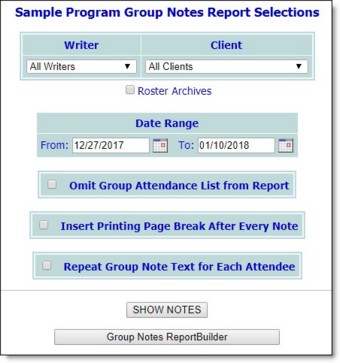
![]() TIP: For more information on the available group note report settings, click here.
TIP: For more information on the available group note report settings, click here.
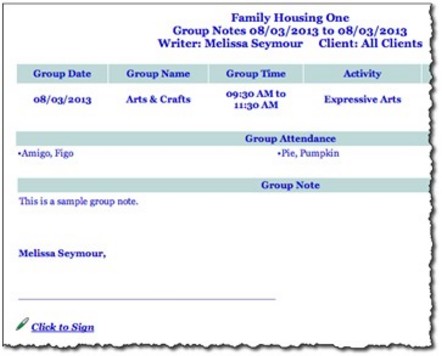
If you have not yet signed the note in question and the program's electronic signature rules indicate that you should be allowed to do so, you will see a Click to Sign link. The note can now be electronically signed.
![]() TIP: For more information on the rules that govern electronic signing for group notes in each program, click here.
TIP: For more information on the rules that govern electronic signing for group notes in each program, click here.
![]() NOTE: If, during the process of setting up your electronic signature, you specified default signature settings, those settings are reflected here. As a result, you may not need to configure the options below - with the exception of entering your PIN (which is always required) - unless it is necessary to adjust the defaults.
NOTE: If, during the process of setting up your electronic signature, you specified default signature settings, those settings are reflected here. As a result, you may not need to configure the options below - with the exception of entering your PIN (which is always required) - unless it is necessary to adjust the defaults.
![]() Sign With - Notes can be signed using initials or full name images. Click the radio button next to the type of image with which you want to sign this note - "No Image," "Initials Image," or "Full Name Image."
Sign With - Notes can be signed using initials or full name images. Click the radio button next to the type of image with which you want to sign this note - "No Image," "Initials Image," or "Full Name Image."
![]() NOTE: Sign with options are only available for the images you uploaded during the process of setting up your electronic signature. For example, if you uploaded only a full name image and not your initials, only the "No Image" and "Full Name Image" options will be available here.
NOTE: Sign with options are only available for the images you uploaded during the process of setting up your electronic signature. For example, if you uploaded only a full name image and not your initials, only the "No Image" and "Full Name Image" options will be available here.
![]() Authority Level - Click the radio button next to the statement that describes your authority level in relation to this note - "I am the author and I approve this document," "I am the reviewer and I approve this document," or "This document is accurate."
Authority Level - Click the radio button next to the statement that describes your authority level in relation to this note - "I am the author and I approve this document," "I am the reviewer and I approve this document," or "This document is accurate."
![]() NOTE: The "I am the author..." option is only available when you wrote the note being saved.
NOTE: The "I am the author..." option is only available when you wrote the note being saved.
![]() Date and Time Stamps - The Date and Time checkboxes are automatically selected by default so that a date and time stamp is included with your electronic signature. De-select one or both of these options if needed.
Date and Time Stamps - The Date and Time checkboxes are automatically selected by default so that a date and time stamp is included with your electronic signature. De-select one or both of these options if needed.
![]() NOTE: If these checkboxes are not available, it is an indication that your agency has opted to have all electronic signatures date and time stamped automatically.
NOTE: If these checkboxes are not available, it is an indication that your agency has opted to have all electronic signatures date and time stamped automatically.
![]() Credentials - Click the checkbox next to each credential to be included with your signature.
Credentials - Click the checkbox next to each credential to be included with your signature.
![]() NOTE: This portion of the signing dialog box is only available when credentials have been specified for you in the Human Resources module Staff Information feature.
NOTE: This portion of the signing dialog box is only available when credentials have been specified for you in the Human Resources module Staff Information feature.
![]() PIN - In this field, type your five-digit PIN to confirm your identity.
PIN - In this field, type your five-digit PIN to confirm your identity.
![]() IMPORTANT! Clicking the SIGN NOW button is an acknowledgment that the individual doing so is the authorized signer. An electronic signature constitutes a legally binding symbol that authenticates the document to which it is attached.
IMPORTANT! Clicking the SIGN NOW button is an acknowledgment that the individual doing so is the authorized signer. An electronic signature constitutes a legally binding symbol that authenticates the document to which it is attached.
When SIGN NOW is clicked, the following takes place:
![]() The note is signed and the electronic signature is displayed with that note on the group notes report page (replacing the default blank signature line if you are the note writer or co-leader). The signature for staff members is composed of authority level, followed by signer name and credentials (if included), job title, the signature or initials image if one was selected, and the date and time on which the note was signed if that information was set to be included.
The note is signed and the electronic signature is displayed with that note on the group notes report page (replacing the default blank signature line if you are the note writer or co-leader). The signature for staff members is composed of authority level, followed by signer name and credentials (if included), job title, the signature or initials image if one was selected, and the date and time on which the note was signed if that information was set to be included.
![]() NOTE: Job title information is taken from your Staff Information record in the Human Resources module. The signature will always display your job title as of the time the note was signed, regardless of whether that title changes in the future.
NOTE: Job title information is taken from your Staff Information record in the Human Resources module. The signature will always display your job title as of the time the note was signed, regardless of whether that title changes in the future.
Keep in mind that if any other staff members previously signed the same note, the new signature is added to those existing signatures. In such cases reviewer signatures are listed after the note writer's signature (or default blank signature line if the writer has not signed the note).
![]() The note is locked from further edits. Notes that have been signed and locked in this manner are shown with a lock and key icon next to them in the group notes index in data entry mode as shown here.
The note is locked from further edits. Notes that have been signed and locked in this manner are shown with a lock and key icon next to them in the group notes index in data entry mode as shown here.
The process of electronically signing a group note is now complete.
https://demodb.footholdtechnology.com/help/?11790
