|   |
| |
To create a new PlanBuilder plan, or to view, update, or delete an existing plan, complete the following steps from the AWARDS Home screen:
![]() TIP: When working on the index page, keep in mind that:
TIP: When working on the index page, keep in mind that:
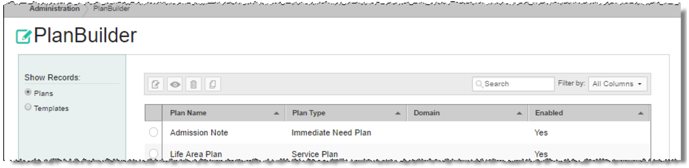
-- PlanBuilder configuration is comprised of two types of records:
![]() Templates - Templates are created and maintained by Foothold Technology based on common plan configurations used by AWARDS agencies. They act as a starting point for all PlanBuilder plan creation, and can be used "as is" or adjusted to meet the needs of specific program types.
Templates - Templates are created and maintained by Foothold Technology based on common plan configurations used by AWARDS agencies. They act as a starting point for all PlanBuilder plan creation, and can be used "as is" or adjusted to meet the needs of specific program types.
![]() Plans - Plans are created based on the built-in templates and maintained by your agency. Those plans currently available for use by one or more program types are shown in the records index with "Yes" in the Enabled column.
Plans - Plans are created based on the built-in templates and maintained by your agency. Those plans currently available for use by one or more program types are shown in the records index with "Yes" in the Enabled column.
-- When working on the index page, medication records are easily accessible using the following tools and navigation features:
![]() "Show Records" display options - By default the PlanBuilder index shows any plans previously created by your agency. To toggle the display to instead view available templates, click the Templates radio button under "Show Records" in the left-hand menu bar.
"Show Records" display options - By default the PlanBuilder index shows any plans previously created by your agency. To toggle the display to instead view available templates, click the Templates radio button under "Show Records" in the left-hand menu bar.
![]() Navigation options - 10 records are displayed on the page by default. To access records on subsequent pages of the index (when applicable), click the arrows in the bottom-right corner of the table. To display 25 or 50 records at a time, click the Show drop-down to the left of the record count, also in the bottom-right corner, and make a selection.
Navigation options - 10 records are displayed on the page by default. To access records on subsequent pages of the index (when applicable), click the arrows in the bottom-right corner of the table. To display 25 or 50 records at a time, click the Show drop-down to the left of the record count, also in the bottom-right corner, and make a selection.
Once you select records on the index, a count of how many total records are selected is displayed in the action bar. Selections are maintained while moving from one page of the index to the next; meaning, you can select records on the first page (showing records 1-10 by default) and move to the next page (displaying records 11-20) without losing the selections made on the first page. Links for Show all selected records and Uncheck All are available beneath the index table for easy navigation.
![]() Sorting options - Records in the index are sorted chronologically by plan creation date, with the newest plans listed last. Click a column header in the table to sort the index by a different type of data instead. Click the heading again to reverse the sort.
Sorting options - Records in the index are sorted chronologically by plan creation date, with the newest plans listed last. Click a column header in the table to sort the index by a different type of data instead. Click the heading again to reverse the sort.
![]() Search and filtering options - A Search field is available on the action bar along with a corresponding Filter by drop-down list. To search the contents of the index (including those records not currently displayed on the page), enter a value in the Search field. The index is automatically updated as you type. To further narrow your search, use the Filter by selection to indicate whether the search should look at data in "All Columns" (the default) or a specific column.
Search and filtering options - A Search field is available on the action bar along with a corresponding Filter by drop-down list. To search the contents of the index (including those records not currently displayed on the page), enter a value in the Search field. The index is automatically updated as you type. To further narrow your search, use the Filter by selection to indicate whether the search should look at data in "All Columns" (the default) or a specific column.
![]()
![]() Create a new plan - New plans can be created from templates or existing plans. In both cases the resulting plan can be used "as is" or adjusted to meet the needs of specific program types.
Create a new plan - New plans can be created from templates or existing plans. In both cases the resulting plan can be used "as is" or adjusted to meet the needs of specific program types.
- To create a new plan from a template - Click Templates under "Show Records" in the left-hand menu, and then in the templates index click the radio button to the left of the template to be saved as a plan. Click the create new plan from template icon from the action bar above the records table. The Plan Details page is displayed. Configure the fields and options on this page as necessary, and then click Save. The plan's details are saved and a confirmation page is displayed.
- To create a new plan from an existing plan - Click Plans under "Show Records" in the left-hand menu, and then in the plans index click the radio button to the left of the plan to be copied as a new plan. Click the create new plan based on the existing plan icon from the action bar above the records table. The Plan Details page is displayed. Configure the fields and options on this page as necessary, and then click Save. The plan's details are saved and a confirmation page is displayed.
![]() TIP: For more information on each field/option available on the plan details data entry page using either of the above options, see PlanBuilder Fields/Options and navigate to the "Plan Details" portion of the page.
TIP: For more information on each field/option available on the plan details data entry page using either of the above options, see PlanBuilder Fields/Options and navigate to the "Plan Details" portion of the page.
Once a plan is saved for the first time as described here, several items are added to the left-hand menu, enabling you to access the plan's built-in sections and options for adding more sections:
- Goal Section - Automatically inherited from the template. Can be configured as needed.
- Built-In Plan Sections - Automatically inherited from the template, for example: "Individual's Traits." Functions the same as a Custom Section, which is fully customizable.
- + Add Custom Section - Used to add fully customized data entry sections to the plan.
- + Add Signatures Section - Used to add configurable signature sections to the plan for the purposes of applying electronic signatures when staff data entry is complete.
Use these menu options to further configure the plan. Keep in mind that built-in, custom, and signature sections each have their own action bar at the top of the page (for editing, viewing, and deleting), and a Save button at the bottom of the page (for saving any changes or additions you make).
![]() TIP: For more information on each field/option available when working with the plan's sections and "+Add" tools, and instructions on how to use them, see PlanBuilder Fields/Options and navigate to the "Plan Sections" and/or "Signature Sections" portions of the page as needed.
TIP: For more information on each field/option available when working with the plan's sections and "+Add" tools, and instructions on how to use them, see PlanBuilder Fields/Options and navigate to the "Plan Sections" and/or "Signature Sections" portions of the page as needed.
When the plan's creation is complete, use the breadcrumbs in the upper-left corner to return to the PlanBuilder index page, or click an option in the navigation bar to move to a different part of AWARDS as needed.
![]()
![]() Make changes to an existing plan - To do so, click the checkbox to the left of the plan to be worked with, and then click the edit icon from the action bar above the records table.
Make changes to an existing plan - To do so, click the checkbox to the left of the plan to be worked with, and then click the edit icon from the action bar above the records table.
![]() NOTE: Templates cannot be edited, only plans; as a result, the edit icon is only available in the action bar when the Show Records option has been set to "Plans" in the left-hand menu.
NOTE: Templates cannot be edited, only plans; as a result, the edit icon is only available in the action bar when the Show Records option has been set to "Plans" in the left-hand menu.
The Plan Details page is displayed. Make changes or additions to the information on this page as necessary, and then click Save. The plan's details are saved and a confirmation page is displayed. Next use the options in the left-hand menu bar to access and make changes or additions to the other portions of the plan as needed. Be sure to click the Save button at the bottom of the page for each section to ensure that your work is saved.
![]() TIP: For more information on each field/option available on the plan configuration data entry pages, see PlanBuilder Fields/Options.
TIP: For more information on each field/option available on the plan configuration data entry pages, see PlanBuilder Fields/Options.
![]() IMPORTANT! Please keep in mind that any changes made to a plan's configuration will NOT impact plans and reviews which have already been filled out in the Services - Individual module's Plans and Reviews feature if they have been locked with an effective date or electronic signature.
IMPORTANT! Please keep in mind that any changes made to a plan's configuration will NOT impact plans and reviews which have already been filled out in the Services - Individual module's Plans and Reviews feature if they have been locked with an effective date or electronic signature.
![]()
![]() Preview an existing plan or template - To do so, click the checkbox to the left of the record to be viewed, and then click the view icon from the action bar above the records table. A read-only version of the plan details portion of the record is displayed. Use the selections in the left-hand menu to preview the other portions of the plan at this time as well.
Preview an existing plan or template - To do so, click the checkbox to the left of the record to be viewed, and then click the view icon from the action bar above the records table. A read-only version of the plan details portion of the record is displayed. Use the selections in the left-hand menu to preview the other portions of the plan at this time as well.
![]()
![]() Delete an existing plan - To do so, click the checkbox(es) to the left of the plan(s) to be deleted, and then click the delete icon from the action bar above the records table. A confirmation page is displayed. Click OK to proceed with the deletion. The selected plan(s) are deleted and the updated index is displayed.
Delete an existing plan - To do so, click the checkbox(es) to the left of the plan(s) to be deleted, and then click the delete icon from the action bar above the records table. A confirmation page is displayed. Click OK to proceed with the deletion. The selected plan(s) are deleted and the updated index is displayed.
![]() NOTE: Templates cannot be deleted, only plans; as a result, the delete icon is only available in the action bar when the Show Records option has been set to "Plans" in the left-hand menu.
NOTE: Templates cannot be deleted, only plans; as a result, the delete icon is only available in the action bar when the Show Records option has been set to "Plans" in the left-hand menu.
![]() TIP: Plans can only be deleted if they have not yet been filled out for any individuals using the Plans and Reviews feature in the Services - Individual module. To prevent further use of plans in these instances, instead use the edit option in the action bar, change the plan's Enabled option to "No," and then click Save to apply your changes. Disabled plans remain accessible for reporting purposes but can no longer be completed by staff.
TIP: Plans can only be deleted if they have not yet been filled out for any individuals using the Plans and Reviews feature in the Services - Individual module. To prevent further use of plans in these instances, instead use the edit option in the action bar, change the plan's Enabled option to "No," and then click Save to apply your changes. Disabled plans remain accessible for reporting purposes but can no longer be completed by staff.
![]()
![]() Return to the PlanBuilder index - To do so, click the To Index icon from the action bar while working in a record to return to the index page. You can also return to the index page at any time by clicking PlanBuilder from the breadcrumbs trail below the AWARDS navigation bar.
Return to the PlanBuilder index - To do so, click the To Index icon from the action bar while working in a record to return to the index page. You can also return to the index page at any time by clicking PlanBuilder from the breadcrumbs trail below the AWARDS navigation bar.
The process of working with PlanBuilder plans is now complete.
https://demodb.footholdtechnology.com/help/?12075
