|   |
| |
To enter, update, delete or view a facility record, complete the following steps from the AWARDS Home screen:
![]() TIP: When working on the index page, records are easily accessible using the following tools and navigation features:
TIP: When working on the index page, records are easily accessible using the following tools and navigation features:
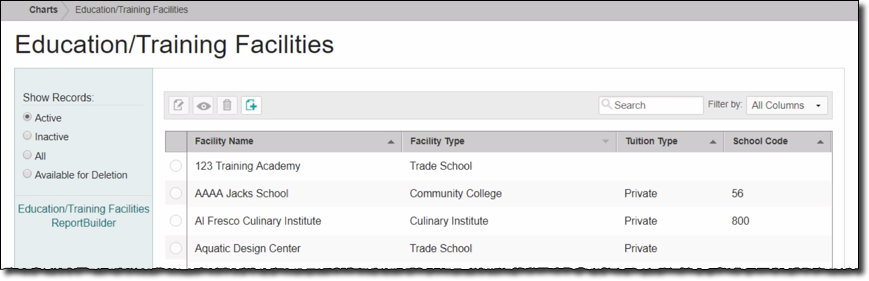
![]() "Show Records" display options - By default the index displays all facilities with a status of "Active." To expand or limit the display, use the selection options under "Show Records" in the left-hand menu. Available options are All, Inactive, and Available for Deletion. (Facilities are available for deletion when there are no Education/Training Enrollment records associated with them.)
"Show Records" display options - By default the index displays all facilities with a status of "Active." To expand or limit the display, use the selection options under "Show Records" in the left-hand menu. Available options are All, Inactive, and Available for Deletion. (Facilities are available for deletion when there are no Education/Training Enrollment records associated with them.)
![]() Sorting options - By default records in the index are sorted alphabetically by facility name, from A-Z; however, the index can also be sorted by Facility Type, Tuition Type, or School Code (if turned on). To do so, click the corresponding column header in the table. Clicking a column heading a second time reverses the sort order.
Sorting options - By default records in the index are sorted alphabetically by facility name, from A-Z; however, the index can also be sorted by Facility Type, Tuition Type, or School Code (if turned on). To do so, click the corresponding column header in the table. Clicking a column heading a second time reverses the sort order.
![]() Navigation options - 10 records are displayed on the page by default. To access records on subsequent pages of the index (when applicable), click the arrows in the bottom-right corner of the table. To display 25 or 50 records at a time, click the Show drop-down to the left of the record count, also in the bottom-right corner, and make a selection.
Navigation options - 10 records are displayed on the page by default. To access records on subsequent pages of the index (when applicable), click the arrows in the bottom-right corner of the table. To display 25 or 50 records at a time, click the Show drop-down to the left of the record count, also in the bottom-right corner, and make a selection.
Once you select records on the index, a count of how many total records are selected is displayed in the action bar. Selections are maintained while moving from one page of the index to the next; meaning, you can select records on the first page (showing records 1-10 by default) and move to the next page (displaying records 11-20) without losing the selections made on the first page. Links for Show all selected records and Uncheck All are available beneath the index table for easy navigation.
![]() Search and filtering options - A Search field is available on the action bar along with a corresponding Filter by drop-down list. To search the contents of the index (including those records not currently displayed on the page), enter a value in the Search field. The index is automatically updated as you type. To further narrow your search, use the Filter by selection to indicate whether the search should look at data in "All Columns" (the default) or a specific column.
Search and filtering options - A Search field is available on the action bar along with a corresponding Filter by drop-down list. To search the contents of the index (including those records not currently displayed on the page), enter a value in the Search field. The index is automatically updated as you type. To further narrow your search, use the Filter by selection to indicate whether the search should look at data in "All Columns" (the default) or a specific column.
![]() Related features access - The Education/Training Facilities ReportBuilder link on the left-hand menu bar provides a shortcut to access the ReportBuilder for this feature. For instructions on using that ReportBuilder, click here.
Related features access - The Education/Training Facilities ReportBuilder link on the left-hand menu bar provides a shortcut to access the ReportBuilder for this feature. For instructions on using that ReportBuilder, click here.
![]()
![]() Add a new facility record - To do so, click the add new icon from the action bar above the records table. A new data entry page is displayed. Configure the fields and options on this page as necessary, and then click Save. The facility record is saved, and a confirmation page is displayed.
Add a new facility record - To do so, click the add new icon from the action bar above the records table. A new data entry page is displayed. Configure the fields and options on this page as necessary, and then click Save. The facility record is saved, and a confirmation page is displayed.
Once a record is saved in this way, "Contacts Information" and "Facility Program" subsections become available in data entry mode on the confirmation page. These subsections can be shown/hidden for data entry as needed using the left-hand menu. Keep in mind that the "Contacts Information" and "Facility Program" sections display as sub-indexes, each with its own action bar and Save button for data entry.
![]() TIP: For more information on each field/option available on the data entry page, see Education / Training Facilities Fields / Options.
TIP: For more information on each field/option available on the data entry page, see Education / Training Facilities Fields / Options.
![]()
![]() Update an existing facility record - To do so, click the record to be updated, or click the checkbox to the left of that record and then click the edit icon from the action bar above the records table. The data entry page is displayed. Make changes to the information on this page as needed, and then click Save. The record is saved, and a confirmation page is displayed.
Update an existing facility record - To do so, click the record to be updated, or click the checkbox to the left of that record and then click the edit icon from the action bar above the records table. The data entry page is displayed. Make changes to the information on this page as needed, and then click Save. The record is saved, and a confirmation page is displayed.
Once a record is saved in this way, "Contacts Information" and "Facility Program" subsections become available in data entry mode on the confirmation page. These subsections can be shown/hidden for data entry as needed using the left-hand menu. Keep in mind that the "Contacts Information" and "Facility Program" sections display as sub-indexes, each with its own action bar and Save button for data entry.
![]() TIP: For more information on each field/option available on the data entry page, see Education / Training Facilities Fields / Options.
TIP: For more information on each field/option available on the data entry page, see Education / Training Facilities Fields / Options.
![]()
![]() View or print an existing facility record - To do so, click the checkbox to the left the record to be viewed/printed, and then click the view icon from the action bar above the records table. A read-only version of the record is displayed and can be printed as needed using your browser's print option.
View or print an existing facility record - To do so, click the checkbox to the left the record to be viewed/printed, and then click the view icon from the action bar above the records table. A read-only version of the record is displayed and can be printed as needed using your browser's print option.
![]()
![]() Delete an existing facility record - To do so, click the checkbox(es) to the left of the record(s) to be deleted, and then click the delete icon from the action bar above the records table. A confirmation message is displayed. Click OK to proceed with the deletion. The selected record(s) are deleted and the updated index is displayed.
Delete an existing facility record - To do so, click the checkbox(es) to the left of the record(s) to be deleted, and then click the delete icon from the action bar above the records table. A confirmation message is displayed. Click OK to proceed with the deletion. The selected record(s) are deleted and the updated index is displayed.
![]() TIP: Prior to selecting records to be deleted, click the Available for Deletion radio button from the left-hand menu. The index is automatically refreshed to show only those records that can be deleted.
TIP: Prior to selecting records to be deleted, click the Available for Deletion radio button from the left-hand menu. The index is automatically refreshed to show only those records that can be deleted.
![]()
![]() Return to the Education/Training Facilities index - To do so, click the To Index icon from the action bar while working in a facility record to return to the index page. You can also return to the index page at any time by clicking Education/Training Facilities from the breadcrumbs trail below the AWARDS navigation bar.
Return to the Education/Training Facilities index - To do so, click the To Index icon from the action bar while working in a facility record to return to the index page. You can also return to the index page at any time by clicking Education/Training Facilities from the breadcrumbs trail below the AWARDS navigation bar.
The process of working with facility records is now complete.
https://demodb.footholdtechnology.com/help/?12179
