Scheduling a Charting Event


Previous Topic  Next Topic 

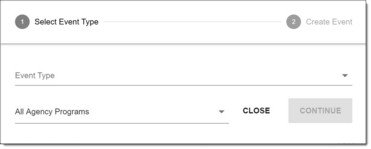
To schedule a charting timetable event for a client, complete the following steps:

  TIP: In order to schedule chart events, you must have the following permissions:

Display Any Chart Records Buttons
Display Chart Records Services - Individual Button

  TIP: Chart events also be scheduled and updated from within the Services-Individual module's Charting Timetable feature.

    1. From the navigation bar at the top of any AWARDS page, click Calendar.  The Calendar is displayed.
    2. Click the green + icon in the top-right corner of the page, or click a Calendar block directly.

The scheduling pop-up is displayed.
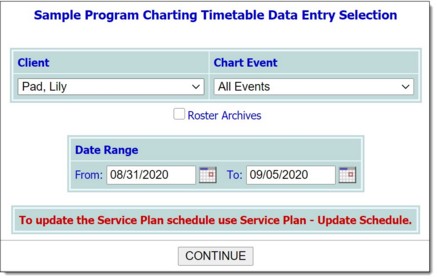
    1. Click the Event Type drop-down arrow and select "Charting Event."
    2. Click the program drop-down arrow and select the program associated with the client for whom the event is to be scheduled.
    3. Click CONTINUE.  The Charting Timetable Data Entry Selection page is displayed.  

    1. Click the Client drop-down arrow and select the client for whom the chart event is to be scheduled.

  TIP: If the event to be scheduled is for a former (discharged) client, first click Roster Archives beneath the client selection option.

    1. Click the Chart Event drop-down arrow and select the event to be scheduled.  The default value is "All Events."
    2. The date of the event being scheduled must fall within the date range in the From and To fields on this page.  (The default date range automatically includes the date(s)  displayed on your current Calendar view.)  Make changes to the default date range as necessary by typing in new dates (using mm/dd/yyyy format), or by selecting dates using the available date picker to the right of each field.
    3. Click CONTINUE.  The Charting Timetable Data Entry page is displayed.

Any existing charting timetable records for the selected client, event, and date range are displayed at the top of this page.
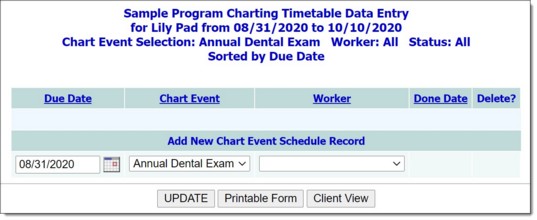
    1. By default the chart event's due date (the date on which the event must be completed) is the first date displayed in your current Calendar view.  If necessary, change that date by typing a new date into the Due Date field (using mm/dd/yyyy format), or select a date using the available date picker to the right of the field.

  TIP: The date entered must fall within the date range entered on the previous page (during step 8).

    1. If a specific event was not selected on the previous page (during step 7), click the Chart Event drop-down arrow and select the event to be scheduled.
    2. Click the Worker drop-down arrow and select the staff member responsible for the selected event.
    3. If applicable, in the Done Date field type the date on which the event was completed (using mm/dd/yyyy format), or select a date using the available date picker to the right of the field.

  TIP: The date entered must fall within the date range entered on the previous page (during step 7).

    1. Click UPDATE.  A confirmation page is displayed.
    2. To make changes to the event details, click Return to Data Entry.  To return to the Calendar, click Calendar from the navigation bar.

The process of scheduling a charting timetable event is now complete.

  https://demodb.footholdtechnology.com/help/?12367