|   |
| |
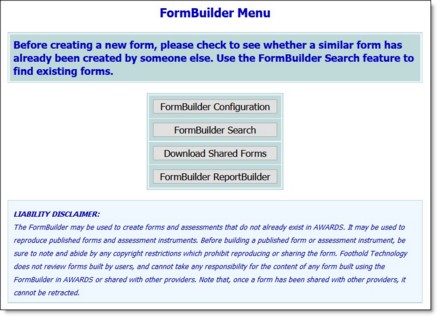
The FormBuilder Configuration tool gives users many options when making changes to existing forms. Using the functionality available there, users can add to forms, change form fields and/or sections, re-arrange form content, make forms available to other programs or AWARDS-using agencies, and more.
To make changes to an existing form, complete the following steps from the AWARDS Home screen:

This page contains an index of all existing forms associated with programs to which you have chart access permission, as well as an option to add a new form.
![]() TIP: By default the form index is sorted alphabetically by form name. To sort by a different variable, click the column heading for that variable. Click the heading a second time to reverse the sort order.
TIP: By default the form index is sorted alphabetically by form name. To sort by a different variable, click the column heading for that variable. Click the heading a second time to reverse the sort order.
![]() TIP: To see at a glance which programs a form is associated with, click the arrow to the left of the form name on the index. A Programs pop-up is displayed, the contents of which are limited by your chart access permissions. Click Close when you are finished reviewing the programs list.
TIP: To see at a glance which programs a form is associated with, click the arrow to the left of the form name on the index. A Programs pop-up is displayed, the contents of which are limited by your chart access permissions. Click Close when you are finished reviewing the programs list.
![]() TIP: To see at a glance which programs are set to display the form as the default in the specified location, click the link in the Default column of the forms index. A Programs pop-up is displayed, the contents of which are limited by your chart access permissions. Click Close when you are finished reviewing the programs list.
TIP: To see at a glance which programs are set to display the form as the default in the specified location, click the link in the Default column of the forms index. A Programs pop-up is displayed, the contents of which are limited by your chart access permissions. Click Close when you are finished reviewing the programs list.
![]() 1. General - Used to change the location of the form or adjust other form configuration information such as the form name.
1. General - Used to change the location of the form or adjust other form configuration information such as the form name.
![]() IMPORTANT! Making changes to the location of a FormBuilder form once it is in use may have unexpected consequences. If you've chosen to change the form's location during this step, a warning is displayed letting you know about this risk. For more information about how a specific location change might affect your data, please check with the Help Desk.
IMPORTANT! Making changes to the location of a FormBuilder form once it is in use may have unexpected consequences. If you've chosen to change the form's location during this step, a warning is displayed letting you know about this risk. For more information about how a specific location change might affect your data, please check with the Help Desk.
![]() 2. Programs - Used to make the form available to more or fewer programs.
2. Programs - Used to make the form available to more or fewer programs.
![]() TIP: "(No Saved Forms)" next to a program's name on this tab indicates that the program was set up to use the form, but that to date it has not actually been used. When a program in which there ARE saved forms is de-selected and the page is saved, an Inactive Date is recorded for that program. When a program in which there are NOT saved forms is de-selected, that indicator is automatically removed and an Inactive Date is NOT recorded when the page is saved. See Inactivating a Form for more information.
TIP: "(No Saved Forms)" next to a program's name on this tab indicates that the program was set up to use the form, but that to date it has not actually been used. When a program in which there ARE saved forms is de-selected and the page is saved, an Inactive Date is recorded for that program. When a program in which there are NOT saved forms is de-selected, that indicator is automatically removed and an Inactive Date is NOT recorded when the page is saved. See Inactivating a Form for more information.
![]() 3. Sections - Used to adjust or add to the form's sections.
3. Sections - Used to adjust or add to the form's sections.
![]() TIP: If you need to delete a section from the "3. Sections" tab, click the Delete checkbox next to the section to be deleted, and then click NEXT. Keep in mind that if the form has been used for data entry and the section in question has data saved in at least one of its fields, that section cannot be deleted (unless the field containing data is read-only).
TIP: If you need to delete a section from the "3. Sections" tab, click the Delete checkbox next to the section to be deleted, and then click NEXT. Keep in mind that if the form has been used for data entry and the section in question has data saved in at least one of its fields, that section cannot be deleted (unless the field containing data is read-only).
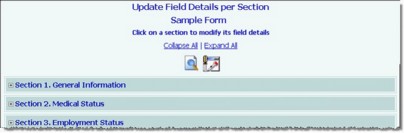
This page contains a list of all form sections, which can each be expanded/collapsed to view/hide the contained fields.
![]() Add a Field - To do so, click
Add a Field - To do so, click ![]() next to a section name to expand that section, and then click Add New Field to this Section. The Add a new field page is displayed. Configure the fields and options on this page, and then click NEXT to save your work. The updated Update Field Details per Section page is displayed.
next to a section name to expand that section, and then click Add New Field to this Section. The Add a new field page is displayed. Configure the fields and options on this page, and then click NEXT to save your work. The updated Update Field Details per Section page is displayed.
![]() Change a Field - To do so, click
Change a Field - To do so, click ![]() next to a section name to expand that section, and then click the name of the field to be changed. The Update a Form Field page is displayed.
next to a section name to expand that section, and then click the name of the field to be changed. The Update a Form Field page is displayed.
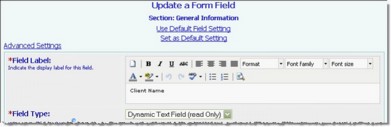
Make changes to the field's settings as needed, and then click NEXT to save your work. The Update Field Details per Section page is re-displayed.
![]() TIP: When updating a field up to three "default" options may be available on the Update a Form Field page:
TIP: When updating a field up to three "default" options may be available on the Update a Form Field page:
![]() Set as Default Setting - When clicked the field becomes the "default field" so that subsequently added/updated fields can "inherit" its settings. Once this has been selected, subsequent fields display Use Default Field Settings, detailed below.
Set as Default Setting - When clicked the field becomes the "default field" so that subsequently added/updated fields can "inherit" its settings. Once this has been selected, subsequent fields display Use Default Field Settings, detailed below.
![]() Default to Last Saved - When clicked the field "inherits" all of the settings of the most recently saved field.
Default to Last Saved - When clicked the field "inherits" all of the settings of the most recently saved field.
![]() Use Default Field Settings - When clicked the field "inherits" all of the settings of the default field. (This option is only available when "Set as Default Setting" has been used first.
Use Default Field Settings - When clicked the field "inherits" all of the settings of the default field. (This option is only available when "Set as Default Setting" has been used first.
![]()
![]() Delete a Field - To do so, click
Delete a Field - To do so, click ![]() next to a section name to expand that section, and then click the delete icon next to the field to be deleted. A delete confirmation dialog box is displayed. Click OK. The field is deleted and the updated Update Field Details per Section page is displayed.
next to a section name to expand that section, and then click the delete icon next to the field to be deleted. A delete confirmation dialog box is displayed. Click OK. The field is deleted and the updated Update Field Details per Section page is displayed.
![]() NOTE: If the form has been used for data entry and the field in question has data saved in it, it cannot be deleted (unless it is a read-only or computed field).
NOTE: If the form has been used for data entry and the field in question has data saved in it, it cannot be deleted (unless it is a read-only or computed field).
![]()
![]() Preview the Form - To do so, click the preview icon. A new window is opened to show you how your form will look. Close that window to return to the Update Field Details per Section page.
Preview the Form - To do so, click the preview icon. A new window is opened to show you how your form will look. Close that window to return to the Update Field Details per Section page.
![]() TIP: The preview tool is also available on the FormBuilder - Index page.
TIP: The preview tool is also available on the FormBuilder - Index page.
![]()
![]() Re-arrange the Form - To do so, click the re-arrange icon. The Arrange Form Layout page is displayed. On this page the form's sections are shown in green and fields are shown in gray. To re-arrange these fields and/or sections, drag-and-drop each form component to the desired location, or click the component to be moved then click one of the red arrow buttons to the right of the list to shift that component's position. (Keep in mind that the form must begin with a section.) Click CONTINUE to save your work. The updated Update Field Details per Section page is displayed.
Re-arrange the Form - To do so, click the re-arrange icon. The Arrange Form Layout page is displayed. On this page the form's sections are shown in green and fields are shown in gray. To re-arrange these fields and/or sections, drag-and-drop each form component to the desired location, or click the component to be moved then click one of the red arrow buttons to the right of the list to shift that component's position. (Keep in mind that the form must begin with a section.) Click CONTINUE to save your work. The updated Update Field Details per Section page is displayed.
The process of making changes to an existing form is now complete.
![]() NOTE: If the changes you made were to a form you previously consented to share, those changes are not automatically reflected in the Download Shared Forms feature. Instead, the form must be re-approved by Foothold Technology. (No action is required on your part to initiate this process.) Once re-approved, the updated version of the form replaces the original in the Download Shared Forms index. It does not, however, replace any already downloaded copies of the form residing in other providers' AWARDS databases.
NOTE: If the changes you made were to a form you previously consented to share, those changes are not automatically reflected in the Download Shared Forms feature. Instead, the form must be re-approved by Foothold Technology. (No action is required on your part to initiate this process.) Once re-approved, the updated version of the form replaces the original in the Download Shared Forms index. It does not, however, replace any already downloaded copies of the form residing in other providers' AWARDS databases.
https://demodb.footholdtechnology.com/help/?10192
