|   |
| |
To enter or update a group note, complete the following steps from the AWARDS Home page:
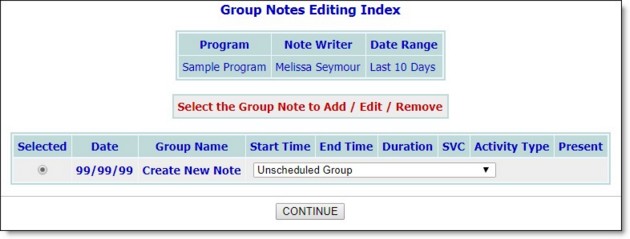
![]() NOTE: There is a default 10 day group note editing window. Group notes written prior to that window cannot be selected for updating unless the default window has been adjusted (using the System Setup Business Rules feature), or unless the user has the "Backdated Contacts Log/Group Notes Data Entry" permission. For more information on business rules and permissions, click here.
NOTE: There is a default 10 day group note editing window. Group notes written prior to that window cannot be selected for updating unless the default window has been adjusted (using the System Setup Business Rules feature), or unless the user has the "Backdated Contacts Log/Group Notes Data Entry" permission. For more information on business rules and permissions, click here.
![]() NOTE: The groups included in this selection list are those configured using the Services - Group module's Group Schedule Setup feature.
NOTE: The groups included in this selection list are those configured using the Services - Group module's Group Schedule Setup feature.
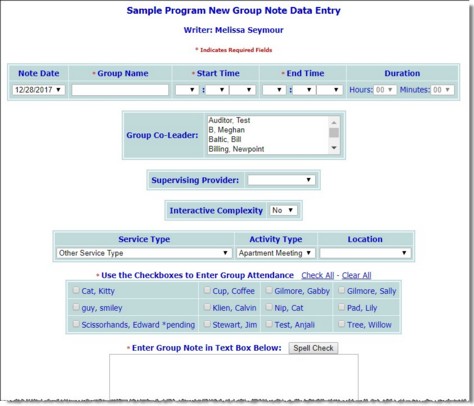
![]() Note Date - Click the drop-down arrow and select the date on which the group contact took place. Upon selection of a date, the page is refreshed so that the group attendance selection lists are reflective of group members on that date (when working with scheduled groups) and program consumers on the roster on that date.
Note Date - Click the drop-down arrow and select the date on which the group contact took place. Upon selection of a date, the page is refreshed so that the group attendance selection lists are reflective of group members on that date (when working with scheduled groups) and program consumers on the roster on that date.
![]() Group Name - In this field, type or make changes to a name for the group. If a specific group was selected on the Group Note Editing Index page, the group name defaults to that selection and cannot be changed.
Group Name - In this field, type or make changes to a name for the group. If a specific group was selected on the Group Note Editing Index page, the group name defaults to that selection and cannot be changed.
![]() Start Time / End Time / Duration - Click the Start Time drop-down arrows and select the times at which the group contact began. In addition, either End Time or Duration will be required for the note (as noted with a red asterisk). Use the available drop-down arrows for required option to specify when the group contact ended, or how long it was, respectively. If End Time is required, Duration will be a read-only value that is automatically calculated based on that time, or vice versa with Duration being required and End Time being calculated automatically.
Start Time / End Time / Duration - Click the Start Time drop-down arrows and select the times at which the group contact began. In addition, either End Time or Duration will be required for the note (as noted with a red asterisk). Use the available drop-down arrows for required option to specify when the group contact ended, or how long it was, respectively. If End Time is required, Duration will be a read-only value that is automatically calculated based on that time, or vice versa with Duration being required and End Time being calculated automatically.
![]() NOTE: If a specific group was selected on the Group Note Editing Index page, the start and end times default to those set up for that group.
NOTE: If a specific group was selected on the Group Note Editing Index page, the start and end times default to those set up for that group.
![]() NOTE: If a group activity record has already been entered for the group, individual participant clock times entered in the group activity record are reflected when the group note is entered. By default, only individual clock times that fall within the group note's Start and End times are displayed. If adjustments are made to the group note Start and End times to accommodate early arrivals or late departures, the page refreshes and any early/late individual clock times from the group activity are displayed on the note's data entry page. When group activity times exist outside of the note time, a message is displayed on the group note data entry page, including the note time that should be used if the writer wants to pull all individual group activity times into the note. This message also includes a link for users to click to update the note times automatically.
NOTE: If a group activity record has already been entered for the group, individual participant clock times entered in the group activity record are reflected when the group note is entered. By default, only individual clock times that fall within the group note's Start and End times are displayed. If adjustments are made to the group note Start and End times to accommodate early arrivals or late departures, the page refreshes and any early/late individual clock times from the group activity are displayed on the note's data entry page. When group activity times exist outside of the note time, a message is displayed on the group note data entry page, including the note time that should be used if the writer wants to pull all individual group activity times into the note. This message also includes a link for users to click to update the note times automatically.
![]() Service Type - Click the drop-down arrow and select the type of service provided during the group contact. If a specific group was selected on the Group Note Editing Index page, and the group's activity type is identical to a service type, that service type will be set as the default.
Service Type - Click the drop-down arrow and select the type of service provided during the group contact. If a specific group was selected on the Group Note Editing Index page, and the group's activity type is identical to a service type, that service type will be set as the default.
![]() Activity Type - Click the drop-down arrow and select the type of activity the occurred during the group contact.
Activity Type - Click the drop-down arrow and select the type of activity the occurred during the group contact.
![]() NOTE: The available activities are those configured for the selected program. Housing programs use a pre-defined general activities list, while day programs can use the Services - Group module's Activities feature to modify their activities list.
NOTE: The available activities are those configured for the selected program. Housing programs use a pre-defined general activities list, while day programs can use the Services - Group module's Activities feature to modify their activities list.
![]() Location - Click this drop-down arrow and select the group's location.
Location - Click this drop-down arrow and select the group's location.
![]() NOTE: This is an optional setting, not automatically available in all AWARDS databases. If configured, this list is shared with contacts log records, group notes, and progress notes, and is configurable by the agency. For more information, please see the Service Contacts - Implementation Request Form.
NOTE: This is an optional setting, not automatically available in all AWARDS databases. If configured, this list is shared with contacts log records, group notes, and progress notes, and is configurable by the agency. For more information, please see the Service Contacts - Implementation Request Form.
![]() Group Attendance - Click the checkbox next to each program consumer who attended this group or use the Check All option if applicable. If a specific group was selected on the Group Note Editing Index page, group attendees may be selected by default based on the membership of that group. Adjust the individual settings for each participant as well:
Group Attendance - Click the checkbox next to each program consumer who attended this group or use the Check All option if applicable. If a specific group was selected on the Group Note Editing Index page, group attendees may be selected by default based on the membership of that group. Adjust the individual settings for each participant as well:
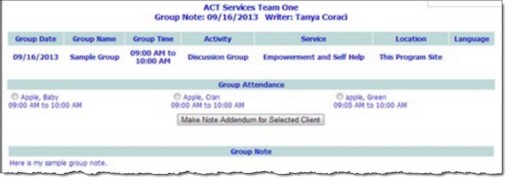
![]() In and Out - Individual clock times are displayed for selected consumers (or expected members marked as "Present"). By default, these times display the overall group time, as entered in the group note settings at the top of the page. However, users can edit the individual clock times to reflect instances of late arrivals, early departures, etc.
In and Out - Individual clock times are displayed for selected consumers (or expected members marked as "Present"). By default, these times display the overall group time, as entered in the group note settings at the top of the page. However, users can edit the individual clock times to reflect instances of late arrivals, early departures, etc.

![]() Status - Available for expected attendees of scheduled groups. Click the drop-down arrow and select the correct status for each individual. If the individual was not present, a corresponding (Reason for Absence if Applicable) field is available for additional detail.
Status - Available for expected attendees of scheduled groups. Click the drop-down arrow and select the correct status for each individual. If the individual was not present, a corresponding (Reason for Absence if Applicable) field is available for additional detail.
![]() Telehealth - Displayed when an attendee's name is checked off or when a scheduled participant's status is set to "present." (In the latter case, individuals who are not scheduled attendees can be checked off as attending via telehealth by clicking Show Full Program Roster to Expand Attendance and checking the appropriate names, at which point the Telehealth option is automatically displayed for those individuals.)
Telehealth - Displayed when an attendee's name is checked off or when a scheduled participant's status is set to "present." (In the latter case, individuals who are not scheduled attendees can be checked off as attending via telehealth by clicking Show Full Program Roster to Expand Attendance and checking the appropriate names, at which point the Telehealth option is automatically displayed for those individuals.)
![]() NOTE: This is an optional setting, not automatically available in all AWARDS databases. For more information, or to request that it be made available, please see the Service Contacts - Implementation Request Form.
NOTE: This is an optional setting, not automatically available in all AWARDS databases. For more information, or to request that it be made available, please see the Service Contacts - Implementation Request Form.
![]() TIP: If the location of the group is set to "Telehealth" the Telehealth checkbox is automatically checked for any of the group's attendees. If you have a large group where most participated via telehealth, set the location to "Telehealth," use the Check All option to select everyone, and then make adjustments to the attendees and individual telehealth status details as needed.
TIP: If the location of the group is set to "Telehealth" the Telehealth checkbox is automatically checked for any of the group's attendees. If you have a large group where most participated via telehealth, set the location to "Telehealth," use the Check All option to select everyone, and then make adjustments to the attendees and individual telehealth status details as needed.
![]() WARNING! For existing group notes, de-selecting all Group Attendance client checkboxes and clicking SAVE NOTE deletes the group note.
WARNING! For existing group notes, de-selecting all Group Attendance client checkboxes and clicking SAVE NOTE deletes the group note.
![]() NOTE: Each individual's group clock time displays next to his or her name when group notes are viewed in report mode, and the Group Notes ReportBuilder also displays Start Time and End Time using the individual's clock time. For billing agencies, AWARDS uses the individual clock times to determine if an invoice should be generated, not the overall group time.
NOTE: Each individual's group clock time displays next to his or her name when group notes are viewed in report mode, and the Group Notes ReportBuilder also displays Start Time and End Time using the individual's clock time. For billing agencies, AWARDS uses the individual clock times to determine if an invoice should be generated, not the overall group time.
![]() NOTE: For BillingBuilder clients, group notes that are used to generate invoices for procedures associated with configured Daily/Per Diem and Fee for Service billing types are locked once invoices have been posted to A/R. Please note that because, by definition, a group note generates documents for multiple clients at a time, it is possible to have invoices generated and posted for some of the group's participants, but not all, depending on billing requirements. As a result, individual start and end times and individual addenda for clients for whom an invoice has not yet been posted can still be edited and/or added as needed. It is also possible to add new clients who may have been omitted previously to the group. Also note that edits can be made to all of the group note attributes, group note text, and consumer addenda if the batch of invoices is unposted from A/R using UNPOST BATCH on the Create Insurance Claims page within the BillingBuilder.
NOTE: For BillingBuilder clients, group notes that are used to generate invoices for procedures associated with configured Daily/Per Diem and Fee for Service billing types are locked once invoices have been posted to A/R. Please note that because, by definition, a group note generates documents for multiple clients at a time, it is possible to have invoices generated and posted for some of the group's participants, but not all, depending on billing requirements. As a result, individual start and end times and individual addenda for clients for whom an invoice has not yet been posted can still be edited and/or added as needed. It is also possible to add new clients who may have been omitted previously to the group. Also note that edits can be made to all of the group note attributes, group note text, and consumer addenda if the batch of invoices is unposted from A/R using UNPOST BATCH on the Create Insurance Claims page within the BillingBuilder.
![]() WARNING! Do not attempt to edit the group note by clicking your browser's Back button from this page. Edits should be made by clicking Edit Group Note or by returning to the group note index and selecting the note from there.
WARNING! Do not attempt to edit the group note by clicking your browser's Back button from this page. Edits should be made by clicking Edit Group Note or by returning to the group note index and selecting the note from there.
![]() NOTE: If you add an addendum for a scheduled member of this group and there is an associated item on a service plan or plan/review for this group, the addendum will indicate on the confirmation page that this group note is linked that that part of their plan.
NOTE: If you add an addendum for a scheduled member of this group and there is an associated item on a service plan or plan/review for this group, the addendum will indicate on the confirmation page that this group note is linked that that part of their plan.
![]() TIP: Changes or additions to the other group note information and/or text can also be made at this time.
TIP: Changes or additions to the other group note information and/or text can also be made at this time.
The process of entering or updating a group note is now complete.
https://demodb.footholdtechnology.com/help/?10421
