|   |
| |
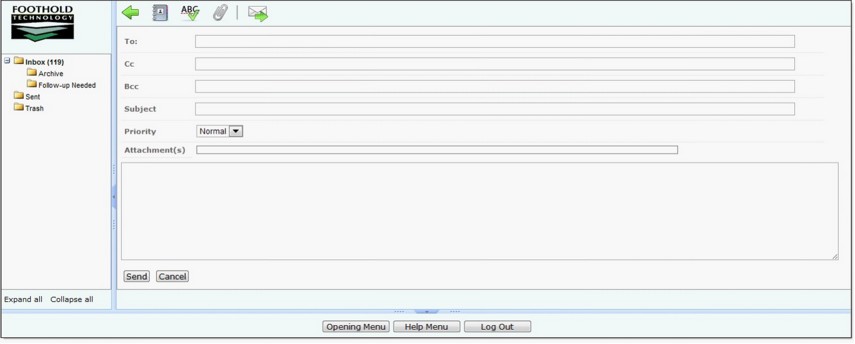
To compose and send a new message, complete the following steps from within the Messages module, accessed by clicking Messages (or the Messages icon) from the navigation bar:
![]()
The compose message page is displayed.
![]() TIP: To send a message to the Help Desk, click the Help Desk icon instead of Compose. When composing a message to the Help Desk, the steps will vary from those provided below. For more information on contacting the Help Desk, please click here.
TIP: To send a message to the Help Desk, click the Help Desk icon instead of Compose. When composing a message to the Help Desk, the steps will vary from those provided below. For more information on contacting the Help Desk, please click here.
![]()
![]() Type in the recipient name(s) - Type the user ID or first and last names of each AWARDS user to whom this message should be sent. Separate each user ID or name with a semicolon (;).
Type in the recipient name(s) - Type the user ID or first and last names of each AWARDS user to whom this message should be sent. Separate each user ID or name with a semicolon (;).
![]() Select the recipient name(s) using the address book - Double-click within the To, Cc, or Bcc fields, or click the Address Book icon.
Select the recipient name(s) using the address book - Double-click within the To, Cc, or Bcc fields, or click the Address Book icon.
![]()
The Address Book page is displayed.
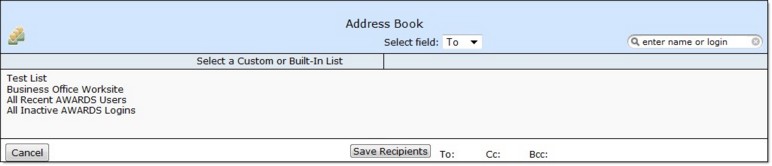
Click the Select field drop-down arrow and make a selection to indicate the type of recipient you are about to specify - "To," "Cc," or "Bcc." (If you accessed the address book by clicking within one of those recipient type fields on the message composition page, that type is selected by default.
![]() NOTE: Any previously entered/selected recipients of the specified type are displayed in green on the right-hand side of this page. The page also includes a total count of any To, Cc, and/or Bcc recipients in the bottom-right corner.
NOTE: Any previously entered/selected recipients of the specified type are displayed in green on the right-hand side of this page. The page also includes a total count of any To, Cc, and/or Bcc recipients in the bottom-right corner.
Select a custom or built-in list of users from the left side of the page, and/or search for an individual user by entering a value in the "enter name or login" option on the right, and then pressing <ENTER>. When completing a search, results are displayed on the right side of the page with a checkbox next to each individual, where any already specified recipients of the selected recipient type are already checked and noted in green text. Click the checkbox next to each user to whom the message should be sent, or use the available All checkbox.
Once a list or individual user has been selected, click Save Recipients to save your selections and return to the message composition page.
![]() TIP: For more information on configuring / maintaining custom lists, see Managing Custom Lists.
TIP: For more information on configuring / maintaining custom lists, see Managing Custom Lists.
![]() NOTE: Urgent messages are displayed in their respective folders with a red subject line.
NOTE: Urgent messages are displayed in their respective folders with a red subject line.
![]()
![]() TIP: The maximum file size for attachments is 64MB each.
TIP: The maximum file size for attachments is 64MB each.
![]() TIP: To delete an attachment once it has been added to a message, click the delete icon next to that attachment.
TIP: To delete an attachment once it has been added to a message, click the delete icon next to that attachment.
![]()
![]()
![]() NOTE: The spell check feature opens in a second window. If it does not display properly it may be an indication that a pop-up blocker setting is enabled in your browser.
NOTE: The spell check feature opens in a second window. If it does not display properly it may be an indication that a pop-up blocker setting is enabled in your browser.
![]()
The message is sent, a copy of the sent message is placed in the "Sent" folder, and a confirmation dialog box is displayed. Click Close to acknowledge that your message has been sent, and to return to the messages index.
The process of composing and sending a message is now complete.
https://demodb.footholdtechnology.com/help/?11611
