|   |
| |
Client File Cabinet files can be uploaded, deleted, and downloaded from individual client face sheets, as well as from the Service-Individual module's Client File Cabinet feature. Aside from a different initial point of access in each instance the general steps in the process are the same, as detailed here:
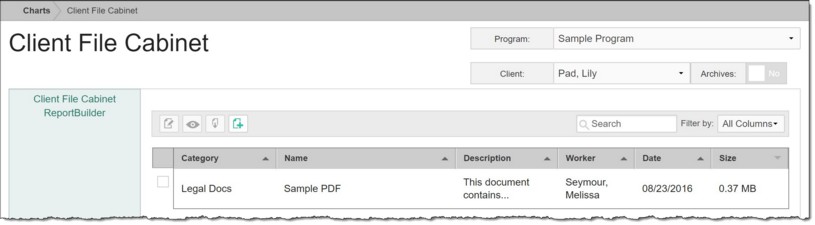
![]() Services-Individual > Client File Cabinet - Click Charts from the left-hand menu, and then click Services-Individual. From the fly-out menu displayed, click Client File Cabinet. The Client File Cabinet index page is displayed. Click the Client drop-down arrow in the upper-right corner of the page and select the individual whose File Cabinet is to be worked with (first clicking the Archives toggle if the client is not on the current roster).
Services-Individual > Client File Cabinet - Click Charts from the left-hand menu, and then click Services-Individual. From the fly-out menu displayed, click Client File Cabinet. The Client File Cabinet index page is displayed. Click the Client drop-down arrow in the upper-right corner of the page and select the individual whose File Cabinet is to be worked with (first clicking the Archives toggle if the client is not on the current roster).
![]() Profile > Face Sheet - Click Census from the left-hand menu. From the fly-out menu displayed, click Profile, and then click Face Sheet. Select the client to be worked with (first clicking the Roster Archives option if the client is not on the current roster), and then click CONTINUE. The face sheet is displayed. Scroll down to the Client File Cabinet portion of the record and click Update Client File Cabinet.
Profile > Face Sheet - Click Census from the left-hand menu. From the fly-out menu displayed, click Profile, and then click Face Sheet. Select the client to be worked with (first clicking the Roster Archives option if the client is not on the current roster), and then click CONTINUE. The face sheet is displayed. Scroll down to the Client File Cabinet portion of the record and click Update Client File Cabinet.
Regardless of the path taken above, the individual's Client File Cabinet index page is now displayed, listing any existing files previously uploaded for him/her.
![]() NOTE: If a file has the sharing icon
NOTE: If a file has the sharing icon ![]() displayed, it is an indication that access to the file is limited to the current program rather than all programs in which the client is enrolled.
displayed, it is an indication that access to the file is limited to the current program rather than all programs in which the client is enrolled.
![]() TIP: When working on the index page, files are easily accessible using the following tools and navigation features:
TIP: When working on the index page, files are easily accessible using the following tools and navigation features:
![]() Sorting options - Records in the index are sorted alphabetically by "Category" (if applicable), and then by "Name." Click a column header in the data table to sort the index by a different type of data. Click the heading again to reverse the sort order.
Sorting options - Records in the index are sorted alphabetically by "Category" (if applicable), and then by "Name." Click a column header in the data table to sort the index by a different type of data. Click the heading again to reverse the sort order.
![]() Navigation options - 10 files are displayed on the page by default. To access files on subsequent pages of the index (when applicable), click the arrows in the bottom-right corner of the table. To display 25 or 50 files at a time, click the Show drop-down to the left of the file count, also in the bottom-right corner, and make a selection.
Navigation options - 10 files are displayed on the page by default. To access files on subsequent pages of the index (when applicable), click the arrows in the bottom-right corner of the table. To display 25 or 50 files at a time, click the Show drop-down to the left of the file count, also in the bottom-right corner, and make a selection.
Once you select files on the index, a count of how many total files are selected is displayed in the action bar. Selections are maintained while moving from one page of the index to the next; meaning, you can select files on the first page (showing files 1-10 by default) and move to the next page (displaying files 11-20) without losing the selections made on the first page. Links for Show all selected records and Uncheck All are available beneath the index table for easy navigation.
![]() Search and filtering options - A Search field is available on the action bar along with a corresponding Filter by drop-down list. To search the contents of the index (including those files not currently displayed on the page), enter a value in the Search field. The index is automatically updated as you type. To further narrow your search, use the Filter by selection to indicate whether the search should look at data in "All Columns" (the default) or a specific column. (Keep in mind that this search looks only at the index values, NOT the files themselves.)
Search and filtering options - A Search field is available on the action bar along with a corresponding Filter by drop-down list. To search the contents of the index (including those files not currently displayed on the page), enter a value in the Search field. The index is automatically updated as you type. To further narrow your search, use the Filter by selection to indicate whether the search should look at data in "All Columns" (the default) or a specific column. (Keep in mind that this search looks only at the index values, NOT the files themselves.)
![]() ReportBuilder access - The Client File Cabinet ReportBuilder link on the left-hand menu bar provides a shortcut to access the ReportBuilder for this feature. For instructions on using that ReportBuilder, click here.
ReportBuilder access - The Client File Cabinet ReportBuilder link on the left-hand menu bar provides a shortcut to access the ReportBuilder for this feature. For instructions on using that ReportBuilder, click here.
![]()
![]() Add a new file - Click the add new icon from the action bar above the files table. A new data entry page is displayed. Configure the fields and options on this page as follows, and then click Save. The file is uploaded, and a confirmation page is displayed.
Add a new file - Click the add new icon from the action bar above the files table. A new data entry page is displayed. Configure the fields and options on this page as follows, and then click Save. The file is uploaded, and a confirmation page is displayed.
![]() TIP: Before beginning the add process, confirm whether or not the file to be attached is already in the client's file cabinet by using the Search field above the files table. The index is automatically updated as you type, and looks for matches in all of the file table's columns.
TIP: Before beginning the add process, confirm whether or not the file to be attached is already in the client's file cabinet by using the Search field above the files table. The index is automatically updated as you type, and looks for matches in all of the file table's columns.
![]() Category - Click this drop-down arrow and select the category in which this file should be placed. This option is only available if your agency has configured a customized categories list. Leave this selection blank if the file should not be categorized.
Category - Click this drop-down arrow and select the category in which this file should be placed. This option is only available if your agency has configured a customized categories list. Leave this selection blank if the file should not be categorized.
![]() Name - In this field, type the name of the file using 40 characters or less. (The name entered here will be used to identify and access the file in the future, and should therefore be brief and descriptive.)
Name - In this field, type the name of the file using 40 characters or less. (The name entered here will be used to identify and access the file in the future, and should therefore be brief and descriptive.)
![]() Description - In this field, type a brief description of what the file contains using 100 characters or less.
Description - In this field, type a brief description of what the file contains using 100 characters or less.
![]() Choose File - Click this button to open a File Upload window. Select the file to be uploaded, and then click Open.
Choose File - Click this button to open a File Upload window. Select the file to be uploaded, and then click Open.
![]() TIP: Keep the Client File Cabinet's available space in mind when selecting which file to use, as each client is limited to a total of 10MB by default, or to the maximum displayed on this page if it has been increased for your agency. Additionally, note that the maximum individual file size is 8 MB. Accepted file types are DOC, XLS, PDF, JPG, BMP, TIFF, MP4, and ZIP.
TIP: Keep the Client File Cabinet's available space in mind when selecting which file to use, as each client is limited to a total of 10MB by default, or to the maximum displayed on this page if it has been increased for your agency. Additionally, note that the maximum individual file size is 8 MB. Accepted file types are DOC, XLS, PDF, JPG, BMP, TIFF, MP4, and ZIP.
![]() Share File Only with [Program Name] - In the event that the client whose file cabinet is being worked with is (or has been) enrolled in more than one program, this option allows you to upload and share a file ONLY with the program through which the file cabinet was accessed (in step 1). To do so, make sure that the toggle is set to "Yes."
Share File Only with [Program Name] - In the event that the client whose file cabinet is being worked with is (or has been) enrolled in more than one program, this option allows you to upload and share a file ONLY with the program through which the file cabinet was accessed (in step 1). To do so, make sure that the toggle is set to "Yes."
![]() TIP: If a program has been configured under System Setup > Agency Program Information > Add/Edit Entire Program to use "No Sharing," the sharing toggle defaults to "Yes" automatically; otherwise it defaults to "No." To have the default value adjusted for a particular program, please contact the Help Desk.
TIP: If a program has been configured under System Setup > Agency Program Information > Add/Edit Entire Program to use "No Sharing," the sharing toggle defaults to "Yes" automatically; otherwise it defaults to "No." To have the default value adjusted for a particular program, please contact the Help Desk.
![]() TIP: If a client is in more than two programs it is not possible to upload a file once and share with a selection of programs, only with one or all. If you want to share a file with only a selection of those programs, it must be uploaded individually in the correct programs with the sharing toggle set to "Yes" in each case.
TIP: If a client is in more than two programs it is not possible to upload a file once and share with a selection of programs, only with one or all. If you want to share a file with only a selection of those programs, it must be uploaded individually in the correct programs with the sharing toggle set to "Yes" in each case.
![]()
![]() Update the information for an existing file - Click the file for which the details are to be updated, or click the checkbox to the left of that file, and then click the edit icon from the action bar above the files table. A data entry page is displayed. Make changes to the information on this page as needed (field/option descriptions are detailed above), and then click Save. The changes are saved, and a confirmation page is displayed.
Update the information for an existing file - Click the file for which the details are to be updated, or click the checkbox to the left of that file, and then click the edit icon from the action bar above the files table. A data entry page is displayed. Make changes to the information on this page as needed (field/option descriptions are detailed above), and then click Save. The changes are saved, and a confirmation page is displayed.
![]() TIP: Documents cannot be re-uploaded during the update/editing process. If you'd like to replace the current file with a new version, delete that file entirely and then re-add it as new.
TIP: Documents cannot be re-uploaded during the update/editing process. If you'd like to replace the current file with a new version, delete that file entirely and then re-add it as new.
![]()
![]() Download an existing file - Click the checkbox to the left of the file to be downloaded, and then click the download icon from the action bar above the files table. A PHI Download Alert is displayed, reminding you of your obligation to properly handle any confidential data and/or protected health information (PHI) within the download in accordance with related government regulations and agency policies. After reading the alert, click OK to acknowledge it and proceed with the download, or Cancel to return to the previous page. Once downloaded the file is accessible on your machine and can be opened and displayed in the appropriate software application (for example, Adobe Acrobat or Microsoft Word). AWARDS remains open and available in the web browser window behind the file.
Download an existing file - Click the checkbox to the left of the file to be downloaded, and then click the download icon from the action bar above the files table. A PHI Download Alert is displayed, reminding you of your obligation to properly handle any confidential data and/or protected health information (PHI) within the download in accordance with related government regulations and agency policies. After reading the alert, click OK to acknowledge it and proceed with the download, or Cancel to return to the previous page. Once downloaded the file is accessible on your machine and can be opened and displayed in the appropriate software application (for example, Adobe Acrobat or Microsoft Word). AWARDS remains open and available in the web browser window behind the file.
![]() TIP: If changes are made to a file once it has been opened and the updated file is saved on your computer, the updates made will not be reflected in AWARDS. Rather, the existing file must be deleted and the new version uploaded in its place.
TIP: If changes are made to a file once it has been opened and the updated file is saved on your computer, the updates made will not be reflected in AWARDS. Rather, the existing file must be deleted and the new version uploaded in its place.
![]()
![]() View or print an existing file's details - Click the checkbox to the left of the file whose details are to be viewed or printed, and then click the view icon from the action bar above the files table. A read-only version of the file information (name, description, category, etc.) is displayed and can be printed as needed using your browser's print option. This option does NOT display the file itself; for file viewing use the download option.
View or print an existing file's details - Click the checkbox to the left of the file whose details are to be viewed or printed, and then click the view icon from the action bar above the files table. A read-only version of the file information (name, description, category, etc.) is displayed and can be printed as needed using your browser's print option. This option does NOT display the file itself; for file viewing use the download option.
![]()
![]() Delete an existing file - Click the checkbox(es) to the left of the file(s) to be deleted, and then click the delete icon from the action bar above the files table. A confirmation message is displayed. Click OK to proceed with the deletion. The selected files(s) are deleted from all programs with which they are shared, and the updated index is displayed.
Delete an existing file - Click the checkbox(es) to the left of the file(s) to be deleted, and then click the delete icon from the action bar above the files table. A confirmation message is displayed. Click OK to proceed with the deletion. The selected files(s) are deleted from all programs with which they are shared, and the updated index is displayed.
![]() NOTE: This option is only available to users with the "Delete Client File Cabinet Documents" exception override permission. Further, deletions of Client File Cabinet files are tracked and can be viewed using the Audit Trail ReportBuilder.
NOTE: This option is only available to users with the "Delete Client File Cabinet Documents" exception override permission. Further, deletions of Client File Cabinet files are tracked and can be viewed using the Audit Trail ReportBuilder.
![]() WARNING! When a File Cabinet File is deleted, it is removed from AWARDS entirely and cannot be retrieved from any of the file cabinet access points.
WARNING! When a File Cabinet File is deleted, it is removed from AWARDS entirely and cannot be retrieved from any of the file cabinet access points.
![]()
![]() Return to the Client File Cabinet index - To do so, click the To Index icon from the action bar while working with a file's details to return to the index page. You can also return to the index page at any time by clicking Client File Cabinet from the breadcrumbs trail below the AWARDS navigation bar.
Return to the Client File Cabinet index - To do so, click the To Index icon from the action bar while working with a file's details to return to the index page. You can also return to the index page at any time by clicking Client File Cabinet from the breadcrumbs trail below the AWARDS navigation bar.
The process of working with Client File Cabinet files is now complete.
https://demodb.footholdtechnology.com/help/?12054
