|   |
| |
Transportation data entry takes place in the following sections:
Expected Passengers - A subsection of ride schedules. Used to record expected passengers for the schedule from the program's roster.
Rides Completed - A subsection of ride schedules. Used to record rides completed that are associated with the selected schedule.
Ride Schedules - The primary component of transportation records. Used to record the rides frequency, driver, and vehicle.
Transported Passengers - A subsection of completed ride records. Used to record transported passengers for the ride being documented.
Below is an alphabetical list of the fields and options located in each of these sections. To jump directly to the information for a specific field or option, press <Ctrl+F> to access your browser's search field and enter the name of the field/option in question.
After a ride schedule is saved for the first time, expected passengers can be entered for it. Expected passenger records can be entered directly from the Ride Schedules sub-index accessed via the ride schedule data entry page, shown below.
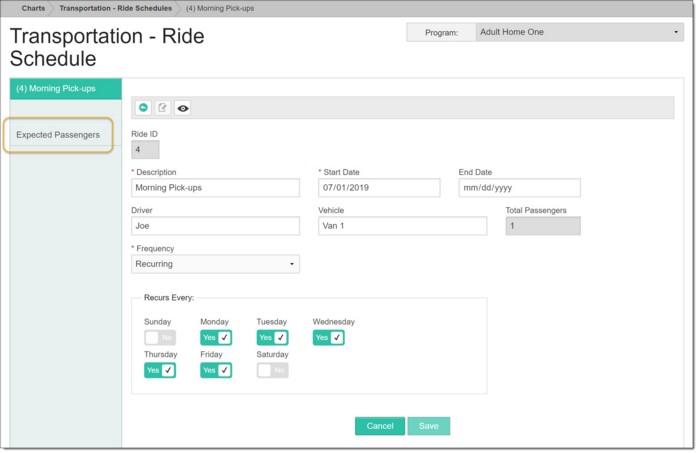
When Expected Passengers is clicked, the corresponding sub-index is displayed.
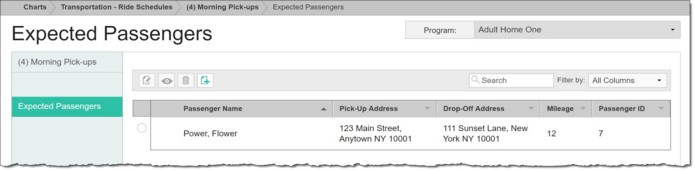
Any previously recorded expected passenger information is displayed in this table, as is the option to add a new record.
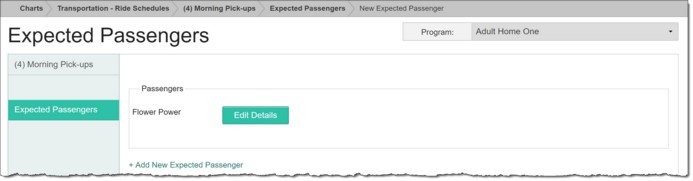
When adding expected passenger records and viewing the data entry form, any previously added expected passenger(s) appear at the top of the page with a corresponding Edit Details button. Click Edit Details if mileage or address information is to be updated for the passenger. A sub-section opens on the form for that passenger, with its own Save button. A + Add New Expected Passenger link also displays on the data entry page. Click this link to open a new set of fields.
Below is an alphabetical list of the fields and options located on data entry page when adding a new expected passenger (with the Add New icon from the Expected Passengers index). To jump directly to the information for a specific field or option, press <Ctrl+F> to access your browser's search field and enter the name of the field/option in question.
Drop-off Address
In this set of fields, either click the Choose Drop-off Location drop-down list and select the agency program and address where the expected passenger is to be taken, or select "Other" and type the address in the Street Address, City, State, Zip fields.
![]() NOTE: The program addresses available in the drop-down list are the addresses entered for each program within the System Setup > Agency Program Information > Add/Edit Entire Program feature.
NOTE: The program addresses available in the drop-down list are the addresses entered for each program within the System Setup > Agency Program Information > Add/Edit Entire Program feature.
![]() NOTE: "Locations" available in the drop-down list are those entered for the agency within the Services - Individual > Transportation > Transportation Locations feature.
NOTE: "Locations" available in the drop-down list are those entered for the agency within the Services - Individual > Transportation > Transportation Locations feature.
Mileage
In this field, type or make changes to the expected mileage to be covered while driving between the pick-up and drop-off addresses for the expected passenger.
![]() TIP: This field accepts decimal values.
TIP: This field accepts decimal values.
Passenger Name
Click this drop-down arrow and select the passenger being added as an expected passenger.
![]() NOTE: This list contains the selected program's current roster. For programs using the multi-step admission process with intake, pending clients are not available within the Transportation feature.
NOTE: This list contains the selected program's current roster. For programs using the multi-step admission process with intake, pending clients are not available within the Transportation feature.
Pick-up Address
Once a Passenger Name is selected, the address from his or her face sheet is automatically shown in the Pick-Up Address set of fields (Street Address, City, State, Zip). Enter or update this address as needed, or remove the information and select an agency program address from the Choose Pick-Up Location drop-down. Select "Other" to enter an address that is not on the list.
![]() NOTE: The program addresses available in the drop-down list are the addresses entered for each program within the System Setup > Agency Program Information > Add/Edit Entire Program feature.
NOTE: The program addresses available in the drop-down list are the addresses entered for each program within the System Setup > Agency Program Information > Add/Edit Entire Program feature.
![]() NOTE: "Locations" available in the drop-down list are those entered for the agency within the Services - Individual > Transportation > Transportation Locations feature.
NOTE: "Locations" available in the drop-down list are those entered for the agency within the Services - Individual > Transportation > Transportation Locations feature.
Would You Like to Reverse the Passengers Pick-up and Drop-off Addresses?
![]() NOTE: This option is only available when using the option to clone an existing ride schedule.
NOTE: This option is only available when using the option to clone an existing ride schedule.
If you are documenting a round-trip ride by cloning an existing ride schedule and would like to reverse the pick-up and drop-off addresses to reflect that it is the reverse of the original ride schedule, click this toggle to set it to "Yes." The address swap is automatically applied.
Return to the top of the page.
Below is an alphabetical list of the fields and options located on data entry page when documenting a completed ride. To jump directly to the information for a specific field or option, press <Ctrl+F> to access your browser's search field and enter the name of the field/option in question.
Comments
In this text box, enter any comments regarding the ride being recorded, if applicable.
Driver
In this text box, enter or update the name of the driver who completed the ride. If a Driver was entered within the ride schedule record, that name is displayed in this field by default.
Ride Date
In this field, type or make changes to the date on which the ride occurred (using mm/dd/yyyy format), or select the date using the date picker drop-down arrow.
Vehicle
In this text box, enter or update the vehicle that was used to complete the ride. If a Vehicle was entered within the ride schedule record, that data is displayed in this field by default.
Return to the top of the page.
Below is an alphabetical list of the fields and options located on data entry page when adding or editing a ride schedule. To jump directly to the information for a specific field or option, press <Ctrl+F> to access your browser's search field and enter the name of the field/option in question.
Description
In this field, type or make changes to the name of the ride schedule. Keep in mind that this will be the schedule's main identifier on the programs ride schedule index.
Driver
In this text box, enter or update the name of the driver who is to complete the ride.
End Date
In this field, type or make changes to the date on which the ride schedule ends (using mm/dd/yyyy format), or select the date using the date picker drop-down arrow.
Frequency
Click this drop-down arrow and select "One Time" or "Recurring" to indicate the frequency of the ride schedule.
If "One Time" is selected, the End Date field automatically adjusts to match the Start Date entered for the ride schedule.
If "Recurring" is selected, a Recurs Every: section of fields is displayed on the page, with toggles for each day of the week, Sunday through Saturday. Select the toggles next to the days of the week on which the ride schedule applies; for example, if the ride occurs every Monday and Wednesday, select those days. If the ride occurs daily, select all the days.
Start Date
In this field, type or make changes to the date on which the ride schedule begins (using mm/dd/yyyy format), or select the date using the date picker drop-down arrow.
Vehicle
In this text box, enter or update the vehicle that will be used to complete the ride.
Return to the top of the page.
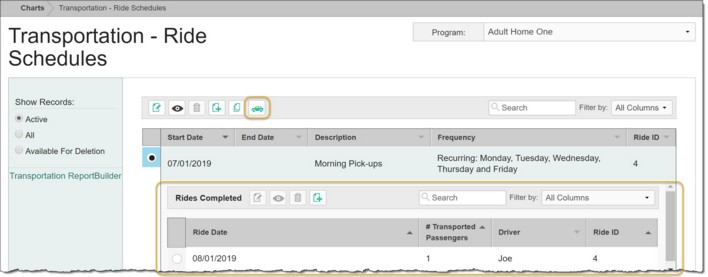
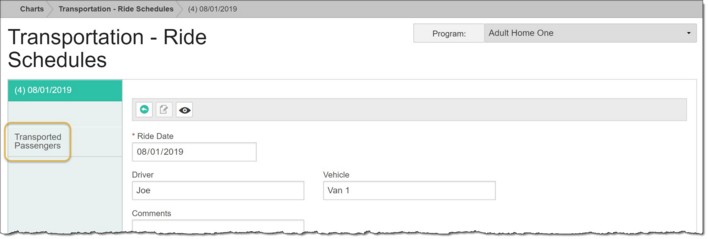
After a completed ride is saved for the first time, transported passengers can be entered for it. Transported passenger records can be entered by accessing the Rides Completed sub-index from the Ride Schedules index page, shown below.
When a new or existing ride completed record is opened, a Transported Passengers subsection is available in the left-hand menu as seen here.
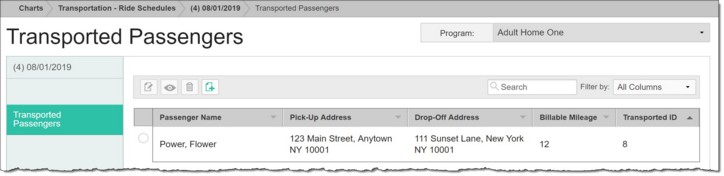
When Transported Passengers is clicked, the corresponding sub-index is displayed. Any previously recorded transported passenger information is displayed in this table, as is the option to add a new record.
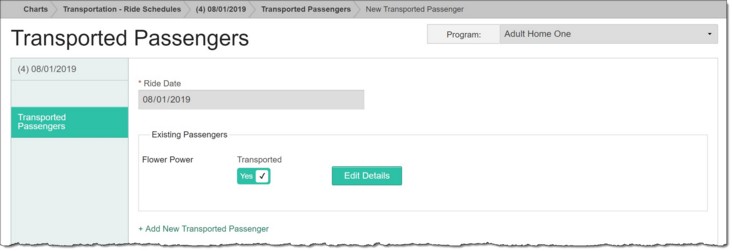
When adding transported passenger records and viewing the data entry form, any expected passengers and previously added transported passenger(s) appear at the top of the page with a corresponding Transported toggle and Edit Details button. Click Edit Details if mileage or address information is to be updated for the passenger. A sub-section opens on the form for that passenger, with its own Save button. A + Add New Transported Passenger link also displays on the data entry page. Click this link to open a new set of fields.
Below is an alphabetical list of the fields and options located on data entry page when adding a new transported passenger (with the Add New icon from the Transported Passengers index). To jump directly to the information for a specific field or option, press <Ctrl+F> to access your browser's search field and enter the name of the field/option in question.
Billable Mileage
In this field, type or make changes to the billable mileage that was covered while driving between the pick-up and drop-off addresses for the transported passenger.
![]() TIP: This field accepts decimal values.
TIP: This field accepts decimal values.
Drop-off Address
In this set of fields, either click the Choose Drop-off Location drop-down list and select the agency program and address where the transported passenger was taken, or select "Other" and type the address in the Street Address, City, State, Zip fields.
![]() NOTE: The program addresses available in the drop-down list are the addresses entered for each program within the System Setup > Agency Program Information > Add/Edit Entire Program feature.
NOTE: The program addresses available in the drop-down list are the addresses entered for each program within the System Setup > Agency Program Information > Add/Edit Entire Program feature.
![]() NOTE: "Locations" available in the drop-down list are those entered for the agency within the Services - Individual > Transportation > Transportation Locations feature.
NOTE: "Locations" available in the drop-down list are those entered for the agency within the Services - Individual > Transportation > Transportation Locations feature.
Passenger Name
Click this drop-down arrow and select the passenger being added as a transported passenger.
![]() NOTE: This list contains the selected program's current roster. For programs using the multi-step admission process with intake, pending clients are not available within the Transportation feature.
NOTE: This list contains the selected program's current roster. For programs using the multi-step admission process with intake, pending clients are not available within the Transportation feature.
Pick-up Address
Once a Passenger Name is selected, the address from his or her face sheet is automatically shown in the Pick-Up Address set of fields (Street Address, City, State, Zip). Enter or update this address as needed, or remove the information and select an agency program address from the Choose Pick-Up Location drop-down. Select "Other" to enter an address that is not on the list.
![]() NOTE: The program addresses available in the drop-down list are the addresses entered for each program within the System Setup > Agency Program Information > Add/Edit Entire Program feature.
NOTE: The program addresses available in the drop-down list are the addresses entered for each program within the System Setup > Agency Program Information > Add/Edit Entire Program feature.
![]() NOTE: "Locations" available in the drop-down list are those entered for the agency within the Services - Individual > Transportation > Transportation Locations feature.
NOTE: "Locations" available in the drop-down list are those entered for the agency within the Services - Individual > Transportation > Transportation Locations feature.
Transported
Select this toggle for any expected passengers that were actually transported during the ride being documented. If an expected passenger was not transported, leave this toggle unselected.
Return to the top of the page.
https://demodb.footholdtechnology.com/help/?12292
