|   |
| |
The third and final step in the process of configuring e-signatures is to add signature lines to the order level. The signature lines for each order level are displayed in a sub-index beneath that order level's heading and requirements information. It is here you will set the type of signatures to be included in the record, the role of each individual who is to sign, and whether there are any requirements or optional settings allowed in each instance.
To add a signature line, or to make changes to or delete an existing signature line, complete the following steps from the AWARDS Home screen:
![]() Progress Notes - The Electronic Signatures Sets page is displayed. Continue with step 3.
Progress Notes - The Electronic Signatures Sets page is displayed. Continue with step 3.
![]() Monthly Checklist - The Electronic Signatures Sets page is displayed, listing any existing monthly checklist signature sets. Continue with step 4.
Monthly Checklist - The Electronic Signatures Sets page is displayed, listing any existing monthly checklist signature sets. Continue with step 4.
![]() NOTE: The Note Type selection list includes all note types configured for your database across all programs, listed in alphabetical order, along with an "All Note Types Default" selection option at the top of the list. That option will be applied to all note types that do not have a configuration set, and all program types that do not have a configuration or default set for a note type. For more information, see the E-Signatures Configuration Hierarchy details page.
NOTE: The Note Type selection list includes all note types configured for your database across all programs, listed in alphabetical order, along with an "All Note Types Default" selection option at the top of the list. That option will be applied to all note types that do not have a configuration set, and all program types that do not have a configuration or default set for a note type. For more information, see the E-Signatures Configuration Hierarchy details page.
The page is automatically refreshed to display any existing signature sets for the selected note type.
![]() NOTE: The data entry page can also be used to add or make changes to order levels if needed.
NOTE: The data entry page can also be used to add or make changes to order levels if needed.
![]() IMPORTANT! If any portion of an existing signature set to which you are making a change has been used on a saved client record, AWARDS must inactivate the entire set (as of today's date) and then create a new copy, which can be added to or edited as needed. When you click a signature set radio button and click an action bar icon in these instances, a confirmation pop-up is displayed. To proceed with inactivating the signature set and creating a new duplicate set in which changes can be made, click Yes, and then click OK to acknowledge that your new set has been created. (The index is refreshed and you can then proceed with your edits.) To inactivate the entire signature set WITHOUT creating a duplicate copy of that set, click No. Note that in all instances the inactivated version of a set is kept as part of already saved client records, while moving forward the new active version of the set (if you have chosen to create one) is applied to all new records using this signature configuration.
IMPORTANT! If any portion of an existing signature set to which you are making a change has been used on a saved client record, AWARDS must inactivate the entire set (as of today's date) and then create a new copy, which can be added to or edited as needed. When you click a signature set radio button and click an action bar icon in these instances, a confirmation pop-up is displayed. To proceed with inactivating the signature set and creating a new duplicate set in which changes can be made, click Yes, and then click OK to acknowledge that your new set has been created. (The index is refreshed and you can then proceed with your edits.) To inactivate the entire signature set WITHOUT creating a duplicate copy of that set, click No. Note that in all instances the inactivated version of a set is kept as part of already saved client records, while moving forward the new active version of the set (if you have chosen to create one) is applied to all new records using this signature configuration.
Note that there is one exception to the above rule - when working with e-signature configurations for progress notes, you can edit most settings for signature lines that have been used on a saved client record WITHOUT inactivating the entire signature set. (If, when working with progress note configurations in this way, it's necessary to make a change to a signature line field/option value that is grayed out or otherwise unavailable, you must set the status to "Inactive" and then add a new signature line using the correct settings.) Any changes made to the signature lines' settings in this instance are effective immediately for any new instances of progress notes using this signature line moving forward, AS WELL AS any saved progress notes using this signature line that have not yet been signed.
![]()
![]() Add a new signature line - To do so, click the Add New icon from the action bar above the order level to which the signature line is being added. A new data entry page is displayed. Configure the fields and options on this page as necessary, and then click Save. The signature line is saved a confirmation page is displayed, and the new signature line is automatically included on any new instances of this type of client record moving forward.
Add a new signature line - To do so, click the Add New icon from the action bar above the order level to which the signature line is being added. A new data entry page is displayed. Configure the fields and options on this page as necessary, and then click Save. The signature line is saved a confirmation page is displayed, and the new signature line is automatically included on any new instances of this type of client record moving forward.
![]() TIP: For more information on each relevant field/option on the data entry page, see Signature Line Fields / Options below.
TIP: For more information on each relevant field/option on the data entry page, see Signature Line Fields / Options below.
![]()
![]() Update an existing signature line - To do so, click the signature to be updated, or click the radio button to the left of that signature line, and then click the Edit icon from the action bar corresponding to the order level you are working with. The data entry page is displayed. Make changes to the information on this page as needed, and then click Save. The signature line is saved, a confirmation page is displayed, and any changes made are automatically included on any new instances of this type of client record moving forward. (Existing saved client records are not impacted.)
Update an existing signature line - To do so, click the signature to be updated, or click the radio button to the left of that signature line, and then click the Edit icon from the action bar corresponding to the order level you are working with. The data entry page is displayed. Make changes to the information on this page as needed, and then click Save. The signature line is saved, a confirmation page is displayed, and any changes made are automatically included on any new instances of this type of client record moving forward. (Existing saved client records are not impacted.)
![]() TIP: For more information on each relevant field/option on the data entry page, see Signature Line Fields / Options below. Keep in mind that if it's necessary to make a change to a signature line field/option value that is grayed out or otherwise unavailable, you must set the status to "Inactive" and then add a new signature line using the correct settings.
TIP: For more information on each relevant field/option on the data entry page, see Signature Line Fields / Options below. Keep in mind that if it's necessary to make a change to a signature line field/option value that is grayed out or otherwise unavailable, you must set the status to "Inactive" and then add a new signature line using the correct settings.
![]()
![]() View or print an existing signature set - To do so, click the radio button to the left the set to be viewed/printed, and then click the View icon from the action bar above the signature sets table. A read-only version of the set is displayed and can be printed as needed using your browser's print option.
View or print an existing signature set - To do so, click the radio button to the left the set to be viewed/printed, and then click the View icon from the action bar above the signature sets table. A read-only version of the set is displayed and can be printed as needed using your browser's print option.
![]()
![]() Delete an existing signature line - To do so, click the radio button to the left of the signature to be deleted, or click the radio button to the left of that record, and then click the Delete icon from the action bar corresponding to the order level you are working with. A confirmation message is displayed. Click OK to proceed with the deletion. The signature line is deleted, the updated index is displayed, and the signature line is no longer included as part of new client records of this type moving forward. (Existing saved client records are not impacted.)
Delete an existing signature line - To do so, click the radio button to the left of the signature to be deleted, or click the radio button to the left of that record, and then click the Delete icon from the action bar corresponding to the order level you are working with. A confirmation message is displayed. Click OK to proceed with the deletion. The signature line is deleted, the updated index is displayed, and the signature line is no longer included as part of new client records of this type moving forward. (Existing saved client records are not impacted.)
![]()
![]() Return to the Order Levels / Signature Lines index - To do so, click the To Index icon from the action bar while working in a signature line to return to the order levels/signature lines page. You can also return to that page at any time by clicking Signatures from the left-hand menu.
Return to the Order Levels / Signature Lines index - To do so, click the To Index icon from the action bar while working in a signature line to return to the order levels/signature lines page. You can also return to that page at any time by clicking Signatures from the left-hand menu.
The process of working with a signature set's signature lines is now complete.
Signature Line Fields / Options
As noted above, when a signature line is added or edited, the signature configuration data entry page is displayed:
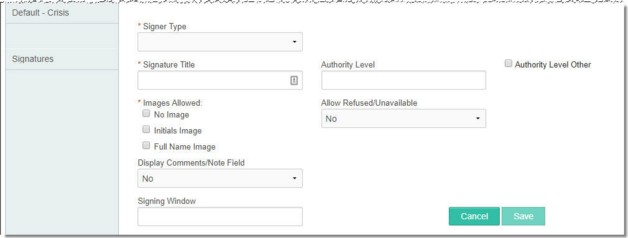
Configure the following fields/options on this page as needed (listed in order of their appearance on the page), and then click Save to complete the data entry process. The new/edited signature line is then saved, a confirmation page is displayed, and unsigned client records are automatically updated to reflect your work.
Click this drop-down arrow and select the type of individual who will be signing this electronic signature line on the client record. Available options are:
![]() Client - When selected, only the individual for whom a record is being (or has been) completed can sign that record with staff assistance, using a Click to Sign link option.
Client - When selected, only the individual for whom a record is being (or has been) completed can sign that record with staff assistance, using a Click to Sign link option.
![]() Employee - When selected, an employee selection list is placed on the client record when it is opened in data entry mode. The selection defaults to the individual meeting the selected Signer Role for this signature; however, if the Lock Employee option is blank or set to "No," changes can be made to that selection as needed. (A selection must be made from that list to enable the selected individual to sign there electronically.)
Employee - When selected, an employee selection list is placed on the client record when it is opened in data entry mode. The selection defaults to the individual meeting the selected Signer Role for this signature; however, if the Lock Employee option is blank or set to "No," changes can be made to that selection as needed. (A selection must be made from that list to enable the selected individual to sign there electronically.)
![]() IMPORTANT! If the Default Signer Role is set to "Deputy Director," we recommend setting the Lock Employee option to "No," as programs may have multiple deputies.
IMPORTANT! If the Default Signer Role is set to "Deputy Director," we recommend setting the Lock Employee option to "No," as programs may have multiple deputies.
![]() Other - When selected, someone other than a client or employee can sign the client record. In order to do so, that individual must be assisted by a staff member with access to the record.
Other - When selected, someone other than a client or employee can sign the client record. In order to do so, that individual must be assisted by a staff member with access to the record.
Only available when the Signer Type is set to "Employee." Click this drop-down arrow and select the type of individual who will be signing the client record. If a selection is made, the employee selection list placed on the record for this signature when it is opened in data entry mode defaults to the appropriate individual; otherwise, a selection must be made from the list and saved to enable the selected individual to sign there electronically. Available options vary based on the type of record for which electronic signatures are being configured. Click the appropriate record type below to view the corresponding signer role fields/options:
![]() NOTE: This option is only available for signatures where the Signer Type is "Employee," AND the Default Signer Role option has been selected.
NOTE: This option is only available for signatures where the Signer Type is "Employee," AND the Default Signer Role option has been selected.
Click this drop-down arrow and select "Yes" to prevent the worker listed as the default signer on a client record from being changed when entering or signing the record. If "No" is selected, or if this option is left at its default "blank" value, the default signer selection can be changed if needed.
![]() IMPORTANT! If the Default Signer Role option is set to "Deputy Director," we recommend setting the Lock Employee option to "No," as programs may have multiple deputies. If the lock option is set to "Yes" in these cases AWARDS automatically selects the first deputy in the list and will not allow that value to be changed.
IMPORTANT! If the Default Signer Role option is set to "Deputy Director," we recommend setting the Lock Employee option to "No," as programs may have multiple deputies. If the lock option is set to "Yes" in these cases AWARDS automatically selects the first deputy in the list and will not allow that value to be changed.
![]() TIP: When this option is set to "No" the signature selection list when working with progress notes electronic signatures is comprised of staff with chart access permission to the selected program who also meet at least ONE of the following criteria: "Direct Care Staff" user group membership and/or the "Include in Direct Care Staff List" data entry/access permission.
TIP: When this option is set to "No" the signature selection list when working with progress notes electronic signatures is comprised of staff with chart access permission to the selected program who also meet at least ONE of the following criteria: "Direct Care Staff" user group membership and/or the "Include in Direct Care Staff List" data entry/access permission.
Signature Title
In this field, type or make changes to the label to be placed on the client record for this electronic signature.
![]() TIP: A title is not required if the Signer Type has been set to "Client." If one is not entered, the signature label defaults to the terminology set up for the program behind-the-scenes; for example, individual, client, consumer, member, etc., as reflected in Consumer name drop-downs throughout AWARDS.
TIP: A title is not required if the Signer Type has been set to "Client." If one is not entered, the signature label defaults to the terminology set up for the program behind-the-scenes; for example, individual, client, consumer, member, etc., as reflected in Consumer name drop-downs throughout AWARDS.
Authority Level / Other Authority Level
In this field, type or make changes to the selected signer type's authority level. If the signer should be allowed to enter his or her own authority level information, check the corresponding Authority Level Other checkbox. If neither option is configured, the signer will not have an authority level associated with his/her signature during the signing process.
Message Notifications Suspended
By default when a record is ready for electronic signing an internal notification message is generated and sent to the anticipated signer via AWARDS Messages. In some agencies where signatures are applied immediately in all cases these notifications are not necessary. To have them turned off in such instances, click this toggle to set it to "Yes."
Images Allowed
Only available when the Signer Type is set to "Employee" or "Client." Click the checkbox next to each image type to be available for use during the signing process when using a PIN and uploaded image. Available options are "No Image," "Initials Image," and "Full Name Image." At least one selection must be made.
By default the only option available to signers is to record a signature, with no way to indicate a refusal to sign or to allow anyone else to record that they may be unavailable to sign for any reason. To allow recording of such a refusal or unavailability for this signature, click this drop-down arrow and select "Yes." When "Yes" is selected the signing process will include a Click for Refused/Unavailable option that will enable anyone with access to the client record to note a refusal or unavailability, and to specify a corresponding Reason.
![]() NOTE: Recorded refusals/unavailability will be captured in the Audit Trail ReportBuilder.
NOTE: Recorded refusals/unavailability will be captured in the Audit Trail ReportBuilder.
Only available when Allow Refused/Unavailable is set to "Yes." In this text box type a list of the reasons to be available for selection when a signature is refused or a signer is unavailable. The default values are "Unavailable" and "Refused." Those options can be overwritten with a new list, or added to as needed. Each selection item must be recorded on a separate line.

Display Comments/Note Field
If the signing process should include a Comments/Note field that can be used by the signer to record additional information pertaining to their signing of a client record, click this drop-down arrow and select "Yes."
Signature Order
Only available after the signature record has been saved at least once. Defaults to the next numerical value based on the number of existing signatures, beginning with 1, but can be changed as needed to adjust the signature's display order on the client record.
![]() TIP: If a signature line is deleted, the ordering of other signatures in that order level is NOT automatically adjusted to reflect the change; for example, if there are two signatures and signature 1 is deleted, the numbering on signature 2 must be manually changed to reflect that it is now 1. Similarly, if no signatures are deleted but the numbering on signature 3 is changed to be number 2, the other signature orders must also be adjusted accordingly.
TIP: If a signature line is deleted, the ordering of other signatures in that order level is NOT automatically adjusted to reflect the change; for example, if there are two signatures and signature 1 is deleted, the numbering on signature 2 must be manually changed to reflect that it is now 1. Similarly, if no signatures are deleted but the numbering on signature 3 is changed to be number 2, the other signature orders must also be adjusted accordingly.
Signing Window (Days)
![]() NOTE: This option is only available when configuring progress note electronic signatures.
NOTE: This option is only available when configuring progress note electronic signatures.
In this field, type or make changes to the number of days within which the signer must sign the progress note, based on the note date. (For example, if the signing window is set to 10 days, the signer can sign notes dated with today's date or dates in the past ten days. Once the note date is out of that window it can no longer be signed using this signature line.) If no value is specified for the signing window, there will be no limit on the number of days within which signing must take place by this signer.
![]() IMPORTANT! Any changes made to a signing window are effective immediately for any new instances of progress notes using this signature line moving forward, AS WELL AS any saved progress notes using this signature line that have not yet been signed. For more information on the process of editing the signing window, click here.
IMPORTANT! Any changes made to a signing window are effective immediately for any new instances of progress notes using this signature line moving forward, AS WELL AS any saved progress notes using this signature line that have not yet been signed. For more information on the process of editing the signing window, click here.
https://demodb.footholdtechnology.com/help/?12249

 Monthly Checklist