|   |
| |
The report functionality within the ResourceTracker enables users to view reports of tickets submitted by themselves or anyone at the agency.
![]() IMPORTANT! Ticket forms are highly configurable; as a result, labels mentioned in the instructions below may vary from those in AWARDS.
IMPORTANT! Ticket forms are highly configurable; as a result, labels mentioned in the instructions below may vary from those in AWARDS.
To view a ResourceTracker report, complete the following steps from the AWARDS Home screen:
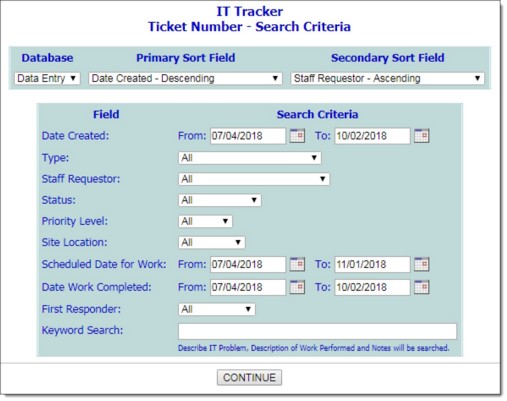
If you are taken to this Search Criteria page, continue with step 4. Otherwise, you are taken to the Resource Tracker Work Orders - Data Entry Index page and should continue with step 3.
![]() Primary Sort Field - Click this drop-down arrow and select the field by which the tickets should be sorted on the report.
Primary Sort Field - Click this drop-down arrow and select the field by which the tickets should be sorted on the report.
![]() Secondary Sort Field - Click this drop-down arrow and select the field by which the tickets should be sub-sorted on the report.
Secondary Sort Field - Click this drop-down arrow and select the field by which the tickets should be sub-sorted on the report.
![]() Date Created - To filter the tickets by date, enter dates in these From and To fields. Only those tickets created during the date range specified here are included in the report contents. The default date range is three months in the past through today's date.
Date Created - To filter the tickets by date, enter dates in these From and To fields. Only those tickets created during the date range specified here are included in the report contents. The default date range is three months in the past through today's date.
![]() Work Category - To filter the tickets by work category, click this drop-down arrow and select the appropriate work category. The default value is "All."
Work Category - To filter the tickets by work category, click this drop-down arrow and select the appropriate work category. The default value is "All."
![]() Requestor - To filter the tickets by requestor, click this drop-down arrow and select the appropriate staff member's name. The default value is "All."
Requestor - To filter the tickets by requestor, click this drop-down arrow and select the appropriate staff member's name. The default value is "All."
![]() Status - To filter the tickets by status, click this drop-down arrow and select the appropriate status. The default value is "All."
Status - To filter the tickets by status, click this drop-down arrow and select the appropriate status. The default value is "All."
![]() Priority - To filter the tickets by priority, click this drop-down arrow and select the appropriate priority. The default value is "All."
Priority - To filter the tickets by priority, click this drop-down arrow and select the appropriate priority. The default value is "All."
![]() Requesting Site - To filter the tickets by requesting site, click this drop-down arrow and select the appropriate site. The default value is "All."
Requesting Site - To filter the tickets by requesting site, click this drop-down arrow and select the appropriate site. The default value is "All."
![]() Scheduled Date for Work - To filter the tickets by the date for which work is scheduled, enter dates in these From and To fields. Only those tickets whose scheduled work date falls within the date range specified here are included in the report contents. The default date range is three months in the past through one month in the future.
Scheduled Date for Work - To filter the tickets by the date for which work is scheduled, enter dates in these From and To fields. Only those tickets whose scheduled work date falls within the date range specified here are included in the report contents. The default date range is three months in the past through one month in the future.
![]() Date Work Completed - To filter the tickets by the date on which work was completed, enter dates in these From and To fields. Only those tickets whose date of work completion falls within the date range specified here are included in the report contents. The default date range is three months in the past through today's date.
Date Work Completed - To filter the tickets by the date on which work was completed, enter dates in these From and To fields. Only those tickets whose date of work completion falls within the date range specified here are included in the report contents. The default date range is three months in the past through today's date.
![]() Responder - To filter the tickets by the assigned responder, click this drop-down arrow and select the appropriate staff member's name. The default value is "All."
Responder - To filter the tickets by the assigned responder, click this drop-down arrow and select the appropriate staff member's name. The default value is "All."
![]() Keyword Search - To filter the tickets based on a certain word or phrase, enter the applicable search criteria in this field. The "Brief Description of Work Requested," "Description of Work Performed," and "Notes" sections of the tickets are searched for the keywords, and only those tickets with a match are included in the report contents.
Keyword Search - To filter the tickets based on a certain word or phrase, enter the applicable search criteria in this field. The "Brief Description of Work Requested," "Description of Work Performed," and "Notes" sections of the tickets are searched for the keywords, and only those tickets with a match are included in the report contents.
![]() TIP: Some headings in the table of report results are clickable links that enable you to change how the report is sorted. An Excel File link is also included at the top of the report page, enabling you to export the report data into an Excel spreadsheet if needed. When the Excel link is clicked, a PHI Download Alert is displayed, reminding you of your obligation to properly handle any confidential data and/or protected health information (PHI) within the download in accordance with related government regulations and agency policies. After reading the alert, click OK to acknowledge it and proceed with the export, or Cancel to return to the previous page.
TIP: Some headings in the table of report results are clickable links that enable you to change how the report is sorted. An Excel File link is also included at the top of the report page, enabling you to export the report data into an Excel spreadsheet if needed. When the Excel link is clicked, a PHI Download Alert is displayed, reminding you of your obligation to properly handle any confidential data and/or protected health information (PHI) within the download in accordance with related government regulations and agency policies. After reading the alert, click OK to acknowledge it and proceed with the export, or Cancel to return to the previous page.
The process of viewing a ResourceTracker report is now complete.
https://demodb.footholdtechnology.com/help/?11519
