|
|   |
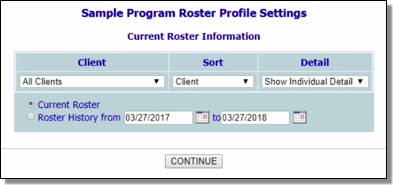
The Program Profile Report, accessible from the Reports module is used to view current and historical roster information for a selected program or program type. Click the link for the type of program profile report you would like to run:
Viewing a Current Roster Report - Learn to view a report of clients currently on roster of a program or program type.
Viewing a Roster History Report - Learn to view a report of clients on the roster of a program or program type over a period of time.
![]() TIP: Frequently asked questions about the Program Profile Report are located at the bottom of the page.
TIP: Frequently asked questions about the Program Profile Report are located at the bottom of the page.
Viewing a Current Roster Report
To view a report of current roster information for a selected program or program type, complete the following steps:

![]() TIP: To instead view a report of clients on the roster of the selected program or program type over a specified period of time, follow the instructions found under Viewing a Roster History Report.
TIP: To instead view a report of clients on the roster of the selected program or program type over a specified period of time, follow the instructions found under Viewing a Roster History Report.
![]() Client - When this option is selected, report information is sorted alphabetically by client name.
Client - When this option is selected, report information is sorted alphabetically by client name.
![]() Admission Date - When this option is selected, report information is sorted chronologically by admission date, with the most recent admissions listed last.
Admission Date - When this option is selected, report information is sorted chronologically by admission date, with the most recent admissions listed last.
![]() Program - When this option is selected, report information is sorted alphabetically by program name.
Program - When this option is selected, report information is sorted alphabetically by program name.
![]() NOTE: The Program selection is only available if a program type and not a specific program was selected in step 2.
NOTE: The Program selection is only available if a program type and not a specific program was selected in step 2.
![]() Show Individual Detail - When this option is selected, the report includes detail on individual clients.
Show Individual Detail - When this option is selected, the report includes detail on individual clients.
![]() Summary Tables Only - When this option is selected, only summary demographics information tables (and no client names) are included in the report.
Summary Tables Only - When this option is selected, only summary demographics information tables (and no client names) are included in the report.
The contents of this read-only report are based on the selections made on the previous pages and may include a combination of three data sections:
![]() Individual client detail - Displayed if the report has been set to show individual detail. Includes client name, admission date, LOS (length of stay) days, birthdate, age, gender, and race/ethnicity data. A combination of one or more of the following variables may also be included in the individual client detail if set up behind-the-scenes to do so: client social security number (SSN), income at admission, zip code, and employer.
Individual client detail - Displayed if the report has been set to show individual detail. Includes client name, admission date, LOS (length of stay) days, birthdate, age, gender, and race/ethnicity data. A combination of one or more of the following variables may also be included in the individual client detail if set up behind-the-scenes to do so: client social security number (SSN), income at admission, zip code, and employer.
![]() Totals and averages information - Displayed regardless of which detail setting has been chosen for the report. Includes the total census and average and median LOS calculated from admission through the report date.
Totals and averages information - Displayed regardless of which detail setting has been chosen for the report. Includes the total census and average and median LOS calculated from admission through the report date.
![]() Summary demographics data - Displayed regardless of which detail setting has been chosen for the report. Includes count and percentage information for gender, age, race, ethnicity, and income at admission (if set up behind-the-scenes to include it).
Summary demographics data - Displayed regardless of which detail setting has been chosen for the report. Includes count and percentage information for gender, age, race, ethnicity, and income at admission (if set up behind-the-scenes to include it).
![]() TIP: Click the heading of any report column to sort the report contents by that variable. To limit which columns are displayed, click the column display icon in the upper left-hand corner of the report and pick and choose which columns of information should be included.
TIP: Click the heading of any report column to sort the report contents by that variable. To limit which columns are displayed, click the column display icon in the upper left-hand corner of the report and pick and choose which columns of information should be included.
To export the report information to Microsoft Excel for further review and analysis, click the Excel File link at the top of the page. A PHI Download Alert is displayed, reminding you of your obligation to properly handle any confidential data and/or protected health information (PHI) within the download in accordance with related government regulations and agency policies. After reading the alert, click OK to acknowledge it and proceed with the export, or Cancel to return to the previous page. Once exported to Excel the report information can be saved and worked with as needed.
The process of viewing a current roster Program Profile Report is now complete.
Return to the top of the page.
Viewing a Roster History Report
To view a report of consumers on the roster of a program group of programs over a specified period of time, complete the following steps:
![]() TIP: To instead view a report of clients currently on the roster of the selected program, follow the instructions found under Viewing a Current Roster Report.
TIP: To instead view a report of clients currently on the roster of the selected program, follow the instructions found under Viewing a Current Roster Report.
![]() Client - When this option is selected, report information is sorted alphabetically by client name.
Client - When this option is selected, report information is sorted alphabetically by client name.
![]() Admission Date - When this option is selected, report information is sorted chronologically by admission date, with the most recent admissions listed last.
Admission Date - When this option is selected, report information is sorted chronologically by admission date, with the most recent admissions listed last.
![]() Discharge Date - When this option is selected, report information is sorted chronologically by discharge date, with the most recent discharges listed last.
Discharge Date - When this option is selected, report information is sorted chronologically by discharge date, with the most recent discharges listed last.
![]() Program - When this option is selected, report information is sorted alphabetically by program name.
Program - When this option is selected, report information is sorted alphabetically by program name.
![]() NOTE: The Program selection is only available if a program type and not a specific program was selected in step 2.
NOTE: The Program selection is only available if a program type and not a specific program was selected in step 2.
![]() NOTE: The Status selection option is only available when a range of dates was specified in step 7. If a single date was entered in both the from and to fields, Status is not available.
NOTE: The Status selection option is only available when a range of dates was specified in step 7. If a single date was entered in both the from and to fields, Status is not available.
![]() Complete History - When this option is selected, all clients are included in the report regardless of their status. This option must be selected if a specific client was selected in step 8.
Complete History - When this option is selected, all clients are included in the report regardless of their status. This option must be selected if a specific client was selected in step 8.
![]() Program Discharges - When this option is selected, only clients discharged during the report period are included in the report.
Program Discharges - When this option is selected, only clients discharged during the report period are included in the report.
![]() Program Admissions - When this option is selected, only clients admitted during the report period are included in the report.
Program Admissions - When this option is selected, only clients admitted during the report period are included in the report.
![]() Census Changes - When this option is selected, only clients whose status has changed during the report period are included in the report.
Census Changes - When this option is selected, only clients whose status has changed during the report period are included in the report.
![]() Show Individual Detail - When this option is selected, the report includes detail on individual clients.
Show Individual Detail - When this option is selected, the report includes detail on individual clients.
![]() Summary Tables Only - When this option is selected, only summary demographics information tables (and no client names) are included in the report.
Summary Tables Only - When this option is selected, only summary demographics information tables (and no client names) are included in the report.
The contents of this read-only report are based on the selections made on the previous pages and may include a combination of three data sections:
![]() Individual client detail - Displayed if the report has been set to show individual detail. Includes client name, admission date, discharge date (if applicable), LOS (length of stay) days, birthdate, age, gender, and race/ethnicity data. A combination of one or more of the following variables may also be included in the individual client detail if set up behind-the-scenes to do so: client social security number (SSN), income at admission, zip code, and employer.
Individual client detail - Displayed if the report has been set to show individual detail. Includes client name, admission date, discharge date (if applicable), LOS (length of stay) days, birthdate, age, gender, and race/ethnicity data. A combination of one or more of the following variables may also be included in the individual client detail if set up behind-the-scenes to do so: client social security number (SSN), income at admission, zip code, and employer.
![]() NOTE: When reviewing the LOS days information in this portion of the report, please keep in mind that when the report was run for a range of dates (as opposed to a single date), there are two LOS values for each individual - one in brackets [ ] and one without. The LOS not in brackets is the total length of stay from the client's admission date through the report end date. The LOS in brackets is the length of stay during the report date range only.
NOTE: When reviewing the LOS days information in this portion of the report, please keep in mind that when the report was run for a range of dates (as opposed to a single date), there are two LOS values for each individual - one in brackets [ ] and one without. The LOS not in brackets is the total length of stay from the client's admission date through the report end date. The LOS in brackets is the length of stay during the report date range only.
![]() Totals and averages information - Displayed regardless of which detail setting has been chosen for the report. Includes the total census, average and median LOS calculated from admission through the report end date, and average length of stay for the report date range (in brackets [ ]) when the report was run for a range of dates as opposed to a single date.
Totals and averages information - Displayed regardless of which detail setting has been chosen for the report. Includes the total census, average and median LOS calculated from admission through the report end date, and average length of stay for the report date range (in brackets [ ]) when the report was run for a range of dates as opposed to a single date.
![]() Summary demographics data - Displayed regardless of which detail setting has been chosen for the report. Includes count and percentage information for gender, age, race, ethnicity, and income at admission (if set up behind-the-scenes to include it).
Summary demographics data - Displayed regardless of which detail setting has been chosen for the report. Includes count and percentage information for gender, age, race, ethnicity, and income at admission (if set up behind-the-scenes to include it).
![]() TIP: Click the heading of any report column to sort the report contents by that variable. To limit which columns are displayed, click the column display icon in the upper left-hand corner of the report and pick and choose which columns of information should be included.
TIP: Click the heading of any report column to sort the report contents by that variable. To limit which columns are displayed, click the column display icon in the upper left-hand corner of the report and pick and choose which columns of information should be included.
To export the report information to Microsoft Excel for further review and analysis, click the Excel File link at the top of the page. A PHI Download Alert is displayed, reminding you of your obligation to properly handle any confidential data and/or protected health information (PHI) within the download in accordance with related government regulations and agency policies. After reading the alert, click OK to acknowledge it and proceed with the export, or Cancel to return to the previous page. Once exported to Excel, the report information can be saved and worked with as needed.
The process of viewing a roster history Program Profile Report is now complete.
Return to the top of the page.
Program Profile Report Frequently Asked Questions
The following frequently asked questions provide details on the most commonly asked about pieces of the Program Profile Report. Click a question from the list here to navigate directly to the corresponding answer, or scroll through the full list of questions and answers below.
How can I calculate the average length of stay for a program or group of programs?
How is age calculated on the report?
How is LOS Days (length of stay) counted for Nightly Emergency Shelter Programs?
How can I calculate the average length of stay for a program or group of programs?
Average length of stay information is included in the contents of the Program Profile Report. For more information on viewing that report, see the instructions above.
How is age calculated on the report?
Age is calculated as of the date on which the report was run, as opposed to the end date of the report if run for a range of dates.
How is LOS Days (length of stay) counted for Nightly Emergency Shelter programs?
For programs configured as Nightly Emergency Shelter programs, the Program Profile Report reports the number of nights a client spent in the program in the "LOS Days" column. (For all other programs and for groups of programs, the "LOS Days" column reports the number of days a client spent in the program. In other words, an additional day will be added to the LOS calculation if a client's admission date is prior to the start date of the report. Other reports, including the Demographics ReportBuilder, do not add this additional day to the calculation.) Further, if the report is run for a single day (where the From and To dates are the same), the report includes only clients who were admitted into the program on that day.
The Roster Status Update feature is designed to enable users to clear up inconsistencies between the current status and the last attendance date. As a result, it will provide you with an active/inactive selection only if it finds an inconsistency; specifically, if the status is active and the last attendance date is more than 90 days ago, or if the status is inactive and the last attendance date is within the last 90 days. (There are options to change this interval; please contact the Help Desk for more information.) If there is not an inconsistency but the status must still be changed, you will need to go into the client's face sheet and use the active/inactive selection found under "Update Demographic Data" to do so.
Return to the top of the page.
https://demodb.footholdtechnology.com/help/?10608
