|   |
| |
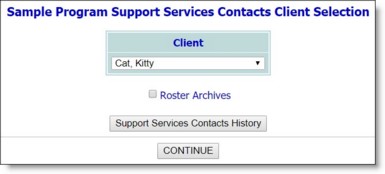
To work with a consumer's past support services contacts history information, complete the following steps from the AWARDS Home screen:
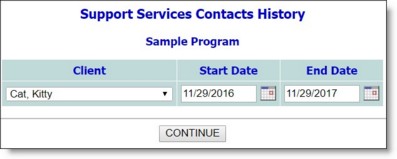
![]() TIP: If the history information to be worked with is for a former (discharged) client, first click the Roster Archives checkbox beneath the client selection option.
TIP: If the history information to be worked with is for a former (discharged) client, first click the Roster Archives checkbox beneath the client selection option.
![]() Delete a support services contacts history record - To do so click the Delete? checkbox next to the contact record to be deleted. Continue with step 10.
Delete a support services contacts history record - To do so click the Delete? checkbox next to the contact record to be deleted. Continue with step 10.
![]() TIP: Current support services contacts cannot be deleted unless their as of and end dates are the same.
TIP: Current support services contacts cannot be deleted unless their as of and end dates are the same.
![]() Update a support services contacts history record - To do so, make changes to the as of or end date values in the corresponding fields (using mm/dd/yyyy format). Continue with step 10.
Update a support services contacts history record - To do so, make changes to the as of or end date values in the corresponding fields (using mm/dd/yyyy format). Continue with step 10.
![]() Add a support services contacts history record - To do so, continue with step 9.
Add a support services contacts history record - To do so, continue with step 9.
![]() TIP: This option to add a new history record is to be used for the purposes of backfilling support services contacts history information only. Current support services contacts must be added using the Medical module Support Services Contacts feature. For more information, see Working with Support Services Contacts Info.
TIP: This option to add a new history record is to be used for the purposes of backfilling support services contacts history information only. Current support services contacts must be added using the Medical module Support Services Contacts feature. For more information, see Working with Support Services Contacts Info.
![]() Add Role / Other - Click the Add Role drop-down arrow and select the former contact's role. If the appropriate role is not listed, type it in the Other field.
Add Role / Other - Click the Add Role drop-down arrow and select the former contact's role. If the appropriate role is not listed, type it in the Other field.
![]() Person - In this field, type the name of the former contact.
Person - In this field, type the name of the former contact.
![]() Agency - In this field, type the name of the agency for which the former contact works.
Agency - In this field, type the name of the agency for which the former contact works.
![]() Address - In this field, type the address of the agency for which the former contact works.
Address - In this field, type the address of the agency for which the former contact works.
![]() Phone - Click the drop-down arrows and select "Work," "Home," "Cell," "Beep," "Fax," or "TTY" to indicate the phone number to be entered for the former contact. Type the phone number(s) in the corresponding fields (using (nnn) nnn-nnnn format, followed by an extension if applicable). Up to two numbers can be entered for each contact.
Phone - Click the drop-down arrows and select "Work," "Home," "Cell," "Beep," "Fax," or "TTY" to indicate the phone number to be entered for the former contact. Type the phone number(s) in the corresponding fields (using (nnn) nnn-nnnn format, followed by an extension if applicable). Up to two numbers can be entered for each contact.
![]() As Of / End Date - In this field, type the date on which the consumer's relationship with the former contact began, and the date on which the relationship ended (using mm/dd/yy format).
As Of / End Date - In this field, type the date on which the consumer's relationship with the former contact began, and the date on which the relationship ended (using mm/dd/yy format).
![]() TIP: To make any additional changes to the history information at this time, click DATA ENTRY to return to the Support Services Contacts Information page.
TIP: To make any additional changes to the history information at this time, click DATA ENTRY to return to the Support Services Contacts Information page.
The process of entering or updating support services contacts history information is now complete.
https://demodb.footholdtechnology.com/help/?10564
