|   |
| |
To jump directly to the information for a specific field or option, press <Ctrl+F> to access your browser's search field and enter the name of the field/option in question.
![]() TIP: In the E-Labs platform, a dot to the left of the field/option name indicates that it is required; for example, Lab, Ordering Provider, Test, and Diagnosis Code are all required.
TIP: In the E-Labs platform, a dot to the left of the field/option name indicates that it is required; for example, Lab, Ordering Provider, Test, and Diagnosis Code are all required.
Patient / Guarantor / Primary Insurance Information
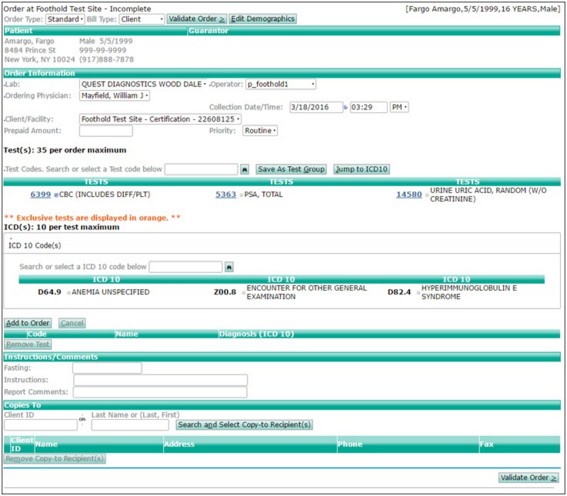
Key fields/options to configure in the Patient/Guarantor/Primary Insurance Information portion of the order form data entry page are as follows:
![]() Order Type - Click this drop-down arrow and choose the method of specimen collection. "Standard" indicates that the agency is collecting the specimen. "PSC" indicates that the order is to be printed and given to the patient to have the specimen collected elsewhere.
Order Type - Click this drop-down arrow and choose the method of specimen collection. "Standard" indicates that the agency is collecting the specimen. "PSC" indicates that the order is to be printed and given to the patient to have the specimen collected elsewhere.
![]() IMPORTANT! Insurance information must be entered in a particular sequence the first time lab orders are sent for a client in AWARDS when using Third Party billing; specifically, when adding insurance information in E-Labs for a new client if billing to his/her insurance:
IMPORTANT! Insurance information must be entered in a particular sequence the first time lab orders are sent for a client in AWARDS when using Third Party billing; specifically, when adding insurance information in E-Labs for a new client if billing to his/her insurance:
1. Open E-Labs in AWARDS, from Medical > Laboratory Orders > New E-Labs Order.
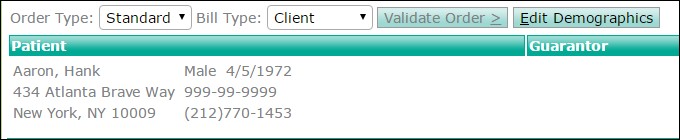
2. With Payer set to "Client," click Edit Demographics.
3. Change the Bill Type to "Third Party."
4. Select a valid payer for the lab and enter the required information.
5. Select the Ordering Provider and Facility, and then click Next.
Keep in mind that this only needs to be done ONCE per client. Once valid insurance information has been entered for the client you can first select "Third Party" under Bill Type and then complete the typical e-labs data entry process.
![]() Patient / Guarantor - By default the Patient portion of the page displays demographic data for the client as previously entered in AWARDS. Edits can be made to the values shown there by clicking Edit Demographics (which opens additional fields/options to data entry as shown here); however, those changes will NOT sync back into AWARDS.
Patient / Guarantor - By default the Patient portion of the page displays demographic data for the client as previously entered in AWARDS. Edits can be made to the values shown there by clicking Edit Demographics (which opens additional fields/options to data entry as shown here); however, those changes will NOT sync back into AWARDS.
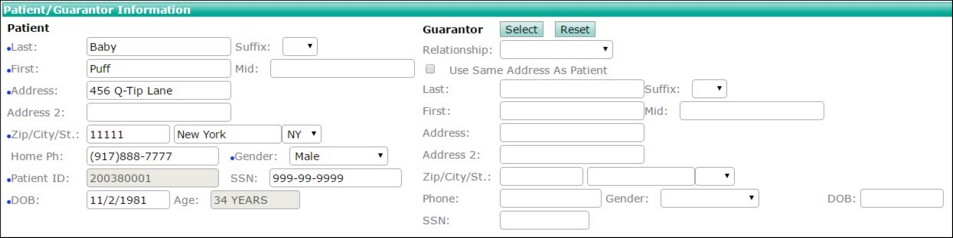
![]() NOTE: The Guarantor portion of the page, shown above, is only available for data entry if "Third Party" was selected as the Bill Type.
NOTE: The Guarantor portion of the page, shown above, is only available for data entry if "Third Party" was selected as the Bill Type.
When using the Edit Demographics option, click Next to complete your data entry and return to the order form.
![]() Primary Insurance - If "Third Party" has been selected as the Bill Type, a primary insurance or guarantor must be entered. If insurance information was specified for this client during the submission of a previous E-Lab order, that information will default here, but can be changed as needed. To enter/update the insurance information, click Edit Demographics to open the following additional fields/options to data entry:
Primary Insurance - If "Third Party" has been selected as the Bill Type, a primary insurance or guarantor must be entered. If insurance information was specified for this client during the submission of a previous E-Lab order, that information will default here, but can be changed as needed. To enter/update the insurance information, click Edit Demographics to open the following additional fields/options to data entry:

Here, be sure to configure the following fields/options:
![]() IMPORTANT! Entitlement records do NOT sync from AWARDS into this form, nor does any insurance information entered here sync back into AWARDS.
IMPORTANT! Entitlement records do NOT sync from AWARDS into this form, nor does any insurance information entered here sync back into AWARDS.
![]() Code - In this field, type the code for the insurance/payer, if known, and then press <ENTER>. If found, the insurance name is then inserted automatically. If the code is NOT known, click the binocular icon to open the Payer Search window.
Code - In this field, type the code for the insurance/payer, if known, and then press <ENTER>. If found, the insurance name is then inserted automatically. If the code is NOT known, click the binocular icon to open the Payer Search window.
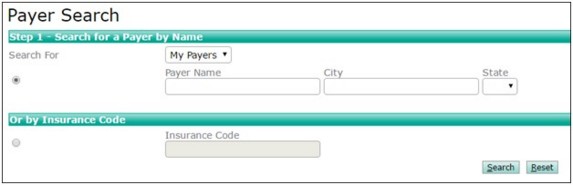
Search for a payer by name or code, and once found select that payer to have it automatically dropped into the order form.
![]() Policy Number - In this field enter the client's policy number for the selected payer.
Policy Number - In this field enter the client's policy number for the selected payer.
![]() Insured - Use these fields and options to specify who carries the insurance coverage for the client.
Insured - Use these fields and options to specify who carries the insurance coverage for the client.
When the insurance data entry is complete, click Next. The updated order form is now displayed and the specified insurance/payer information will now be used as the default for this client when submitting E-Labs orders for him/her in the future.
Return to the top of the page.

Key fields/options to configure in the Order Information portion of the order form data entry page are as follows:
![]() Lab - Click this drop-down arrow and select the lab to which the order/client is being sent.
Lab - Click this drop-down arrow and select the lab to which the order/client is being sent.
![]() NOTE: If "Third Party" was selected as the Bill Type, the Lab selection list will be blank until insurance information is entered. At that time the lab list will refresh to display those labs designated by your agency that accept the insurance in question.
NOTE: If "Third Party" was selected as the Bill Type, the Lab selection list will be blank until insurance information is entered. At that time the lab list will refresh to display those labs designated by your agency that accept the insurance in question.
Return to the top of the page.

Key fields/options to configure in the Test Information portion of the order form data entry page are as follows:
![]() Tests - Click the checkbox next to each test being ordered. The tests listed here are those "saved to preferences" for the selected Lab. If the test being ordered is NOT listed here, type the test code into the search field above the tests list, and then press <ENTER>. If found, the test is automatically selected and inserted into the order form. If the test code is NOT known, click the binocular icon to open the Test Code Search window.
Tests - Click the checkbox next to each test being ordered. The tests listed here are those "saved to preferences" for the selected Lab. If the test being ordered is NOT listed here, type the test code into the search field above the tests list, and then press <ENTER>. If found, the test is automatically selected and inserted into the order form. If the test code is NOT known, click the binocular icon to open the Test Code Search window.
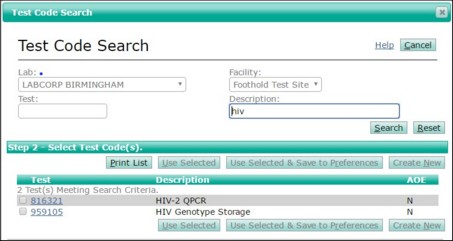
Search for a test by name or code, click the checkbox next to the appropriate test in the search results, and then click one of the following buttons to complete the process and drop the test into the order form:
![]() Use Selected - When clicked, the selected test is added only to the lab order being worked with.
Use Selected - When clicked, the selected test is added only to the lab order being worked with.
![]() Use Selected & Save to Preferences - When clicked, the selected test is added to the lab order being worked with AND to the default tests list for this lab. The updated default tests list will then be available on all lab orders for the selected lab for all clients moving forward.
Use Selected & Save to Preferences - When clicked, the selected test is added to the lab order being worked with AND to the default tests list for this lab. The updated default tests list will then be available on all lab orders for the selected lab for all clients moving forward.
![]() TIP: If it is ever necessary to remove tests from a lab's default tests list, please contact the Help Desk for assistance. Be sure to provide the name of the lab in question, along with the full name of the test to be removed.
TIP: If it is ever necessary to remove tests from a lab's default tests list, please contact the Help Desk for assistance. Be sure to provide the name of the lab in question, along with the full name of the test to be removed.
Return to the top of the page.
ICD 10 / Diagnosis Information
Once one or more tests have been specified for this order, the ICD 10 / Diagnosis Information portion of the form is expanded for data entry. Key fields/options to configure in this section of the order form data entry page are as follows:
![]() NOTE: A consumer's diagnoses are synced to E-Labs and will be checked off by default. Please note that diagnoses that have been recently accessed, including diagnoses from other consumers orders may also show, but will not be checked off.
NOTE: A consumer's diagnoses are synced to E-Labs and will be checked off by default. Please note that diagnoses that have been recently accessed, including diagnoses from other consumers orders may also show, but will not be checked off.
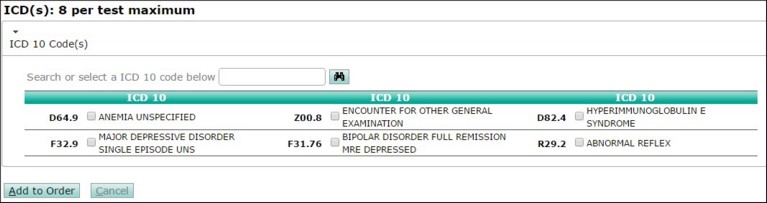
![]() ICD 10 Codes - Click the checkbox next to each relevant diagnosis and uncheck any default selections that are not relevant, as needed. The diagnoses available here are those entered for the client in AWARDS (which are checked off on the order form by default), as well as those "saved to preferences" for the agency (which are unchecked by default). To choose a diagnosis NOT listed here, type the code into the search field above the diagnoses list, and then press <ENTER>. If found, the diagnosis is automatically selected and inserted into the order form. If the diagnosis code is NOT known, click the binocular icon to open the ICD-10 Code Search window.
ICD 10 Codes - Click the checkbox next to each relevant diagnosis and uncheck any default selections that are not relevant, as needed. The diagnoses available here are those entered for the client in AWARDS (which are checked off on the order form by default), as well as those "saved to preferences" for the agency (which are unchecked by default). To choose a diagnosis NOT listed here, type the code into the search field above the diagnoses list, and then press <ENTER>. If found, the diagnosis is automatically selected and inserted into the order form. If the diagnosis code is NOT known, click the binocular icon to open the ICD-10 Code Search window.
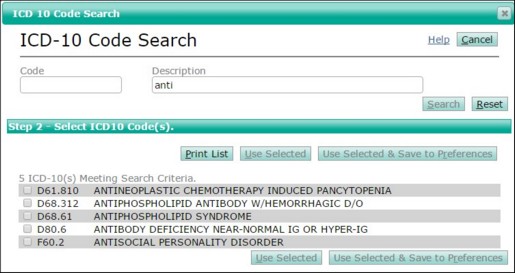
Search for a diagnosis by name or code, click the checkbox next to the appropriate diagnosis in the search results, and then click one of the following buttons to complete the process and drop the diagnosis into the order form:
![]() Use Selected - When clicked, the selected diagnosis is added only to the lab order being worked with.
Use Selected - When clicked, the selected diagnosis is added only to the lab order being worked with.
![]() Use Selected & Save to Preferences - When clicked, the selected diagnosis is added to the lab order being worked with AND to the default diagnoses list for the agency. The updated default diagnoses list will then be available on all lab orders for all clients moving forward.
Use Selected & Save to Preferences - When clicked, the selected diagnosis is added to the lab order being worked with AND to the default diagnoses list for the agency. The updated default diagnoses list will then be available on all lab orders for all clients moving forward.
![]() TIP: If it is ever necessary to remove diagnoses from the agency's default list, please contact the Help Desk for assistance. Be sure to provide the full name of the diagnosis to be removed.
TIP: If it is ever necessary to remove diagnoses from the agency's default list, please contact the Help Desk for assistance. Be sure to provide the full name of the diagnosis to be removed.
Diagnosis codes added to a lab order using the search feature and/or the default selection list do NOT sync back into AWARDS for the client.
Return to the top of the page.
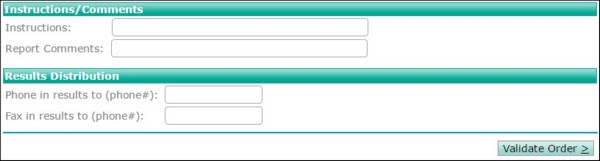
The Instructions/Comments portion of the order form data entry page is lab-specific; it will vary from lab to lab and may therefore vary from the example shown above. Examples of commonly seen fields/options you may choose to configure in the portion of the form are as follows:
![]() Fasting - In this field, type any information regarding whether the client has fasted before the test.
Fasting - In this field, type any information regarding whether the client has fasted before the test.
![]() Instructions - In this field, type any instructions for the lab handling the specimen.
Instructions - In this field, type any instructions for the lab handling the specimen.
![]() Report Comments - In this field, type any information needed for future reference. These comments will be returned with the lab reports.
Report Comments - In this field, type any information needed for future reference. These comments will be returned with the lab reports.
![]() Copies To - Complete this portion of the form to request that the lab send a CC to another physician using the Clinical Exchange. Record that physician's Client ID from the lab in the Client ID field, and enter his/her name. If the physician's ID is not known, enter his/her address for the lab to contact them via mail (when available).
Copies To - Complete this portion of the form to request that the lab send a CC to another physician using the Clinical Exchange. Record that physician's Client ID from the lab in the Client ID field, and enter his/her name. If the physician's ID is not known, enter his/her address for the lab to contact them via mail (when available).
![]() Results Distribution - In these fields, type the phone and/or fax numbers to which results should be distributed in addition to electronic distribution via AWARDS.
Results Distribution - In these fields, type the phone and/or fax numbers to which results should be distributed in addition to electronic distribution via AWARDS.
Return to the top of the page.
https://demodb.footholdtechnology.com/help/?12021