|   |
| |
The Payment Postings feature enables users to apply personal payments made by clients to invoice balances.
Required Permissions
The BillingBuilder's Payment Postings feature is available to users with the following permissions:
Display Executive Administration Buttons - OR - Display Fiscal Buttons (only required if you are not a member of the "Fiscal Staff" or "Executive Officer" user groups)
Copay/Persional Payments
![]() NOTE: Permissions are assigned using the Permissions Maintenance feature. If you do not have access to that feature and need a permission listed here, please contact your supervisor or your local Help Desk for assistance.
NOTE: Permissions are assigned using the Permissions Maintenance feature. If you do not have access to that feature and need a permission listed here, please contact your supervisor or your local Help Desk for assistance.
Working with Payment Posting Records
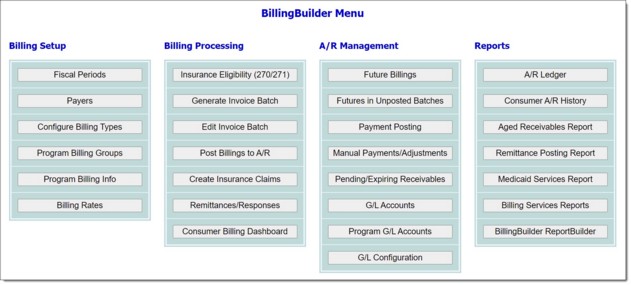
To apply personal payments made by clients to invoice balances, complete the following steps from the AWARDS Home screen:

![]() Payer and Program - Use these drop-down selection lists to specify a payer and program (or program group) for which payment posting information is to be worked with. Once selections are made the index is refreshed to load all invoices that match the specified payer/program combination and fall within the date range (set below).
Payer and Program - Use these drop-down selection lists to specify a payer and program (or program group) for which payment posting information is to be worked with. Once selections are made the index is refreshed to load all invoices that match the specified payer/program combination and fall within the date range (set below).
![]() Start Date and End Date Filter - By default the index displays only those records with invoice dates in the last three months. If needed, make changes to the Start Date and End Date values so that the records to be worked within fall within the specified range. If the dates are adjusted be sure to click Apply to refresh the index so that it reflects the revised date range.
Start Date and End Date Filter - By default the index displays only those records with invoice dates in the last three months. If needed, make changes to the Start Date and End Date values so that the records to be worked within fall within the specified range. If the dates are adjusted be sure to click Apply to refresh the index so that it reflects the revised date range.
![]() Show Records Filter - By default the index displays only records with a balance. If needed click one of the other available radio buttons to adjust the view to only those records with a partial balance, those without a balance, those belonging to clients with unapplied funds, or all.
Show Records Filter - By default the index displays only records with a balance. If needed click one of the other available radio buttons to adjust the view to only those records with a partial balance, those without a balance, those belonging to clients with unapplied funds, or all.
![]() Search and Filter By - To search the contents of the index (those records that match the criteria above, including records not currently displayed on the page), enter a value in the Search field. The index is automatically updated as you type. To further narrow your search, use the Filter by selection to indicate whether the search should look at data in "All Columns" (the default) or a specific column.
Search and Filter By - To search the contents of the index (those records that match the criteria above, including records not currently displayed on the page), enter a value in the Search field. The index is automatically updated as you type. To further narrow your search, use the Filter by selection to indicate whether the search should look at data in "All Columns" (the default) or a specific column.
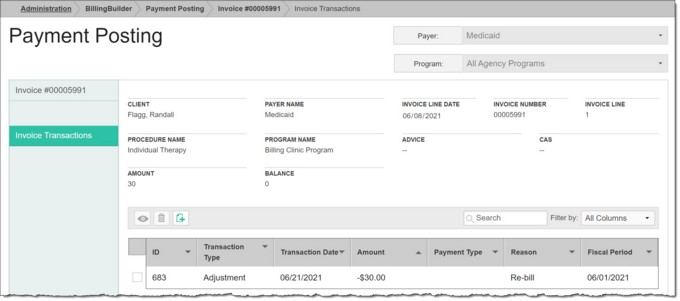
![]() Record Invoice Transactions - To apply payments or adjustments to the invoice, click Invoice Transactions from the left-hand menu to open the corresponding sub-index where any existing payment or adjustment records associated with this invoice are displayed and additional records can be added. Continue with step 6
Record Invoice Transactions - To apply payments or adjustments to the invoice, click Invoice Transactions from the left-hand menu to open the corresponding sub-index where any existing payment or adjustment records associated with this invoice are displayed and additional records can be added. Continue with step 6
![]()
![]() View a related progress note - Click the View icon next to a progress note to view it in report mode.
View a related progress note - Click the View icon next to a progress note to view it in report mode.
![]()
![]() Return to the Payment Posting index - To do so, click the To Index icon from the action bar while working in a record to return to the index page. You can also return to the index page at any time by clicking Payment Posting from the breadcrumbs trail below the AWARDS navigation bar.
Return to the Payment Posting index - To do so, click the To Index icon from the action bar while working in a record to return to the index page. You can also return to the index page at any time by clicking Payment Posting from the breadcrumbs trail below the AWARDS navigation bar.
![]()
![]() Add a new payment or adjustment - To do so, click the Add New icon from the action bar above the records table. A new data entry page is displayed. Continue with step 7.
Add a new payment or adjustment - To do so, click the Add New icon from the action bar above the records table. A new data entry page is displayed. Continue with step 7.

![]()
![]() View or print an existing payment or adjustment - Click the checkbox to the left the record to be viewed or printed, and then click the View icon from the action bar above the records table. A read-only version of the record is displayed and can be printed as needed using your browser's print option.
View or print an existing payment or adjustment - Click the checkbox to the left the record to be viewed or printed, and then click the View icon from the action bar above the records table. A read-only version of the record is displayed and can be printed as needed using your browser's print option.
![]()
![]() Delete an existing payment or adjustment - Click the checkbox(es) to the left of the record(s) to be deleted, and then click the Delete icon from the action bar above the records table. A confirmation message is displayed. Click OK to proceed with the deletion. The selected record(s) are deleted and the updated index is displayed.
Delete an existing payment or adjustment - Click the checkbox(es) to the left of the record(s) to be deleted, and then click the Delete icon from the action bar above the records table. A confirmation message is displayed. Click OK to proceed with the deletion. The selected record(s) are deleted and the updated index is displayed.
![]() Transaction Type - Click this drop-down arrow and select "Payment" or "Adjustment." Payment is selected by default.
Transaction Type - Click this drop-down arrow and select "Payment" or "Adjustment." Payment is selected by default.
![]() Transaction Date - In this field type the date of the invoice transaction (using mm/dd/yyyy format) or select the date using the date picker icon. Dates cannot be in the future.
Transaction Date - In this field type the date of the invoice transaction (using mm/dd/yyyy format) or select the date using the date picker icon. Dates cannot be in the future.
![]() Reduce Balance / Increase Balance - Click the appropriate radio button for this transaction.
Reduce Balance / Increase Balance - Click the appropriate radio button for this transaction.
- If Reduce Balance is selected the corresponding Amount (entered below) must be a positive number not greater than the Balance amount. This value will be applied against the outstanding invoice balance, reducing it.
- If Increase Balance is selected the corresponding Amount (entered below) must be a negative number. This value will be added to the outstanding invoice balance, increasing it.
![]() Amount - In this field type the invoice amount. Whether the value must be positive or negative is based on the reduce/increase selection made above.
Amount - In this field type the invoice amount. Whether the value must be positive or negative is based on the reduce/increase selection made above.
If the Transaction Type is "Payment," keep in mind the following when entering the Amount value:
- If this is a "Personal Copay" the amount entered cannot be more than the total of unapplied payments (both copays and non-copays) in the Entitlements module's Personal Payments feature.
- If this is a "Personal Non Copay" the amount entered cannot be more than the total of unapplied non-copay amounts in the Entitlements module's Personal Payments feature.
- For records of both payment types, once applied to an invoice the corresponding personal payment record in the Entitlements module's Personal Payments feature becomes locked and cannot be edited or deleted.
![]() Reason/Type - Either a field or a selection list based on whether the Transaction Type is "Payment" or "Adjustment." When working with payments, type a brief description of the reason/type for this invoice transaction in the available field. When working with adjustments, click the drop-down arrow and make a selection from the available list.
Reason/Type - Either a field or a selection list based on whether the Transaction Type is "Payment" or "Adjustment." When working with payments, type a brief description of the reason/type for this invoice transaction in the available field. When working with adjustments, click the drop-down arrow and make a selection from the available list.
![]() Payment Type - Only available when the Transaction Type is set to "Payment." Click this drop-down arrow and make a selection to indicate whether the payment is "Payer Personal Copay" or "Personal Non Copay."
Payment Type - Only available when the Transaction Type is set to "Payment." Click this drop-down arrow and make a selection to indicate whether the payment is "Payer Personal Copay" or "Personal Non Copay."
The process of working with payment postings is now complete.
