|   |
| |
Viewing / Printing an Invoice Batch
To view detailed information on these processes, click the name of the process above or scroll through the content below.
Viewing / Printing an Invoice Batch
To view, and if necessary print, an invoice batch, complete the following steps:

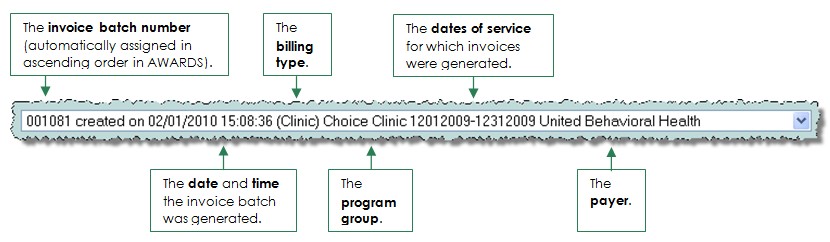
![]() TIP: Invoice batches are listed with several pieces of information that make it easy to understand what they contain, as shown here:
TIP: Invoice batches are listed with several pieces of information that make it easy to understand what they contain, as shown here:
Each invoice in the batch is represented by one row in the table, and the amounts listed in the row are the total amount being billed for that invoice (Claim Amount) and the Remit Amount. The Claim Amount is supplied by the billing rate setup under BillingBuilder > Billing Rates. There are two exceptions that could change the Claim Amount set for an invoice:
1) In a situation where AWARDS is billing a secondary and/or tertiary payer, the invoice will be assigned the claim amount billed to the primary payer.
2) If the invoice is billing a primary payer, but there is a higher billing rate setup for a secondary payer, AWARDS will use the higher rate as the claim amount.
Invoice rows also include the client name and ID number, an invoice number, which is automatically assigned by AWARDS, the diagnosis code used for the invoice, the service date for the service being billed, the procedure code (followed by the HCPCS modifier if applicable), the NPI (if applicable), and Delay Code (if applicable).
![]() TIP: If the billing type for the batch is set to allow multi-line invoices and more than one service has been provided in a day, you will see each service as a line in the invoice batch. Multiple lines in the same invoice will be numbered in parentheses.
TIP: If the billing type for the batch is set to allow multi-line invoices and more than one service has been provided in a day, you will see each service as a line in the invoice batch. Multiple lines in the same invoice will be numbered in parentheses.
![]() TIP: If the payer is Medicaid and the invoice date is 90 days ago or older, the Delay Code will default to 8. If the payer is not Medicaid, the default Delay Code will be blank. This value can be updated by accessing the invoice batch in data entry mode, as described in the next section.
TIP: If the payer is Medicaid and the invoice date is 90 days ago or older, the Delay Code will default to 8. If the payer is not Medicaid, the default Delay Code will be blank. This value can be updated by accessing the invoice batch in data entry mode, as described in the next section.
![]() TIP: To see the billing rules for any procedures included in the batch, run the Procedures Report accessed by following this path in AWARDS: Fiscal > BillingBuilder > Configure Billing Types > View Billing Types > Procedures Report.
TIP: To see the billing rules for any procedures included in the batch, run the Procedures Report accessed by following this path in AWARDS: Fiscal > BillingBuilder > Configure Billing Types > View Billing Types > Procedures Report.
![]() TIP: An Excel File link is displayed at the bottom of the report. It can be used to export the data into a spreadsheet. When this link is clicked, a PHI Download Alert is displayed, reminding you of your obligation to properly handle any confidential data and/or protected health information (PHI) within the download in accordance with related government regulations and agency policies. After reading the alert, click OK to acknowledge it and proceed with the export, or Cancel to return to the previous page.
TIP: An Excel File link is displayed at the bottom of the report. It can be used to export the data into a spreadsheet. When this link is clicked, a PHI Download Alert is displayed, reminding you of your obligation to properly handle any confidential data and/or protected health information (PHI) within the download in accordance with related government regulations and agency policies. After reading the alert, click OK to acknowledge it and proceed with the export, or Cancel to return to the previous page.
![]() NOTE: By default, a page break is inserted between every invoice when the batch is printed.
NOTE: By default, a page break is inserted between every invoice when the batch is printed.
The process of viewing / printing an invoice batch is now complete.
![]() TIP: To edit or delete any of the invoices being viewed in step 5, do one of the following at this time, keeping in mind that if the batch contains more than ten invoices, only ten of them can be opened and displayed in data entry mode at a single time:
TIP: To edit or delete any of the invoices being viewed in step 5, do one of the following at this time, keeping in mind that if the batch contains more than ten invoices, only ten of them can be opened and displayed in data entry mode at a single time:
![]() Click Update or Update First 10 Invoices. (Which of those buttons is available is based on how many total invoices there are in the batch.) All invoice rows, or the first ten invoice rows, are opened in data entry mode, respectively.
Click Update or Update First 10 Invoices. (Which of those buttons is available is based on how many total invoices there are in the batch.) All invoice rows, or the first ten invoice rows, are opened in data entry mode, respectively.
![]() Click the hyperlinked invoice number of a specific invoice to be edited. That invoice row and up to nine of the invoice rows below it (if applicable) are opened in data entry mode.
Click the hyperlinked invoice number of a specific invoice to be edited. That invoice row and up to nine of the invoice rows below it (if applicable) are opened in data entry mode.
Make any necessary changes, and then click Save if your work is complete, or use the Next # Invoices and Prev # Inovices buttons to navigate through the remaining invoices in the batch as needed. Be sure to click Save to finish the editing/deleting process and return to the Edit Billings page.
Editing and deleting invoices is discussed in more detail in the sections that follow.
Return to the top of the page.
When editing an invoice batch, you can edit certain information contained within the invoice batch, delete individual invoices, and add new invoices. To edit an invoice batch for the purposes of completing any of these data entry tasks, complete the following steps:
![]() NOTE: If the invoice batch created is for a "Self-Pay" payer, the billing action used is Generate COB Remainders Re-Billing Batch, remainder assigned has a "Self-Pay" payer selected, and the rebilling record used to generate the invoice is associated with a prior invoice where patient responsibility (CAS*PR*3*10~) information has been captured in a remittance worksheet, the claim amount reflects the patient responsibility supplied by the payer (as shown in the example here).
NOTE: If the invoice batch created is for a "Self-Pay" payer, the billing action used is Generate COB Remainders Re-Billing Batch, remainder assigned has a "Self-Pay" payer selected, and the rebilling record used to generate the invoice is associated with a prior invoice where patient responsibility (CAS*PR*3*10~) information has been captured in a remittance worksheet, the claim amount reflects the patient responsibility supplied by the payer (as shown in the example here).

If the payer is Medicaid and the invoice date is 90 days ago or older, the Delay Code will default to 8. If the payer is not Medicaid, the default Delay Code will be blank. The Delay Code field will accept all ASC X12 5010 valid values listed below:
1 - Proof of Eligibility Unknown or Unavailable
2 - Litigation
3 - Authorization Delays
4 - Delay in Certifying Provider
5 - Delay in Supplying Billing Forms
6 - Delay in Delivery of Custom-made Appliances
7 - Third Party Processing Delay
8 - Delay in Eligibility Determination
9 - Original Claim Rejected or Denied Due to a Reason Unrelated to the Billing Limitation Rules
10 - Administration Delay in the Prior Approval Process
11 - Other
15 - Natural Disaster
Once the correct value has been entered and saved in the batch, it will be included in the 837P and 837I files within loop 2300, segment CLM20.
![]() IMPORTANT! Only ten invoices open in data entry mode at a single time. If an invoice batch contains more than ten invoices, only the first ten are shown at this time. The other invoices can be accessed later in this process.
IMPORTANT! Only ten invoices open in data entry mode at a single time. If an invoice batch contains more than ten invoices, only the first ten are shown at this time. The other invoices can be accessed later in this process.
![]() NOTE: If the billing type for the batch is set to allow multi-line invoices and more than one service has been provided in a day, you will see each service as a line in the invoice batch. Multiple lines in the same invoice will be numbered in parentheses.
NOTE: If the billing type for the batch is set to allow multi-line invoices and more than one service has been provided in a day, you will see each service as a line in the invoice batch. Multiple lines in the same invoice will be numbered in parentheses.
![]() Edit the information for one or more invoices - To do so, adjust the values in the Diagnosis, Service Date, Procedure, NPI (if applicable), and/or Amount fields as necessary.
Edit the information for one or more invoices - To do so, adjust the values in the Diagnosis, Service Date, Procedure, NPI (if applicable), and/or Amount fields as necessary.
![]() NOTE: Client names and invoice numbers are read-only and cannot be edited.
NOTE: Client names and invoice numbers are read-only and cannot be edited.
![]() Delete one or more individual invoices - To do so, click the Delete checkbox next to the row(s) of the invoice(s) to be deleted.
Delete one or more individual invoices - To do so, click the Delete checkbox next to the row(s) of the invoice(s) to be deleted.
![]() TIP: Once deleted, the only way to retrieve an invoice is to generate a new batch. Please note, Medicaid remainders assigned to COB re-billing invoices for procedure code 4525 (clinic treatment) that are associated with NYS PROS services do not have the option to be deleted.
TIP: Once deleted, the only way to retrieve an invoice is to generate a new batch. Please note, Medicaid remainders assigned to COB re-billing invoices for procedure code 4525 (clinic treatment) that are associated with NYS PROS services do not have the option to be deleted.
If all invoices in the batch have been edited or selected for deletion as needed, continue with step 8.
If other invoices in the batch need to be edited or deleted and are not currently displayed on the data entry page, click Next # Invoices. The changes made to the first ten invoices (if any) are saved, any deleted invoices are removed from the batch, and the next ten invoices are displayed in data entry mode. Repeat steps 6 and 7 as needed until all changes are complete, and then continue with step 8.
![]() TIP: A Prev # Invoices button is also available at the bottom of the editing page, which re-opens the previous ten invoices in data entry mode.
TIP: A Prev # Invoices button is also available at the bottom of the editing page, which re-opens the previous ten invoices in data entry mode.
![]() TIP: If it is not necessary to add an invoice, skip ahead to step 16.
TIP: If it is not necessary to add an invoice, skip ahead to step 16.
![]() NOTE: When an invoice is manually added to a batch in this way, AWARDS does NOT apply the billing rules to verify that billable services have been documented.
NOTE: When an invoice is manually added to a batch in this way, AWARDS does NOT apply the billing rules to verify that billable services have been documented.
The process of editing an invoice batch is now complete.
Return to the top of the page.
To delete an ENTIRE invoice batch, complete the following steps:
![]() TIP: To instead delete a single invoice from a batch, follow the instructions under Editing an Invoice Batch.
TIP: To instead delete a single invoice from a batch, follow the instructions under Editing an Invoice Batch.
![]() TIP: Once an entire batch is deleted, it can be restored by regenerating the batch; however, information may be changed in the new batch depending on new services provided for clients in the given month.
TIP: Once an entire batch is deleted, it can be restored by regenerating the batch; however, information may be changed in the new batch depending on new services provided for clients in the given month.
The process of deleting an entire invoice batch is now complete.
![]() TIP: An entire invoice batch can also be deleted by clicking Update instead of Delete in step 5, and then clicking Delete Entire Batch on the page that follows.
TIP: An entire invoice batch can also be deleted by clicking Update instead of Delete in step 5, and then clicking Delete Entire Batch on the page that follows.
Return to the top of the page.
https://demodb.footholdtechnology.com/help/?11433
