|   |
| |
Each of these processes are described in detail in the sub-sections that follow:
Correcting an Error in a Payment Record
To view detailed information on these processes, click the name of the process above or scroll through the content below. Please keep in mind that the Consumer Billing Dashboard feature can be accessed within AWARDS from the Calendar, Consumer Search, or the BillingBuilder. The instructions provided here focus on accessing it from the BillingBuilder.
![]() IMPORTANT!
Prior to processing in person payments for self-paying clients using the steps discussed in this portion of Online Help, please ensure that the clients have entitlements records created for Self-Pay as an insurer, or a co-payment amount indicated in the client's entitlement records for another insurer.
IMPORTANT!
Prior to processing in person payments for self-paying clients using the steps discussed in this portion of Online Help, please ensure that the clients have entitlements records created for Self-Pay as an insurer, or a co-payment amount indicated in the client's entitlement records for another insurer.
In person payments can be used to enter full or partial co-pay amounts. To do so, complete the following steps:
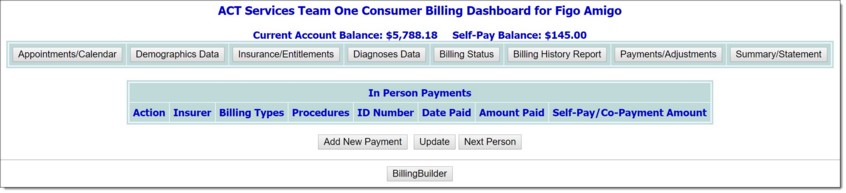
This page contains a list of any previously entered in person payments for the selected client, as well as buttons to view additional client information, described here:
![]() Appointments/Calendar - Displays the calendar for the selected consumer in the selected program. The calendar then shows a button to take you back to the billing dashboard.
Appointments/Calendar - Displays the calendar for the selected consumer in the selected program. The calendar then shows a button to take you back to the billing dashboard.
![]() Demographics Data - Displays a read-only version of the demographics section of the face sheet for the selected client with a button for data entry and a button to return to the billing dashboard.
Demographics Data - Displays a read-only version of the demographics section of the face sheet for the selected client with a button for data entry and a button to return to the billing dashboard.
![]() Insurance/Entitlements - Displays the certified entitlements for the selected client with a button to return to the billing dashboard.
Insurance/Entitlements - Displays the certified entitlements for the selected client with a button to return to the billing dashboard.
![]() Diagnoses Data - Displays a read-only version of the diagnoses section of the face sheet for the selected client with a button for data entry and a button to return to the billing dashboard.
Diagnoses Data - Displays a read-only version of the diagnoses section of the face sheet for the selected client with a button for data entry and a button to return to the billing dashboard.
![]() Billing Status - Displays the Billing Services Report, except that it is being run for the selected client in the selected program, rather than a program census. If the billing type is fee for service or per diem, you can run the report for any date range needed. There is also a button to return to the billing dashboard.
Billing Status - Displays the Billing Services Report, except that it is being run for the selected client in the selected program, rather than a program census. If the billing type is fee for service or per diem, you can run the report for any date range needed. There is also a button to return to the billing dashboard.
![]() Billing History - Displays the Consumer Billing History Report for the selected consumer in the selected program. There is also a button to return to the billing dashboard as well as a button to return to payments/adjustments for the selected client.
Billing History - Displays the Consumer Billing History Report for the selected consumer in the selected program. There is also a button to return to the billing dashboard as well as a button to return to payments/adjustments for the selected client.
![]() Payments/Adjustments - Displays the payments and adjustments of the selected consumer. There is also a button to return to the billing dashboard, as well as a button to return to billing history for the selected client.
Payments/Adjustments - Displays the payments and adjustments of the selected consumer. There is also a button to return to the billing dashboard, as well as a button to return to billing history for the selected client.
![]() Summary/Statement - Displays a summary/statement designed to be given to the consumer that is based on the information shown in the billing history report. Clicking this button displays the Summary/Statement settings page, allowing users to set date ranges and report variables. Once the desired date range has been selected, please ensure that the appropriate boxes has been checked for Client, Transaction Type, Type, Description, Program, Amount, Total Due, Posted Date, Employee, and Date of Service, as each checked box will produce a column of data in the report.
Summary/Statement - Displays a summary/statement designed to be given to the consumer that is based on the information shown in the billing history report. Clicking this button displays the Summary/Statement settings page, allowing users to set date ranges and report variables. Once the desired date range has been selected, please ensure that the appropriate boxes has been checked for Client, Transaction Type, Type, Description, Program, Amount, Total Due, Posted Date, Employee, and Date of Service, as each checked box will produce a column of data in the report.
![]() IMPORTANT! Some of the options on this page are dynamic, meaning that the selections they make available to you are based on other options you've set earlier in the page. As a result, please configure the options in the order in which they are described here.
IMPORTANT! Some of the options on this page are dynamic, meaning that the selections they make available to you are based on other options you've set earlier in the page. As a result, please configure the options in the order in which they are described here.
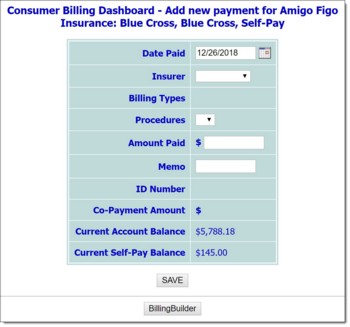
![]() Date Paid - In this field, type the date on which the payment was made (using mm/dd/yyyy format). This is normally the date of service.
Date Paid - In this field, type the date on which the payment was made (using mm/dd/yyyy format). This is normally the date of service.
![]() Insurer - Click this drop-down arrow and select an insurer/payer for which a co-pay amount has been entered in the client's entitlement records.
Insurer - Click this drop-down arrow and select an insurer/payer for which a co-pay amount has been entered in the client's entitlement records.
![]() Billing Types - Click this drop-down arrow and select the billing type. The types available here are based on the selected insurer/payer.
Billing Types - Click this drop-down arrow and select the billing type. The types available here are based on the selected insurer/payer.
![]() Procedures - Click this drop-down arrow and select the procedure. The procedures available here are those associated with the selected billing type.
Procedures - Click this drop-down arrow and select the procedure. The procedures available here are those associated with the selected billing type.
![]() Amount Paid - In this field, type the amount paid. If this is a partial payment or a zero payment, the In Person Payment invoice (which is automatically generated) will maintain a balance. An additional payment can be added to this invoice at a later time using Manual Payments/Adjustments.
Amount Paid - In this field, type the amount paid. If this is a partial payment or a zero payment, the In Person Payment invoice (which is automatically generated) will maintain a balance. An additional payment can be added to this invoice at a later time using Manual Payments/Adjustments.
![]() Memo - In this field, type an optional memo that will appear on the printed receipt for the consumer.
Memo - In this field, type an optional memo that will appear on the printed receipt for the consumer.
To print a receipt for the payment from this page, click Printable Receipt. To print a receipt at a later time, follow the steps under Printing a Payment Receipt.
When a co-payment is entered for a consumer, an invoice batch is automatically created with an invoice for that co-payment, so that the co-pay will have an associated invoice to be applied to for A/R purposes. The invoice batch will automatically be posted to the fiscal period of the date entered under "Date Paid" (if the fiscal period is still open to entry, if not the current open fiscal period will be assigned). Additionally, the invoice batch will be marked with the label Copay in the information heading and a (Co-payment) label will be inserted into the description column of the Consumer A/R History Report and the A/R Ledger Report for all invoices and payment ledger types that are created when a co-payment is entered within the Consumer Billing Dashboard > In Person Payments feature.
The process of entering a co-payment is now complete.
![]() TIP: When the payment is saved an invoice is created for the client for the amount owed. This invoice can be accessed using the BillingBuilder, Edit Invoices component.
TIP: When the payment is saved an invoice is created for the client for the amount owed. This invoice can be accessed using the BillingBuilder, Edit Invoices component.
Return to the top of the page.
The Consumer Billing Dashboard feature can be used to enter self payments. To do so, complete the following steps:
This page contains a list of any previously entered in person payments for the selected client, as well as buttons to view additional client information.
![]() IMPORTANT! Some of the options on this page are dynamic, meaning that the selections they make available to you are based on other options you've set earlier in the page. As a result, please configure the options in the order in which they are described here.
IMPORTANT! Some of the options on this page are dynamic, meaning that the selections they make available to you are based on other options you've set earlier in the page. As a result, please configure the options in the order in which they are described here.
![]() Insurer - Click this drop-down arrow and select "Self-Pay."
Insurer - Click this drop-down arrow and select "Self-Pay."
![]() Billing Types - Click this drop-down arrow and select the billing type. The types available here are based on the selected insurer.
Billing Types - Click this drop-down arrow and select the billing type. The types available here are based on the selected insurer.
![]() Procedures - Click this drop-down arrow and select the procedure. The procedures available here are those associated with the selected billing type.
Procedures - Click this drop-down arrow and select the procedure. The procedures available here are those associated with the selected billing type.
![]() Date Paid - In this field, type the date on which the payment was made (using mm/dd/yyyy format).
Date Paid - In this field, type the date on which the payment was made (using mm/dd/yyyy format).
![]() Amount Paid - In this field, type the amount paid. If this is a partial payment, the balance is added to the read-only Outstanding Balance on this page after the payment record is saved (in step 11).
Amount Paid - In this field, type the amount paid. If this is a partial payment, the balance is added to the read-only Outstanding Balance on this page after the payment record is saved (in step 11).
To print a receipt for the payment from this page, click Printable Receipt. To print a receipt at a later time, follow the steps under Printing a Payment Receipt.
The process of entering a self payment is now complete.
![]() TIP: When the payment is saved an invoice is created for the client for the amount owed. This invoice can be accessed using the BillingBuilder, Edit Invoices component.
TIP: When the payment is saved an invoice is created for the client for the amount owed. This invoice can be accessed using the BillingBuilder, Edit Invoices component.
Return to the top of the page.
To print a payment receipt for a co-pay or self payment, complete the following steps:
This page contains a list of any previously entered in person payments for the selected client, as well as buttons to view additional client information.
The process of printing a payment receipt is now complete.
Return to the top of the page.
Correcting an Error in a Payment Record
Once payment records are in the system, you can correct them if they contain an error; specifically, if an error was made when entering a payment record, that record must be zeroed out and the associated invoice must be voided. A new payment record must then be entered using the steps outlined earlier on this Online Help page.
To carry out the portions of this process for zeroing out the payment record and voiding the invoice, complete the following steps:
This page contains a list of any previously entered in person payments for the selected client, as well as buttons to view additional client information.
The process of zeroing out a payment and voiding an invoice is now complete.
Return to the top of the page.
https://demodb.footholdtechnology.com/help/?11766
