Viewing a Consumer A / R History Report
FisFiscal | BillingBuilder | Reports


Previous Topic  Next Topic 

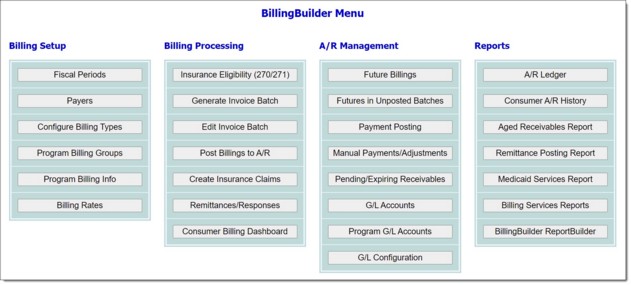
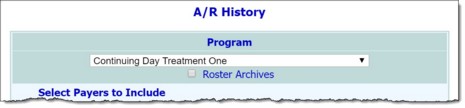
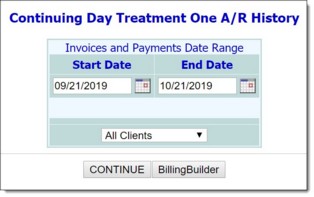
The Consumer A/R History feature in the BillingBuilder's Reports component is used to view read-only consumer A/R history reports. To do so, complete the following steps:

    1. From the AWARDS Home screen, click Administration from the left-hand menu, and then click Fiscal.  The Fiscal fly-out menu is displayed.
    2. Click BillingBuilder.  The BillingBuilder Menu page is displayed.

    1. Click Consumer A/R History.  The Consumer A/R History selection page is displayed. 

    1. Click the Program drop-down arrow and select the program or program type associated with the consumer for whom the report is to be viewed.
    2. If the consumer for whom the report is to be viewed is a former (discharged) consumer, click the Roster Archives checkbox.
    3. The Select Payers to Include checklist allows you to select which payers should be included in the report.  By default, all payers are selected and "Check All" and "Clear All" options are available beneath the list.  Make changes to the default selections as needed.
    4. When a single program is selected from the Program drop-down in step 4, only clients within that program are included in the report.  To further limit the report to only include invoices created for the selected program, click the Limit Results to Invoices in Selected Program checkbox.
    5. The Output Report as Summary/Statement option allows the data associated with the report parameters selected to show in a format that can be provide to clients.  If this report option is selected, on the next page the user running the report will also need to set the desired date range, select a specific client or all clients, and ensure that the appropriate boxes have been checked for Client, Transaction Type, Description, Program, Amount, Total Due, Posted Date, Employee, and Date of Service.  Each checked box will produce a column of data within the report.
    6. Select a report Sorting option by clicking either "Transaction Date," "Invoice Number," or "Invoice Date" radio button.  "Transaction Date" is selected by default.
    7. Click CONTINUE.  The Consumer History Report consumer selection page is displayed.

    1. In the Start Date field, type or make changes to the start date from which information is to be included in the report (in mm/dd/yyyy format).  The default value is 30 days prior to today's date.
    2. In the End Date field, type or make changes to the end date through which information to be included in the report (in mm/dd/yyyy format).  The default value is today's date.
    3. Click the Consumer drop-down arrow and select the consumer for whom the report is to be viewed.
    4. Click CONTINUE.  The report is displayed on the Consumer History Report page.

The contents of this read-only report include transaction date, transaction type, description, amount, and total due information.

Clicking any of the column headers enables you to sort the report in both an ascending and descending manner.

The report provides an option to show/hide specific columns as well.  This can be done by clicking the icon in the upper-left hand corner of the table, and then checking/unchecking the respective column titles. 

The process of viewing a consumer history report is now complete. 

  https://demodb.footholdtechnology.com/help/?11347