|   |
| |
Updating an existing initial report can include any of the following tasks, each governed by the incident reporting rules:
![]() Editing Report Information - Initial reports can be edited by the users who originally entered them, and/or by the program director/deputy of the program for which the report was entered. Edits cannot be made after the initial report has been locked and filed.
Editing Report Information - Initial reports can be edited by the users who originally entered them, and/or by the program director/deputy of the program for which the report was entered. Edits cannot be made after the initial report has been locked and filed.
![]() Adding Comments to the Report - Comments can be added to the initial report by any user, with the exception of the program director and deputies of the program for which the report was entered, and the user who originally entered the initial report. These users can only add comments if they have the "Incident Review Data Entry" Permission.
Adding Comments to the Report - Comments can be added to the initial report by any user, with the exception of the program director and deputies of the program for which the report was entered, and the user who originally entered the initial report. These users can only add comments if they have the "Incident Review Data Entry" Permission.
![]() Locking and Filing the Report - Locking and filing can be done by the user who originally entered the initial report and/or by the program director/deputy of the program for which the report was entered. It must take place before the incident review committee will be able to access and work with the corresponding incident review form. Once an initial report is locked and filed, changes can no longer be made to it.
Locking and Filing the Report - Locking and filing can be done by the user who originally entered the initial report and/or by the program director/deputy of the program for which the report was entered. It must take place before the incident review committee will be able to access and work with the corresponding incident review form. Once an initial report is locked and filed, changes can no longer be made to it.
To update an existing initial report, please complete the following steps from the AWARDS Home screen:
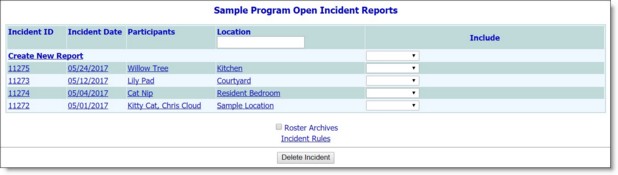
This page contains a list of open incidents that the user may view, edit, or add comments to.
![]() TIP: The Include selection option is only available when BOTH of the following are true:
TIP: The Include selection option is only available when BOTH of the following are true:
- One or more forms created in the FormBuilder have been set to display in incident reports for the selected program.
- A form has not already been saved with the incident report, or data has not been saved in a previously included form.
If a form has already been included in an incident and data has been saved in that form, the name of the associated form displays as read-only here.
![]() Edit Report Information - Make changes or additions to the information on the initial report as necessary, and then continue with step 8. For more information on the fields/options on this page, see the Initial Incident Report Fields/Options.
Edit Report Information - Make changes or additions to the information on the initial report as necessary, and then continue with step 8. For more information on the fields/options on this page, see the Initial Incident Report Fields/Options.
![]() NOTE: Editing report information is limited to the user who originally entered the initial report, and the director/deputy of the program.
NOTE: Editing report information is limited to the user who originally entered the initial report, and the director/deputy of the program.
![]() Add Comments to the Report - If the Add Comments text box is not immediately visible on the page, click Add Comments. The Incident Draft Form page is refreshed to display an "Add Comment" text box. Type comments in this text box as necessary, and then click CONTINUE. The comments are saved and the Open Incident Reports page is re-displayed.
Add Comments to the Report - If the Add Comments text box is not immediately visible on the page, click Add Comments. The Incident Draft Form page is refreshed to display an "Add Comment" text box. Type comments in this text box as necessary, and then click CONTINUE. The comments are saved and the Open Incident Reports page is re-displayed.
![]() NOTE: Adding comments to the report is limited to users with "Incident Review Data Entry" permission and other users at the site who are neither the user who originally entered the report, nor the director / deputy.
NOTE: Adding comments to the report is limited to users with "Incident Review Data Entry" permission and other users at the site who are neither the user who originally entered the report, nor the director / deputy.
![]() Lock / File the Report - Click LOCK/FILE REPORT. The initial report is locked from further changes and is filed for review by members of the incident review committee. A read-only report version of the initial report is also displayed.
Lock / File the Report - Click LOCK/FILE REPORT. The initial report is locked from further changes and is filed for review by members of the incident review committee. A read-only report version of the initial report is also displayed.
![]() NOTE: Locking / filing the report is limited to the user who originally entered the initial report, and the director/ deputy of the program.
NOTE: Locking / filing the report is limited to the user who originally entered the initial report, and the director/ deputy of the program.
![]() Printing the Initial Report - Click Printable Form. A printable version of the initial report is displayed and the browser's print options may be used to print it.
Printing the Initial Report - Click Printable Form. A printable version of the initial report is displayed and the browser's print options may be used to print it.
![]() Updating the Initial Report (If not already locked) - Click DATA ENTRY. The Incident Draft Form page is displayed. Repeat steps 6 through 8 as necessary.
Updating the Initial Report (If not already locked) - Click DATA ENTRY. The Incident Draft Form page is displayed. Repeat steps 6 through 8 as necessary.
![]() Locking / Filing the Initial Report (If not already locked) - Click DATA ENTRY. The Incident Draft Form page is displayed. Click LOCK/FILE REPORT. The initial report is locked from further changes and is filed for review by members of the incident review committee. A read-only report version of the initial report is also displayed.
Locking / Filing the Initial Report (If not already locked) - Click DATA ENTRY. The Incident Draft Form page is displayed. Click LOCK/FILE REPORT. The initial report is locked from further changes and is filed for review by members of the incident review committee. A read-only report version of the initial report is also displayed.
The process of updating an initial report is now complete.
https://demodb.footholdtechnology.com/help/?11120
