|   |
| |
To set up your electronic signature images, PIN, and/or default settings for the first time, or to make changes to that information if you set it up in the past, complete the following steps:
![]() TIP: The following instructions are applicable to all staff members setting up or modifying their own electronic signatures. If client signatures have been enabled under System Setup these instructions are also applicable to clients with AWARDS logins. The electronic signatures of any clients who do not have AWARDS logins must be created by staff from within Client Search, as detailed here. Client signature setup need only be completed if signing will take place using a saved image and PIN.
TIP: The following instructions are applicable to all staff members setting up or modifying their own electronic signatures. If client signatures have been enabled under System Setup these instructions are also applicable to clients with AWARDS logins. The electronic signatures of any clients who do not have AWARDS logins must be created by staff from within Client Search, as detailed here. Client signature setup need only be completed if signing will take place using a saved image and PIN.
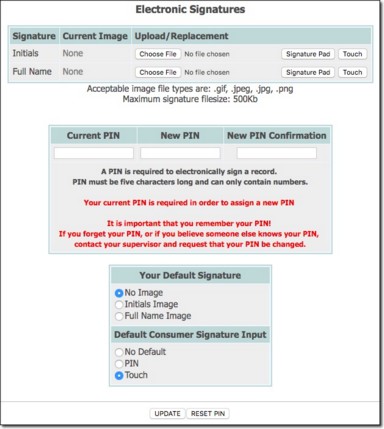
![]() NOTE: If you previously uploaded electronic signature images for yourself, those images appear in the "Current Image" portion of this page.
NOTE: If you previously uploaded electronic signature images for yourself, those images appear in the "Current Image" portion of this page.
![]() Choose file (saved image upload) - To upload either type of image for the first time, or to replace a previously uploaded image, click the corresponding Choose File button. When prompted, select the file to be uploaded from its location on your PC, and then click Open to return to the settings page.
Choose file (saved image upload) - To upload either type of image for the first time, or to replace a previously uploaded image, click the corresponding Choose File button. When prompted, select the file to be uploaded from its location on your PC, and then click Open to return to the settings page.
![]() TIP: Image file types must have one of four extensions in order to be uploaded: .GIF, .JPEG, .JPG, or .PNG. The maximum file size for any uploaded image is 500KB.
TIP: Image file types must have one of four extensions in order to be uploaded: .GIF, .JPEG, .JPG, or .PNG. The maximum file size for any uploaded image is 500KB.
![]() Signature Pad - To capture your signature directly using a signature pad and to then save it for use in AWARDS, click Signature Pad. The page is refreshed to display related options. Click Draw to give focus to the signing area before signing on the pad, Clear if you'd like to clear what has been entered using the pad, or Cancel to close the signing area and remove the signature pad-related options.
Signature Pad - To capture your signature directly using a signature pad and to then save it for use in AWARDS, click Signature Pad. The page is refreshed to display related options. Click Draw to give focus to the signing area before signing on the pad, Clear if you'd like to clear what has been entered using the pad, or Cancel to close the signing area and remove the signature pad-related options.
![]() TIP: This option is only available if the "Signature Pad" option has been checked off under System Setup > Business Rules > global Electronic Signature Rules. The signature pad component of the Electronic Signatures functionality is only compatible with Topaz Model T-S460-HSB SigLite 1x5 HSB. As of 2015, however, we no longer support use of this signature pad hardware, and instead direct agencies to use touch-screen devices.
TIP: This option is only available if the "Signature Pad" option has been checked off under System Setup > Business Rules > global Electronic Signature Rules. The signature pad component of the Electronic Signatures functionality is only compatible with Topaz Model T-S460-HSB SigLite 1x5 HSB. As of 2015, however, we no longer support use of this signature pad hardware, and instead direct agencies to use touch-screen devices.
![]() Touch - To capture your signature directly using "touch" functionality and to then save it for use in AWARDS, click Touch. The page is refreshed to display related options. Use your finger or a stylus on a touch-screen device (such as a tablet) or a touchpad, or use a mouse to sign within the white signing block on the AWARDS page. Click Clear if you'd like to clear what has been entered, or Cancel to close the signing area and remove the touch-related options.
Touch - To capture your signature directly using "touch" functionality and to then save it for use in AWARDS, click Touch. The page is refreshed to display related options. Use your finger or a stylus on a touch-screen device (such as a tablet) or a touchpad, or use a mouse to sign within the white signing block on the AWARDS page. Click Clear if you'd like to clear what has been entered, or Cancel to close the signing area and remove the touch-related options.
![]() TIP: This option is only available if the "Touch" option has been checked off under System Setup > Business Rules > global Electronic Signature Rules.
TIP: This option is only available if the "Touch" option has been checked off under System Setup > Business Rules > global Electronic Signature Rules.
![]() NOTE: If you sign a record using an image and later replace that image (via either of the ways detailed here), the change is only applied from that point forward. The previous version of the image remains in place on any records signed with it.
NOTE: If you sign a record using an image and later replace that image (via either of the ways detailed here), the change is only applied from that point forward. The previous version of the image remains in place on any records signed with it.
![]() To set a new PIN - To create a PIN for the first time, enter a five-digit number in the PIN field, and then re-enter that number in the PIN Confirmation field.
To set a new PIN - To create a PIN for the first time, enter a five-digit number in the PIN field, and then re-enter that number in the PIN Confirmation field.
![]() To reset an existing PIN - To replace your existing PIN, enter it in the Current PIN field. Enter your new five-digit PIN in the New PIN field, and then re-enter it in the New PIN Confirmation field.
To reset an existing PIN - To replace your existing PIN, enter it in the Current PIN field. Enter your new five-digit PIN in the New PIN field, and then re-enter it in the New PIN Confirmation field.
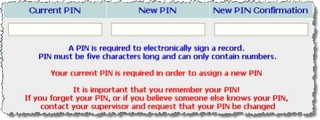
![]() TIP: PINS cannot be all zeros (00000).
TIP: PINS cannot be all zeros (00000).
![]() NOTE: There is no way for AWARDS to remind you of your PIN once it has been set. Memorize your PIN or keep it in a secure place. Do not share it with others.
NOTE: There is no way for AWARDS to remind you of your PIN once it has been set. Memorize your PIN or keep it in a secure place. Do not share it with others.
![]() NOTE: If you select an image type for which an image has not been uploaded, records will be signed with no image.
NOTE: If you select an image type for which an image has not been uploaded, records will be signed with no image.
![]() No default - When selected, clients will be prompted to choose the signing method each time an eligible record is electronically signed.
No default - When selected, clients will be prompted to choose the signing method each time an eligible record is electronically signed.
![]() PIN - When selected, clients will always be prompted to enter a PIN in order to sign with a previously saved signature image.
PIN - When selected, clients will always be prompted to enter a PIN in order to sign with a previously saved signature image.
![]() Signature Pad - When selected, clients will always sign using a signature pad.
Signature Pad - When selected, clients will always sign using a signature pad.
![]() TIP: This option is only available if the "Signature Pad" option has been checked off under System Setup > Business Rules > global Electronic Signature Rules.
TIP: This option is only available if the "Signature Pad" option has been checked off under System Setup > Business Rules > global Electronic Signature Rules.
![]() Touch - When selected, clients will always sign using a finger or stylus on a touch-screen device (such as a tablet) or a touchpad, or using a mouse on devices that are not directly touch-capable.
Touch - When selected, clients will always sign using a finger or stylus on a touch-screen device (such as a tablet) or a touchpad, or using a mouse on devices that are not directly touch-capable.
![]() TIP: This option is only available if the "Touch" option has been checked off under System Setup > Business Rules > global Electronic Signature Rules.
TIP: This option is only available if the "Touch" option has been checked off under System Setup > Business Rules > global Electronic Signature Rules.
![]() TIP: To make changes to your settings at this time, or to correct an error (for example if your PIN and PIN confirmation did not match) click DATA ENTRY to return to the Electronic Signatures page.
TIP: To make changes to your settings at this time, or to correct an error (for example if your PIN and PIN confirmation did not match) click DATA ENTRY to return to the Electronic Signatures page.
The process of setting up or making changes to your electronic signature information is now complete.
https://demodb.footholdtechnology.com/help/?10788
