|   |
| |
Each agency can configure the ResourceTracker to reflect the types of resources being tracked, and the information relevant to each ticket. This process allows agencies to customize terminology, instructions, and list contents.
![]() NOTE: In order to use the configuration functionality you must have the ResourceTracker Configure permission, which will reflect the customized name of this feature for your agency in place of "ResourceTracker."
NOTE: In order to use the configuration functionality you must have the ResourceTracker Configure permission, which will reflect the customized name of this feature for your agency in place of "ResourceTracker."
To configure a ResourceTracker, complete the following steps from the AWARDS Home screen:
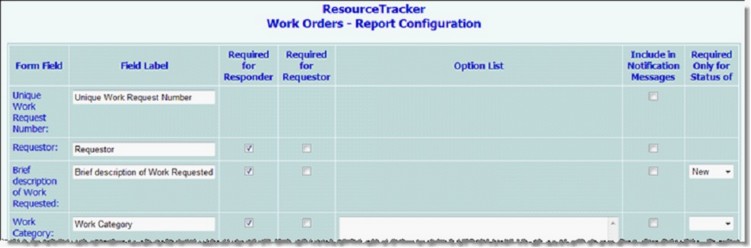
This configuration table contains the following settings, which can be applied to each of the "Form Fields" listed in the far left column (each Form Field is explained in more detail in later steps):
![]() Field Label - Enter the label that should be used for the associated field on the ticket.
Field Label - Enter the label that should be used for the associated field on the ticket.
![]() Required for Responder - Click this checkbox if the associated field should be required for responders completing the ticket.
Required for Responder - Click this checkbox if the associated field should be required for responders completing the ticket.
![]() Required for Requestor - Click this checkbox if the associated field should be required for requestors completing the ticket.
Required for Requestor - Click this checkbox if the associated field should be required for requestors completing the ticket.
![]() Option List - Enter a list of items that should be available for the associated field's drop-down option. Type each entry on its own line.
Option List - Enter a list of items that should be available for the associated field's drop-down option. Type each entry on its own line.
![]() Include in Notification Messages - Click this checkbox if the associated field should be included in the "ResourceTracker Messages" that are automatically generated and sent to the requestor and users with the "ResourceTracker Messages" internal audit message permission when a ticket is entered or updated.
Include in Notification Messages - Click this checkbox if the associated field should be included in the "ResourceTracker Messages" that are automatically generated and sent to the requestor and users with the "ResourceTracker Messages" internal audit message permission when a ticket is entered or updated.
![]() Required Only for Status of - If the associated field should be conditionally required based on a specific status, click this drop-down arrow and select that status.
Required Only for Status of - If the associated field should be conditionally required based on a specific status, click this drop-down arrow and select that status.
![]() NOTE: For example, if the statuses entered in step 7 were "New," "In Progress," and "Closed," and all three are also entered in step 8, the Status drop-down list on the Search Criteria page would list "All," "New," "In Progress," "Closed," "All Not New," "All Not in Progress," and "All Not Closed."
NOTE: For example, if the statuses entered in step 7 were "New," "In Progress," and "Closed," and all three are also entered in step 8, the Status drop-down list on the Search Criteria page would list "All," "New," "In Progress," "Closed," "All Not New," "All Not in Progress," and "All Not Closed."
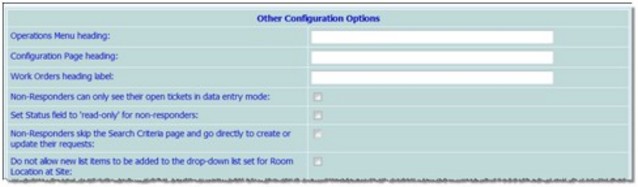
![]() Operations Menu Heading - In this field, enter the label for this customized feature to be shown on the Operations fly-out menu Trackers list.
Operations Menu Heading - In this field, enter the label for this customized feature to be shown on the Operations fly-out menu Trackers list.
![]() Configuration Page Heading - In this field, enter the label for this customized feature to be included in the configuration page's heading.
Configuration Page Heading - In this field, enter the label for this customized feature to be included in the configuration page's heading.
![]() Work Orders Heading Label - In this field, enter the label to be used in place of "Work Orders," if applicable. (For example, Service Ticket, Work Request, or Maintenance Request).
Work Orders Heading Label - In this field, enter the label to be used in place of "Work Orders," if applicable. (For example, Service Ticket, Work Request, or Maintenance Request).
![]() Non-Responders can only see their open tickets in data entry mode - Click this checkbox to limit non-responders (users who only have the ability to submit a ticket, but not respond to it) to viewing only their own active tickets on the Data Entry Index page, instead of seeing all items submitted by all users. Active items are those that do not have a completion date entered. When this option is turned on, non-responders will only be able to view other tickets using the Search Criteria tool in report mode.
Non-Responders can only see their open tickets in data entry mode - Click this checkbox to limit non-responders (users who only have the ability to submit a ticket, but not respond to it) to viewing only their own active tickets on the Data Entry Index page, instead of seeing all items submitted by all users. Active items are those that do not have a completion date entered. When this option is turned on, non-responders will only be able to view other tickets using the Search Criteria tool in report mode.
![]() Set status field to "read-only" for non-responders - Click this checkbox to make the Status field on a ticket read-only for non-responders (users who only have the ability to submit a ticket, but not respond to it). If checked, the Status defaults to "New" (or whatever label has been configured for new requests) when non-responders create a new ticket. When non-responders update an existing request while this option is turned on, the Status displays as read-only; only responders can update the Status information in such cases.
Set status field to "read-only" for non-responders - Click this checkbox to make the Status field on a ticket read-only for non-responders (users who only have the ability to submit a ticket, but not respond to it). If checked, the Status defaults to "New" (or whatever label has been configured for new requests) when non-responders create a new ticket. When non-responders update an existing request while this option is turned on, the Status displays as read-only; only responders can update the Status information in such cases.
![]() Non-Responders skip the Search Criteria page and go directly to create or update their requests - Click this checkbox if non-responders should bypass the Search Criteria page when accessing this feature. If checked, non-responders (users who only have the ability to submit a ticket, but not respond to it) are taken directly to the Data Entry Index page after clicking ResourceTracker from the Operations Menu page.
Non-Responders skip the Search Criteria page and go directly to create or update their requests - Click this checkbox if non-responders should bypass the Search Criteria page when accessing this feature. If checked, non-responders (users who only have the ability to submit a ticket, but not respond to it) are taken directly to the Data Entry Index page after clicking ResourceTracker from the Operations Menu page.
![]() NOTE: This does not completely remove access to the Search Criteria page for non-responders, as a Search Criteria button is available at the bottom of the index page.
NOTE: This does not completely remove access to the Search Criteria page for non-responders, as a Search Criteria button is available at the bottom of the index page.
![]() Do not allow new list items to be added to the drop-down list set for Room Location at Site - When a ticket is entered, the room location options (configured in step 11) appear in a drop-down list, and a text box is also displayed for users to enter a location not contained in the list. Click this checkbox if these other locations should not be automatically added to the Location drop-down list going forward. If this is left unchecked, other locations entered in the Location text box on tickets are automatically added to the Location drop-down list for future tickets.
Do not allow new list items to be added to the drop-down list set for Room Location at Site - When a ticket is entered, the room location options (configured in step 11) appear in a drop-down list, and a text box is also displayed for users to enter a location not contained in the list. Click this checkbox if these other locations should not be automatically added to the Location drop-down list going forward. If this is left unchecked, other locations entered in the Location text box on tickets are automatically added to the Location drop-down list for future tickets.
![]() Include notes in notification message - Click this checkbox if the notes entered on the ticket should be included in the "ResourceTracker Messages" that are automatically generated and sent to the requestor and users with the "ResourceTracker Messages" internal audit message permission when a ticket is entered or updated.
Include notes in notification message - Click this checkbox if the notes entered on the ticket should be included in the "ResourceTracker Messages" that are automatically generated and sent to the requestor and users with the "ResourceTracker Messages" internal audit message permission when a ticket is entered or updated.
![]() User Instructions - In this text box, enter any instructions that may apply to requestors or responders. The text entered here opens in a new window if the User Instructions button is clicked on the bottom of a ticket.
User Instructions - In this text box, enter any instructions that may apply to requestors or responders. The text entered here opens in a new window if the User Instructions button is clicked on the bottom of a ticket.
The process of configuring the ResourceTracker is now complete.
https://demodb.footholdtechnology.com/help/?11516
