|   |
| |
A client can be added from a source program onto a waiting list via the Intake/Admission module, or from the client's face sheet. Aside from a different initial point of access in each instance the general steps in the process are the same, as detailed here:
![]() Intake/Admission - Click Census from the left-hand menu, and then click Intake/Admission. Enter the client's initials in the First Name and Last Name fields, and then click CONTINUE. Next, click the name of the individual to be added to the waiting list. Depending on the type of program being worked with, the intake record is either opened or you are shown a list of options; in either instance, proceed with step 3.
Intake/Admission - Click Census from the left-hand menu, and then click Intake/Admission. Enter the client's initials in the First Name and Last Name fields, and then click CONTINUE. Next, click the name of the individual to be added to the waiting list. Depending on the type of program being worked with, the intake record is either opened or you are shown a list of options; in either instance, proceed with step 3.
![]() Face Sheet - Click Census from the left-hand menu. From the fly-out menu that is displayed, click Profile, and then click Face Sheet. Select the client to be worked with (first clicking the Roster Archives option if the client is not on the current roster), and then click CONTINUE. The face sheet is displayed; proceed with step 2.
Face Sheet - Click Census from the left-hand menu. From the fly-out menu that is displayed, click Profile, and then click Face Sheet. Select the client to be worked with (first clicking the Roster Archives option if the client is not on the current roster), and then click CONTINUE. The face sheet is displayed; proceed with step 2.
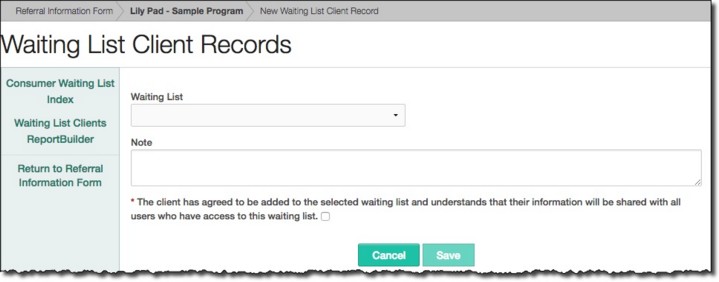
![]() TIP: In some AWARDS databases the face sheet may also be configured to include an optional "Client Waiting Lists" section. Clicking Update Waiting List in that portion of the face sheet opens a Waiting List Client Records page from which the client can also be added to a waiting list using the Add new icon in the action bar; doing so opens the New Waiting List Client Records page referenced beginning in step 3. Skip ahead to step 4.
TIP: In some AWARDS databases the face sheet may also be configured to include an optional "Client Waiting Lists" section. Clicking Update Waiting List in that portion of the face sheet opens a Waiting List Client Records page from which the client can also be added to a waiting list using the Add new icon in the action bar; doing so opens the New Waiting List Client Records page referenced beginning in step 3. Skip ahead to step 4.
![]() TIP: In some instances when working from the Intake/Admission module you must also click CONTINUE after Add to Waiting List in order for the New Waiting List Client Records page to be displayed.
TIP: In some instances when working from the Intake/Admission module you must also click CONTINUE after Add to Waiting List in order for the New Waiting List Client Records page to be displayed.
![]() Return to the Intake Record or Face Sheet - To do so click Return to... in the left-hand menu bar. You are now returned to the record from which you initiated the add to waiting list process.
Return to the Intake Record or Face Sheet - To do so click Return to... in the left-hand menu bar. You are now returned to the record from which you initiated the add to waiting list process.
![]() Access the Client's Waiting List Records Index - To do so, click Consumer Waiting List Index in the left-hand menu bar. The client's waiting list records index is displayed, listing all existing waiting list records for the client. From here additional waiting list records can be added and existing records can be viewed, edited, or deleted, all using the icons in the action bar above the index records table.
Access the Client's Waiting List Records Index - To do so, click Consumer Waiting List Index in the left-hand menu bar. The client's waiting list records index is displayed, listing all existing waiting list records for the client. From here additional waiting list records can be added and existing records can be viewed, edited, or deleted, all using the icons in the action bar above the index records table.
![]() Generate a Report Using the Waiting List Clients ReportBuilder - To do so, click Waiting List Clients ReportBuilder. The corresponding Settings page is displayed. For instructions on using this ReportBuilder to generate detailed historical reports of which clients are on which waiting lists, click here. Note that the point of access to the report in these linked instructions is different (as this ReportBuilder is also accessible from within the Waiting List Configuration feature); however, the available settings, data variables, and report configuration options are the same, as is the bulk of the report generation process.
Generate a Report Using the Waiting List Clients ReportBuilder - To do so, click Waiting List Clients ReportBuilder. The corresponding Settings page is displayed. For instructions on using this ReportBuilder to generate detailed historical reports of which clients are on which waiting lists, click here. Note that the point of access to the report in these linked instructions is different (as this ReportBuilder is also accessible from within the Waiting List Configuration feature); however, the available settings, data variables, and report configuration options are the same, as is the bulk of the report generation process.
The process of adding a client to a waiting list is now complete.
https://demodb.footholdtechnology.com/help/?12064
