|
|   |
Below is an alphabetical list of the fields and options located on the Contacts - Data Entry page. To jump directly to the information for a specific field or option, press <Ctrl+F> to access your browser's search field and enter the name of the field/option in question.
![]() NOTE: A gear icon
NOTE: A gear icon ![]() next to a field or option in this list indicates that it is either optional (and therefore not automatically available in all AWARDS databases), or that some aspect of it (for example drop-down selections) is configurable. For more information on the ways in which this data entry page can be configured, see the "Contacts" portions of the Face Sheet - Implementation Request Form. To request changes detailed there, complete the form and submit it to [email protected].
next to a field or option in this list indicates that it is either optional (and therefore not automatically available in all AWARDS databases), or that some aspect of it (for example drop-down selections) is configurable. For more information on the ways in which this data entry page can be configured, see the "Contacts" portions of the Face Sheet - Implementation Request Form. To request changes detailed there, complete the form and submit it to [email protected].
Address | Address 2 | City | State | Zip
In the Address, Address 2, City, and Zip fields, type or make changes to the contact's address. Also click the State drop-down arrow and select the state in which the contact is located.
Care Team Member
Click this checkbox to designate this contact as a care team member.
Comments
In this text box type or make changes to any comments for this contact individual.
Consent Type | Date Signed / Not Signed | Consent Expiration ![]()
![]() NOTE: These fields and options are only available if the optional contact consents feature has been turned on in your AWARDS database. If you don't see these options and would like to, please download and complete the "Contacts" portion of the Face Sheet - Implementation Request Form, and then submit it to [email protected].
NOTE: These fields and options are only available if the optional contact consents feature has been turned on in your AWARDS database. If you don't see these options and would like to, please download and complete the "Contacts" portion of the Face Sheet - Implementation Request Form, and then submit it to [email protected].
To record or make changes to the consent information for this contact, configure the following fields and options:
![]() Consent Type - Click this drop-down arrow and select the type of consent relevant to this contact.
Consent Type - Click this drop-down arrow and select the type of consent relevant to this contact.
![]() Date Signed / Not Signed - In this field, type or make changes to the date on which consent was given or denied (using mm/dd/yyyy format), or select the date using the date picker drop-down arrow.
Date Signed / Not Signed - In this field, type or make changes to the date on which consent was given or denied (using mm/dd/yyyy format), or select the date using the date picker drop-down arrow.
![]() Consent Expiration - In this field, type or make changes to the date on which consent expires (using mm/dd/yyyy format), or select the date using the date picker drop-down arrow.
Consent Expiration - In this field, type or make changes to the date on which consent expires (using mm/dd/yyyy format), or select the date using the date picker drop-down arrow.
![]() TIP: A value must be entered for Date Signed / Not Signed in order to enter an expiration date here.
TIP: A value must be entered for Date Signed / Not Signed in order to enter an expiration date here.
Contact Methods ![]()
When a new contact record is created, each available contact method is represented by a field on the data entry page as shown here:
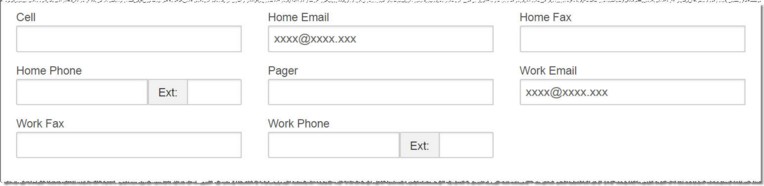
In those fields type the specific value for each relevant method.
After a contact record is saved for the first time, later updates and additions are made the Contact Methods index as shown here:
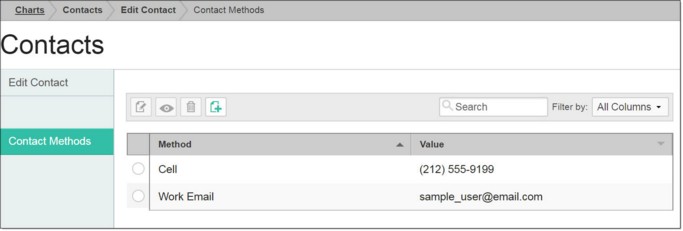
Any previously recorded contact methods are displayed in this table, as are options to add a new method, or to view, edit, or delete existing methods. Complete any of these processes by doing the following:
![]()
![]() Add a new contact method - To do so, click the Add New icon from the action bar above the records table. A new data entry page is displayed. Configure the fields and options on this page as necessary, and then click Save. The record is saved, and a confirmation page is displayed.
Add a new contact method - To do so, click the Add New icon from the action bar above the records table. A new data entry page is displayed. Configure the fields and options on this page as necessary, and then click Save. The record is saved, and a confirmation page is displayed.
![]()
![]() Update an existing contact method - To do so, click the record to be updated, or click the radio button to the left of that record and then click the Edit icon from the action bar above the records table. The data entry page is displayed. Make changes to the information on this page as needed, and then click Save. The contact method record is saved, and a confirmation page is displayed.
Update an existing contact method - To do so, click the record to be updated, or click the radio button to the left of that record and then click the Edit icon from the action bar above the records table. The data entry page is displayed. Make changes to the information on this page as needed, and then click Save. The contact method record is saved, and a confirmation page is displayed.
![]()
![]() View or print an existing contact method - To do so, click the radio button to the left the record to be viewed/printed, and then click the View icon from the action bar above the records table. A read-only version of the record is displayed and can be printed as needed using your browser's print option.
View or print an existing contact method - To do so, click the radio button to the left the record to be viewed/printed, and then click the View icon from the action bar above the records table. A read-only version of the record is displayed and can be printed as needed using your browser's print option.
![]()
![]() Delete an existing contact method - To do so, click the radio button to the left of the record to be deleted, and then click the Delete icon from the action bar above the records table. A confirmation message is displayed. Click OK to proceed with the deletion. The contact method is deleted and the updated index is displayed.
Delete an existing contact method - To do so, click the radio button to the left of the record to be deleted, and then click the Delete icon from the action bar above the records table. A confirmation message is displayed. Click OK to proceed with the deletion. The contact method is deleted and the updated index is displayed.
End Date
In this field, record the date on which this contact information became, or is to become, inactive (if applicable). Type the date using mm/dd/yyyy format, or select the date using the available date picker drop-down.
![]() NOTE: When an end date is in the past the contact record will no longer be displayed as part of the "Current" records shown by default on the Contacts index page. Instead, it will only be accessible when All is selected under "Show Records" in the left-hand menu on that page.
NOTE: When an end date is in the past the contact record will no longer be displayed as part of the "Current" records shown by default on the Contacts index page. Instead, it will only be accessible when All is selected under "Show Records" in the left-hand menu on that page.
Existing Contact
![]() NOTE: This option is only available when adding a new contact record.
NOTE: This option is only available when adding a new contact record.
This option is designed to be used in those instances where you are recording a contact that has already been entered into AWARDS for this client under another contact type; for example, when the same individual should be recorded as both the client's emergency contact and next of kin.
To use this option, click the drop-down arrow and select the correct existing contact. Once a selection is made, the contact's information will pre-populate many of the data entry fields and options on this page, saving you time and effort that would otherwise be spent re-entering the contact details.
![]() NOTE: Keep in mind that not all contact information is dropped in from the existing record. For example, details such as start date, consent information (when applicable), and preferred contact method must be manually configured for each contact record.
NOTE: Keep in mind that not all contact information is dropped in from the existing record. For example, details such as start date, consent information (when applicable), and preferred contact method must be manually configured for each contact record.
First Name | Last Name
In these fields type or make changes to the contact's first and last names.
Include in Collateral List? ![]()
Checking off this option results in the contact being made available in the Collaterals list available during collateral contact progress notes data entry for this client and program.
![]() TIP: The contact will not be available for collateral notes if an expired consent exists for it.
TIP: The contact will not be available for collateral notes if an expired consent exists for it.
Preferred Contact Method
Click this drop-down arrow and select this individual's preferred contact method. Methods available for selection are the same as those configured for use in the Contact Methods portion of contact records.
Primary Contact
Click this checkbox to designate this contact as a primary contact. This selection is for informational purposes only; for example, it can be used to filter on when using the Contacts ReportBuilder. There is no limit on the number of primary contacts that can be specified for a given client or within a specific contact type.
Relation ![]()
From this list check off one or more options to indicate the contact's relationship to the client.
Start Date
In this field, type the date on which this contact information became effective (using mm/dd/yyyy format), or select the date using the available date picker drop-down.
![]() NOTE: The Start Date field was added for data entry in AWARDS on February 10, 2015. For contacts entered into AWARDS prior to that date, the Start Date automatically reflects either the date the contact was initially created, or the date on which the contact was last updated (if the contact record was modified at some point after it was entered).
NOTE: The Start Date field was added for data entry in AWARDS on February 10, 2015. For contacts entered into AWARDS prior to that date, the Start Date automatically reflects either the date the contact was initially created, or the date on which the contact was last updated (if the contact record was modified at some point after it was entered).
Title ![]()
Click this drop-down arrow and select the contact's title; for example, "Mr." or "Ms."
Type ![]()
![]() NOTE: This option is only available when adding a new contact record. For existing records the value is read-only and cannot be changed. If it's necessary to change the type for an existing contact record, that record must be deleted and re-entered using the correct type.
NOTE: This option is only available when adding a new contact record. For existing records the value is read-only and cannot be changed. If it's necessary to change the type for an existing contact record, that record must be deleted and re-entered using the correct type.
Click this drop-down arrow and select the type of contact being recorded. The type is available for reporting purposes as are the other contact variables.
https://demodb.footholdtechnology.com/help/?11882
