To view a read-only transportation billing report, complete the following steps from the AWARDS Home screen:
- Click Administration from the left-hand menu, and then click Operations. The Operations fly-out menu is displayed.
- Click Rides, and then click Ride Billing. The Transportation Billing Report Primary Report Parameter Settings page is displayed.
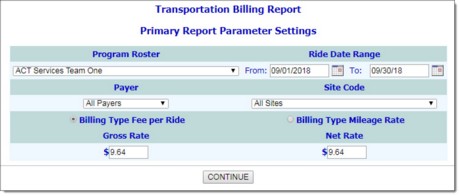
- Click the Program Roster drop-down arrow and select the program for which this report is to be viewed. The default value is "All Agency Programs."
- In the Ride Date Range From and To fields, type the date range for which this report is to be viewed. Only rides taken within this date range will be included in the report. The default value is the last calendar month.
- Click the Payer drop-down arrow and select the type of payer for whom information is to be included in this report. Available options may include:
 All Payers
Medicaid No County
Self Payers
The default value is "All Payers."
- Click the Site Code drop-down arrow and select the site for which this report is to be viewed. The default value is "All Sites."
- In the Gross Fee/Ride field, make changes to the gross fee per ride amount as necessary.
- In the Net Fee/Ride field, make changes to the net fee per ride amount as necessary.
- Click CONTINUE. The Transportation Billing Rider/Sort Selection page is displayed.
- If this report is to be viewed for a specific consumer, click the Rider drop-down arrow and select the consumer. The default value is "All Consumers."
- Click the Sort By drop-down arrow and make a selection to determine the order in which report information is to be displayed. Available options are:
Payer - Site - Date - Rider
Payer - Site - Rider - Date
Payer - Rider - Site - Date
Payer - Rider - Date - Site
Payer - Date - Rider - Site
Payer - Date - Site - Rider
The default value is "Payer - Site - Date - Rider."
- Click one or more of the All Rides? options as necessary to narrow down those rides for which information is to be included in the report. Available options are:
Include Non-Medical-Site Rides? - Click this checkbox if rides to sites other than medical sites are to be included in this report.
Include Self-Pay Billing? - Click this checkbox if self pay rides are to be included in this report.
Show Individual Ride Detail - Click this checkbox if individual ride detail is to be included in the report.
 TIP: This option is only available when a single payer or single site has been selected on the previous page. Individual ride detail is always included when a single rider is selected on this page.
- Click CONTINUE. The transportation billing report is displayed on the Transportation Billing Report page. The contents of this read-only report will vary based on the selections made on the previous pages.
TIP: To export the report information to Microsoft Excel for further review and analysis, click the Excel File link. A PHI Download Alert is displayed, reminding you of your obligation to properly handle any confidential data and/or protected health information (PHI) within the download in accordance with related government regulations and agency policies. After reading the alert, click OK to acknowledge it and proceed with the export, or Cancel to return to the previous page.
The process of viewing a transportation ride billing report is now complete.
https://demodb.footholdtechnology.com/help/?11054


