|   |
| |
To update an employee timesheet, complete the following steps:
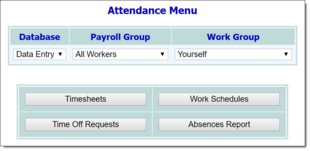
![]() NOTE: Only users who are in the "Human Resources" user group, or who have a Human Resources Data Entry permission have access to the full work group selection list. For all others, "Yourself" is the only available option.
NOTE: Only users who are in the "Human Resources" user group, or who have a Human Resources Data Entry permission have access to the full work group selection list. For all others, "Yourself" is the only available option.
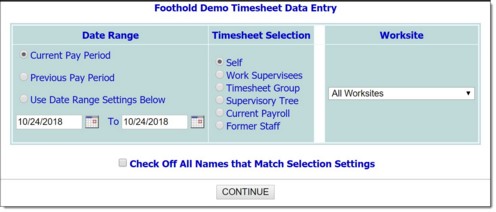
![]() Current Pay Period - When this option is selected, the timesheet for the current pay period will be updated.
Current Pay Period - When this option is selected, the timesheet for the current pay period will be updated.
![]() Previous Pay Period - When this option is selected, the timesheet for the previous pay period will be updated.
Previous Pay Period - When this option is selected, the timesheet for the previous pay period will be updated.
![]() Use Date Range Settings Below - When this option is selected, the timesheet for a specific time period will be updated. Type the from and to dates in the date range fields below this option (using mm/dd/yyyy format). The default value is today's date.
Use Date Range Settings Below - When this option is selected, the timesheet for a specific time period will be updated. Type the from and to dates in the date range fields below this option (using mm/dd/yyyy format). The default value is today's date.
![]() NOTE: Only users who are in the "Human Resources" user group or who have a "Human Resources Data Entry" permission have access to this date range option.
NOTE: Only users who are in the "Human Resources" user group or who have a "Human Resources Data Entry" permission have access to this date range option.
![]() Self - When this option is selected, only the timesheet for the current user will be updated.
Self - When this option is selected, only the timesheet for the current user will be updated.
![]() Work Supervisees - When this option is selected, the timesheets of the current user's work supervisees will be available for updating.
Work Supervisees - When this option is selected, the timesheets of the current user's work supervisees will be available for updating.
![]() Timesheet Group - When this option is selected, the timesheets of all employees for which the current user is a timesheet supervisor will be available for updating.
Timesheet Group - When this option is selected, the timesheets of all employees for which the current user is a timesheet supervisor will be available for updating.
![]() Supervisory Tree - When this option is selected, the timesheets of all employees in the current user's supervisory tree will be available for updating.
Supervisory Tree - When this option is selected, the timesheets of all employees in the current user's supervisory tree will be available for updating.
![]() Current Payroll - When this option is selected, the timesheets of all employees currently on the agency payroll will be available for updating.
Current Payroll - When this option is selected, the timesheets of all employees currently on the agency payroll will be available for updating.
![]() Former Staff - When this option is selected, the timesheets of all former staff members will be available for updating.
Former Staff - When this option is selected, the timesheets of all former staff members will be available for updating.
This option defaults to the Work Group selection made on the previous page.
![]() NOTE: Only users who are in the "Human Resources" user group, who have the "Human Resources Data Entry" permission, or who are a timesheet supervisor have access to the full timesheet selection list. For all other users, "Self" is the only available option.
NOTE: Only users who are in the "Human Resources" user group, who have the "Human Resources Data Entry" permission, or who are a timesheet supervisor have access to the full timesheet selection list. For all other users, "Self" is the only available option.
![]() NOTE: Only users who are in the "Human Resources" user group or who have a "Human Resources Data Entry" permission have access to this option.
NOTE: Only users who are in the "Human Resources" user group or who have a "Human Resources Data Entry" permission have access to this option.
![]() NOTE: This option is not applicable to users who can only update their own timesheets.
NOTE: This option is not applicable to users who can only update their own timesheets.
If "Self' was the timesheet selection on the Timesheet Data Entry page, the current user's timesheet is displayed on the Regular Employee Timesheet page. Continue with step 13.
For all other timesheet selections, the Timesheet Pre-Selection Form page is displayed with a list of those employees whose timesheets meet the search criteria from the previous page. Continue with step 11.
![]() TIP: Timesheet entries with the day of the week displayed in red are those for which information has not yet been entered by the user. Any information currently in those fields has defaulted from the employee's work schedule. (For more information on work schedules, click here.) To add shifts not shown on the timesheet, use the available "Someday" rows.
TIP: Timesheet entries with the day of the week displayed in red are those for which information has not yet been entered by the user. Any information currently in those fields has defaulted from the employee's work schedule. (For more information on work schedules, click here.) To add shifts not shown on the timesheet, use the available "Someday" rows.
For each shift completed, be sure to enter two timesheet rows (an "in/out pair") consisting of the following information:
![]() Date - For each timesheet "in/out pair," click the first Date drop-down arrow and select the date on which the employee began his or her shift, then click the second Date drop-down arrow and select the date on which that shift ended.
Date - For each timesheet "in/out pair," click the first Date drop-down arrow and select the date on which the employee began his or her shift, then click the second Date drop-down arrow and select the date on which that shift ended.
![]() Time - For each timesheet "in/out pair," type the time at which the employee began his or her shift in the Time field (using HH:MM format followed by a space and AM or PM). Type the time at which the employee ended that shift in the second Time field.
Time - For each timesheet "in/out pair," type the time at which the employee began his or her shift in the Time field (using HH:MM format followed by a space and AM or PM). Type the time at which the employee ended that shift in the second Time field.
![]() In/Out - For each timesheet "in/out pair" click the first In/Out drop-down arrow and select "In," then click the second In/Out drop-down arrow and select "Out."
In/Out - For each timesheet "in/out pair" click the first In/Out drop-down arrow and select "In," then click the second In/Out drop-down arrow and select "Out."
![]() Activity - For each timesheet "in/out pair" click the Activity drop-down arrows and select the activity in which the employee participated during the day/hours indicated, or the location at which he or she spent that shift. The activities list consists of agency worksites, as well as standard selections such as "Holiday," "Jury Duty," "Home Office," and more.
Activity - For each timesheet "in/out pair" click the Activity drop-down arrows and select the activity in which the employee participated during the day/hours indicated, or the location at which he or she spent that shift. The activities list consists of agency worksites, as well as standard selections such as "Holiday," "Jury Duty," "Home Office," and more.
![]() BreakHrs - If applicable, type the number of break hours used during this shift in the BreakHrs field. Note that this timesheet field is optional and may not be turned on in your AWARDS database.
BreakHrs - If applicable, type the number of break hours used during this shift in the BreakHrs field. Note that this timesheet field is optional and may not be turned on in your AWARDS database.
![]() Tokens - If applicable, type the number of tokens used during this shift in the Tokens field. Note that this timesheet field is optional and may not be turned on in your AWARDS database.
Tokens - If applicable, type the number of tokens used during this shift in the Tokens field. Note that this timesheet field is optional and may not be turned on in your AWARDS database.
![]() Mileage - If applicable, type the number of miles traveled during this shift in the Mileage field. Note that this timesheet field is optional and may not be turned on in your AWARDS database.
Mileage - If applicable, type the number of miles traveled during this shift in the Mileage field. Note that this timesheet field is optional and may not be turned on in your AWARDS database.
![]() IMPORTANT! If it is necessary to remove a timesheet entry (in/out pair) rather than add one, select "REMOVE ENTRY" as the activity for that entry.
IMPORTANT! If it is necessary to remove a timesheet entry (in/out pair) rather than add one, select "REMOVE ENTRY" as the activity for that entry.
If one's own timesheet is the only one being updated at this time, click UPDATE Timesheet, Return. A read-only version of the timesheet is displayed on a confirmation page. At this point, the timesheet can be printed if necessary.
The process of updating an employee timesheet is now complete.
https://demodb.footholdtechnology.com/help/?10050
